
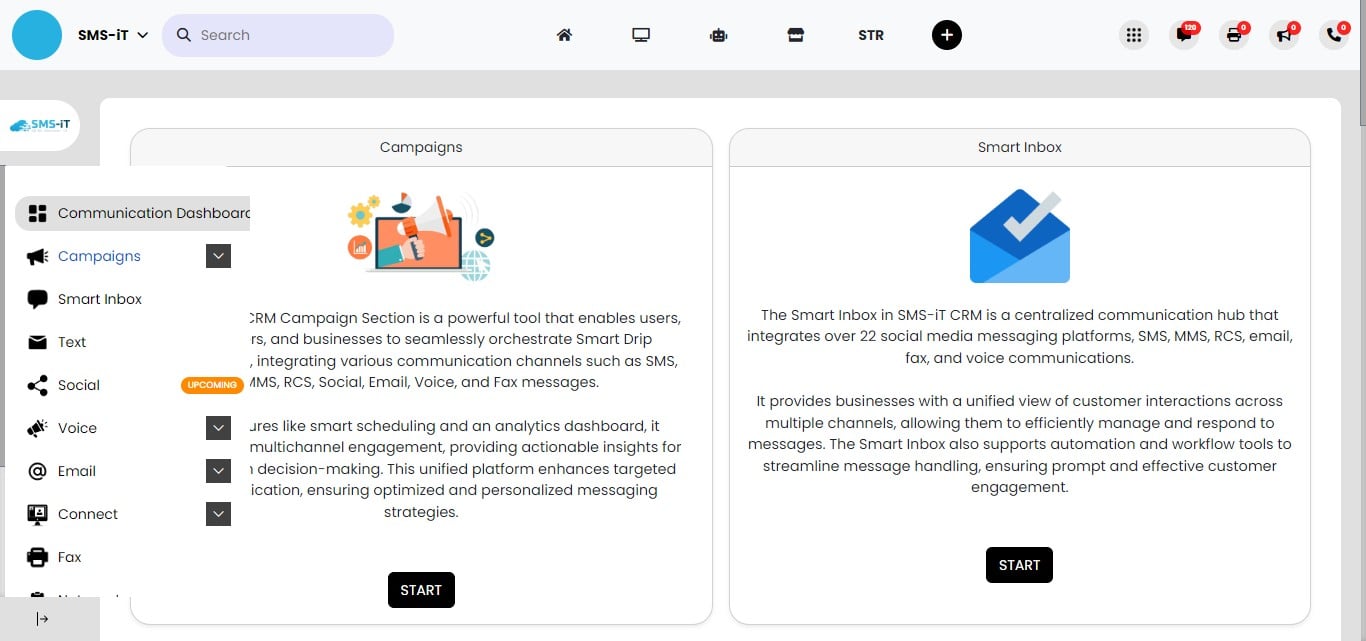
Campaigns
Navigate to https://aicpanel.smsit.ai/home
Campaigns in SMS-iT CRM are powerful, automated workflows designed to streamline and enhance your communications with contacts. These versatile tools allow you to create a series of timed messages across multiple channels, including text messages, emails, voice calls, and social media platforms. By leveraging a combination of these communication methods, you can craft highly effective, personalized outreach strategies. Benefits for Various User Groups: 1. Sales Teams: Boost conversion rates and nurture leads through consistent, timely follow-ups. Automate your sales funnel to ensure no prospect falls through the cracks. 2. Marketing Agencies: Create sophisticated, multi-channel marketing campaigns that deliver the right message at the right time. Improve client results and demonstrate clear ROI through comprehensive analytics. 3. Small Businesses: Maximize your limited resources by automating customer communications. Enhance customer retention and upselling opportunities without increasing your workload. 4. Professionals: Build stronger relationships with clients through regular, personalized touchpoints. Save time on routine communications and focus on high-value activities. With** SMS-iT CRM Campaigns**, you can elevate your communication strategy, increase efficiency, and drive better results across your business operations.
Click on "Communication"

Click on "Campaigns"
Create new campaign
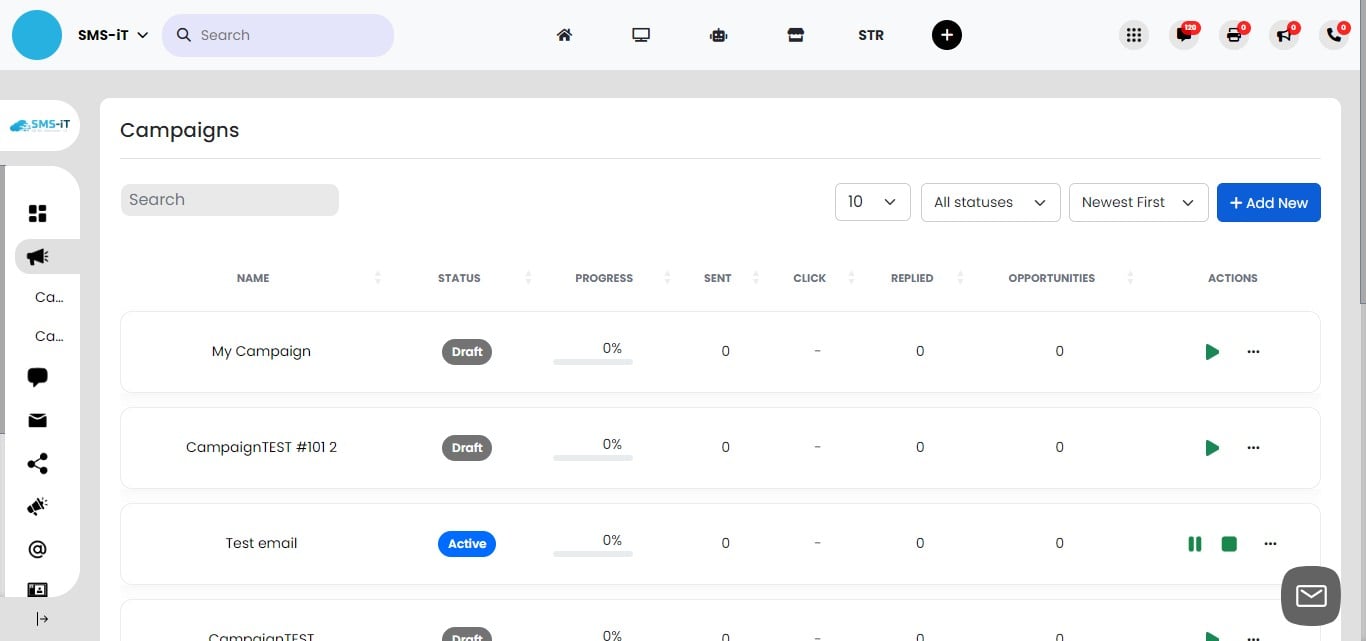
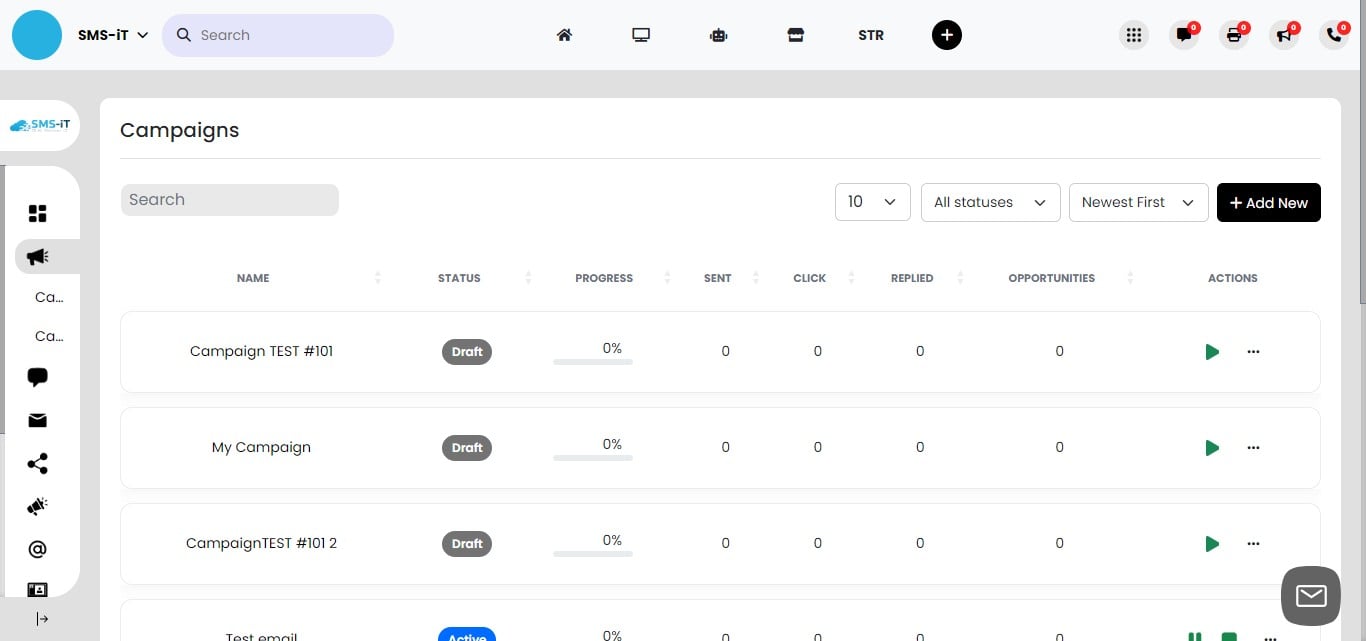
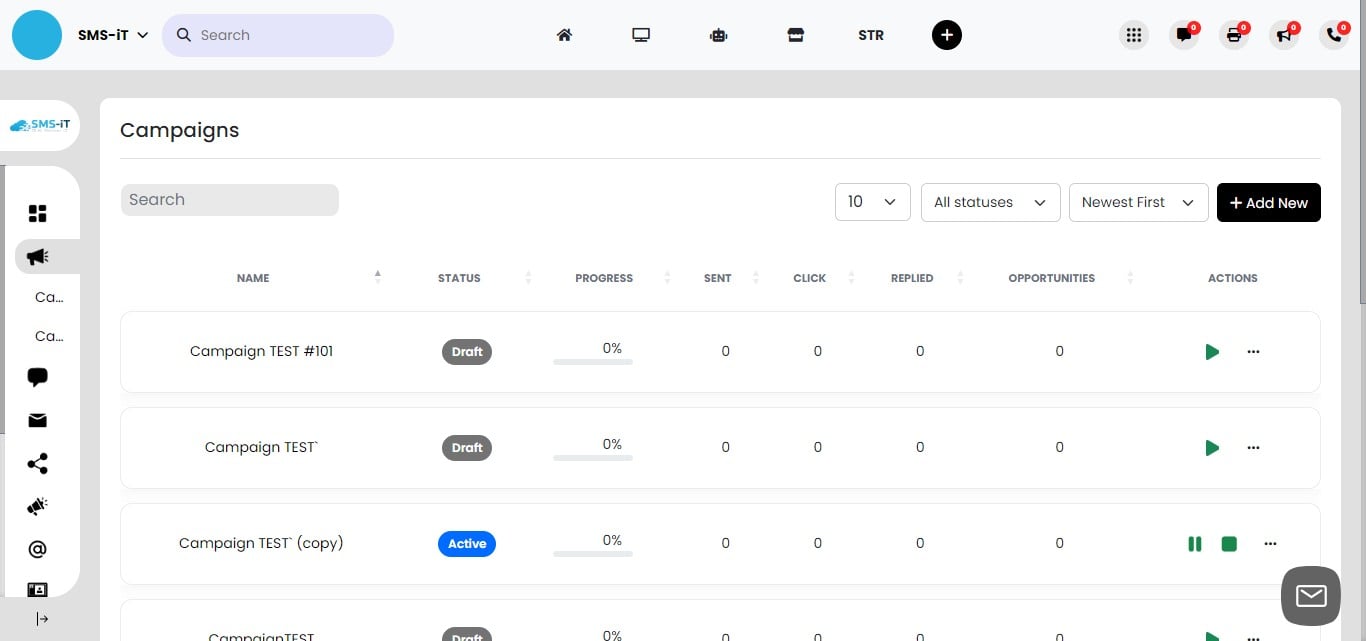
Campaign Dashboard Overview Access the Campaign dashboard to view all your created campaigns. Edit, clone, or duplicate successful campaigns for reuse with different contacts. To create a new campaign, click on the "Add New" button
Name your campaign and Click on "Continue"

Click on "NAME"
Click on "Campaign TEST #101"
Sections overview
Campaign Sections Overview:
Analytics: View total contacts, open rates (email only), link clicks, reply rates, and opportunities. Leads: Add contacts to your campaign. Sequences: Build your workflow automation. Schedule: Set campaign dates and timing. Options: Edit settings for various communication channels (SMS, social, email).
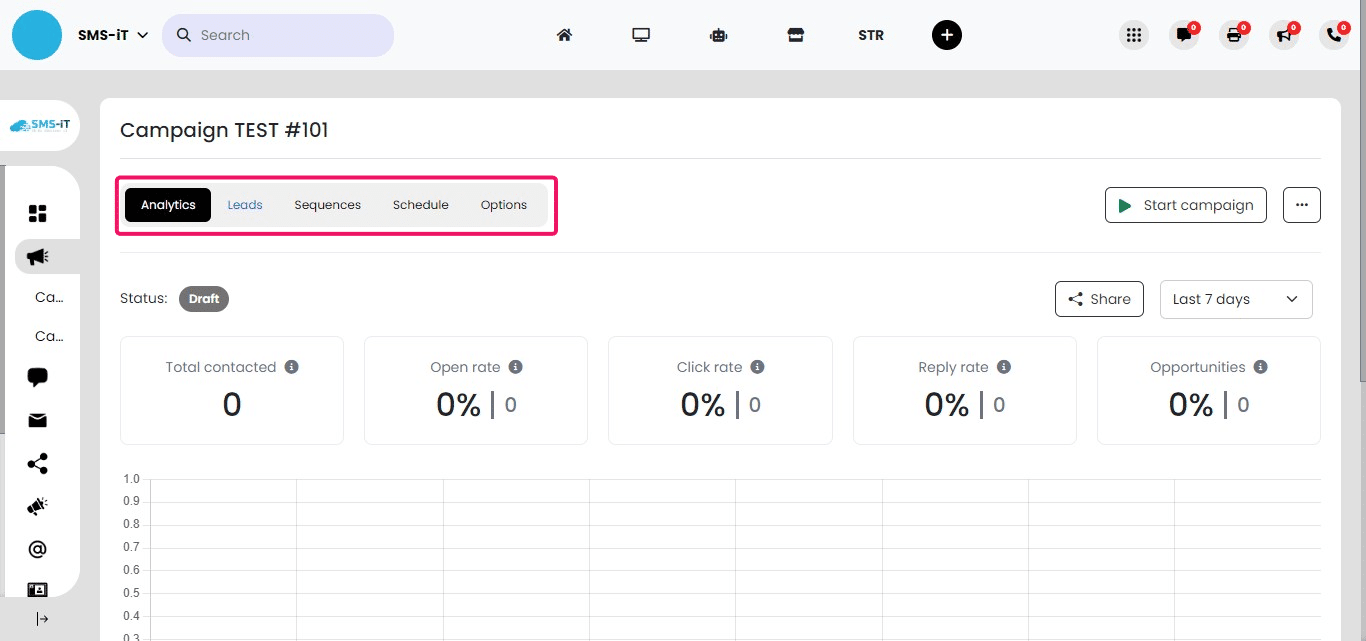
Section 1: Analytics

- Total contacts reached
- Open rates (for email campaigns)
- Link click-through rates (for email and SMS)
- Reply rates
- Opportunities generated](https://assets.guidejar.com/uploads/e5b30968-7bec-4dad-a470-93ff5e252a85/Fn7AYqjYuCNi6qxp2rJ7maNAQdg1/0aa48982-fe90-4888-839e-492df2823e37/1720364907065.jpeg)
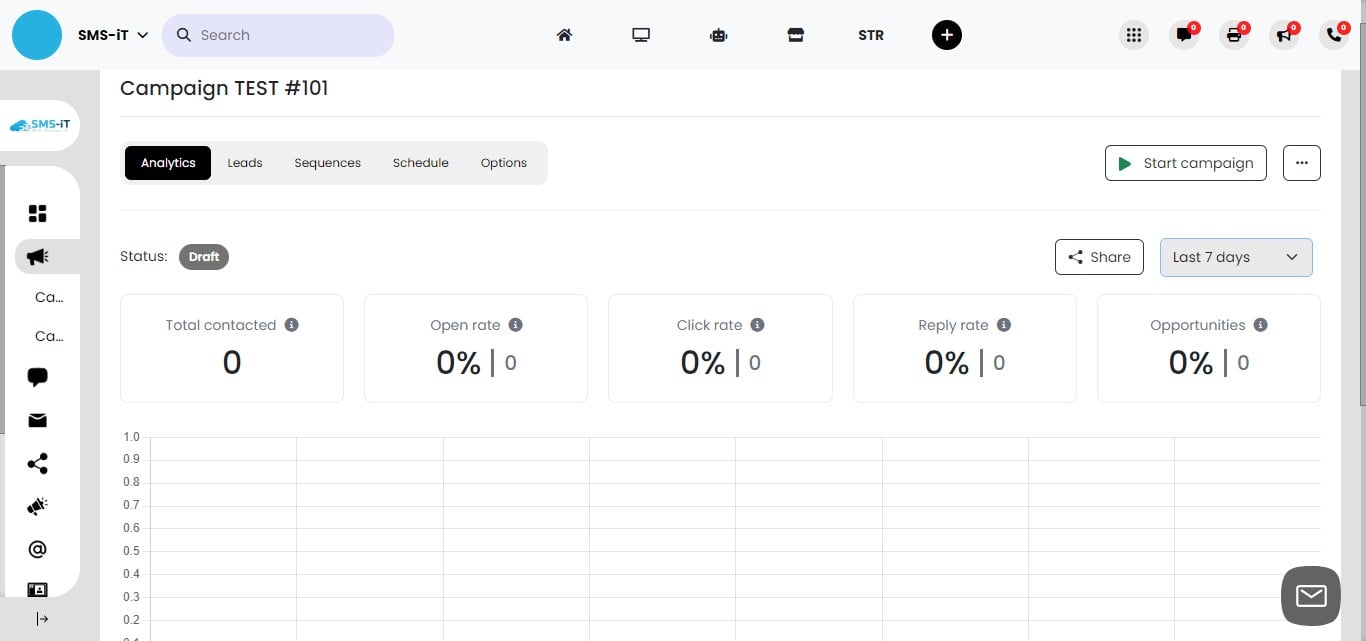
Customizing Analytics Time Frame
Click on the "Last 7 days" dropdown menu. Select from various time frames: - Last month to date - 3 months - 6 months - 12 months
Adjust the time frame to analyze campaign performance over different periods.
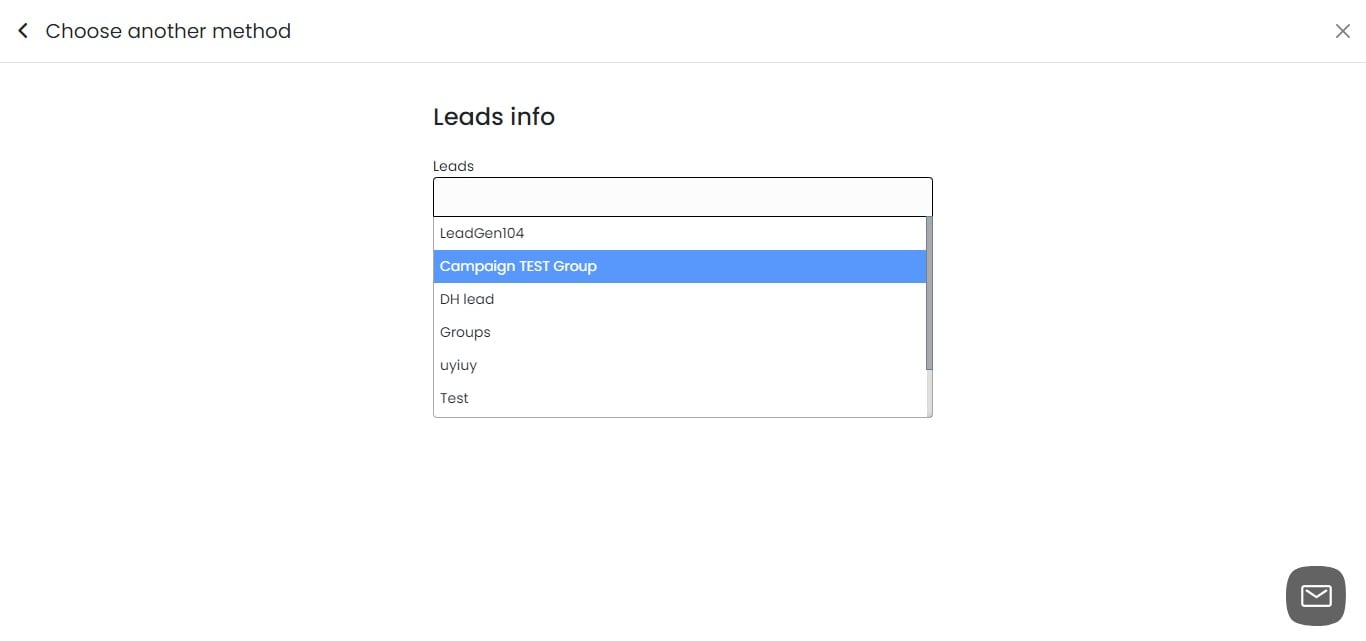
Section 2: Adding Leads
Click on "Leads"
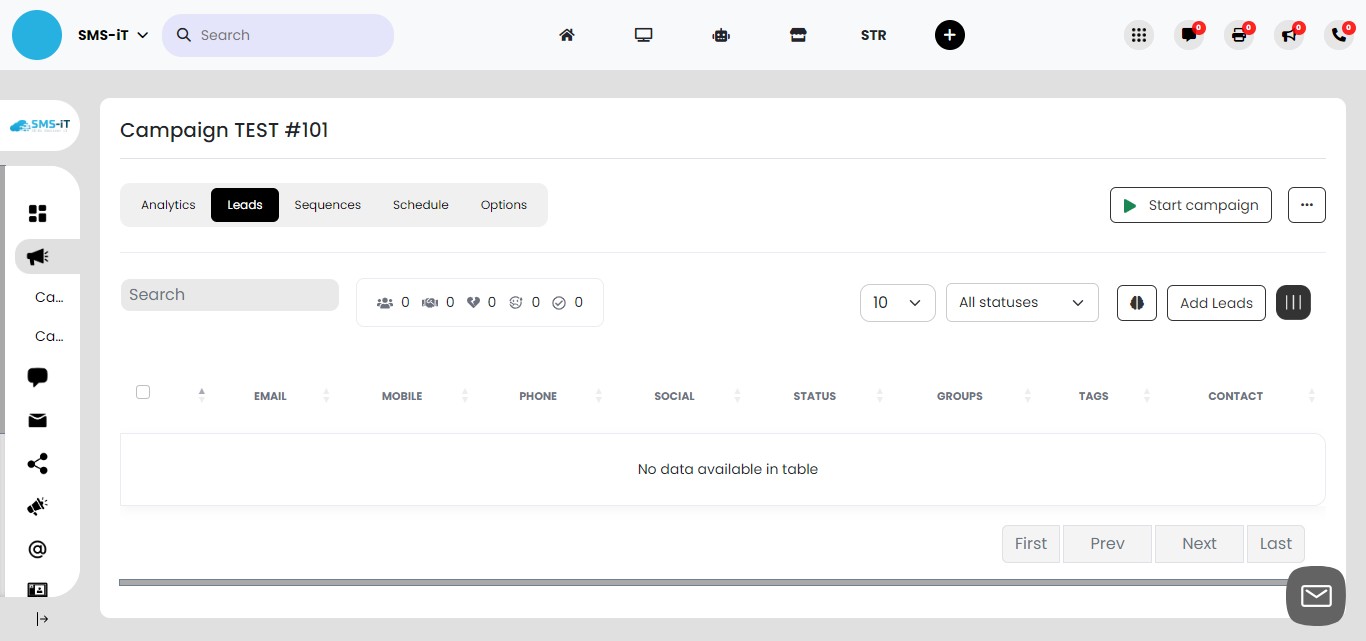
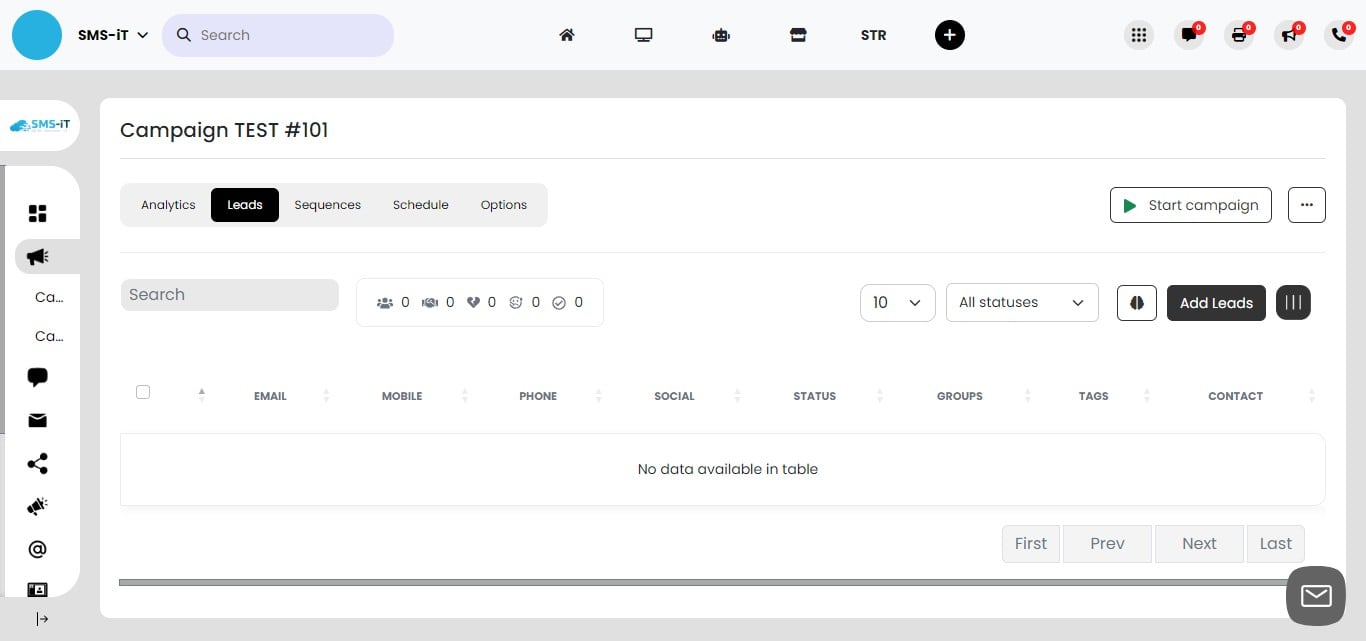
Click on "Add Leads"
Adding Leads to Your Campaign
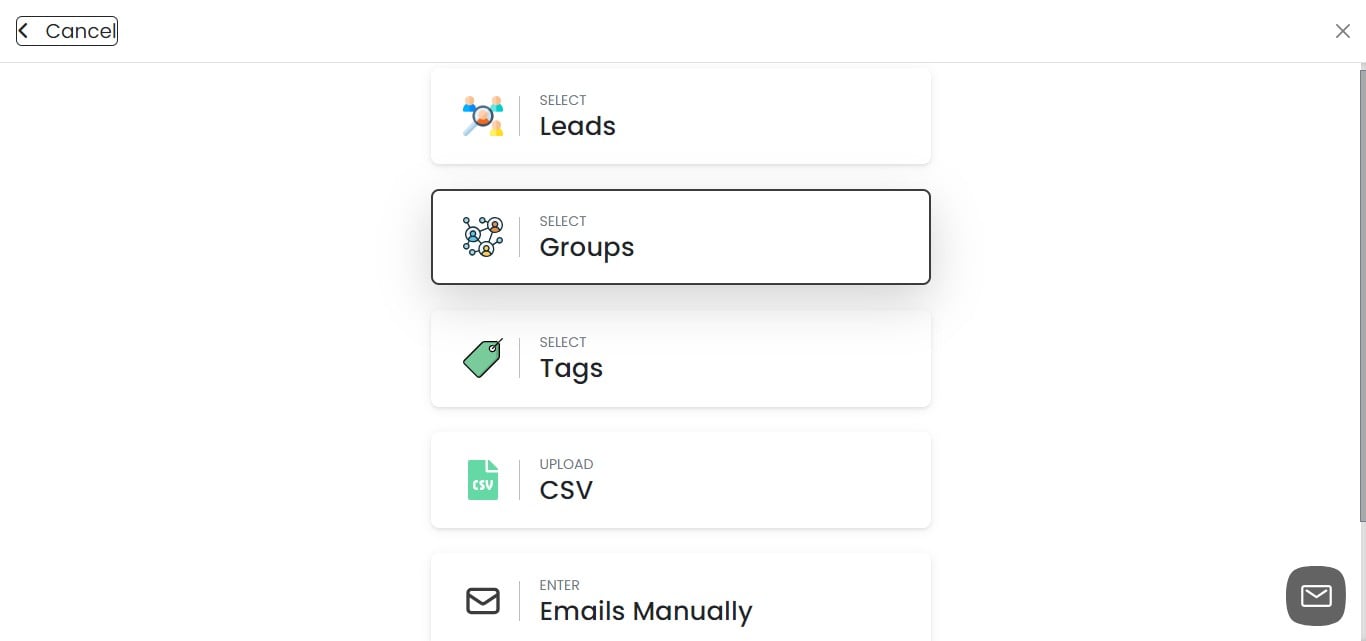
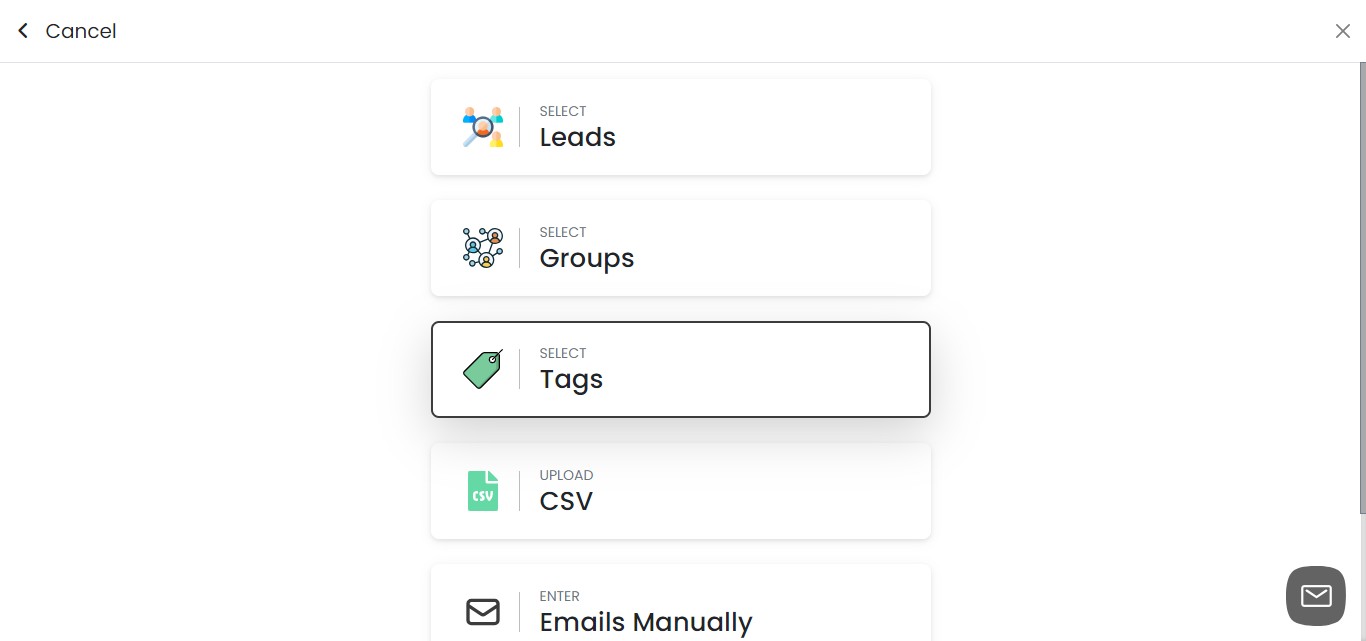
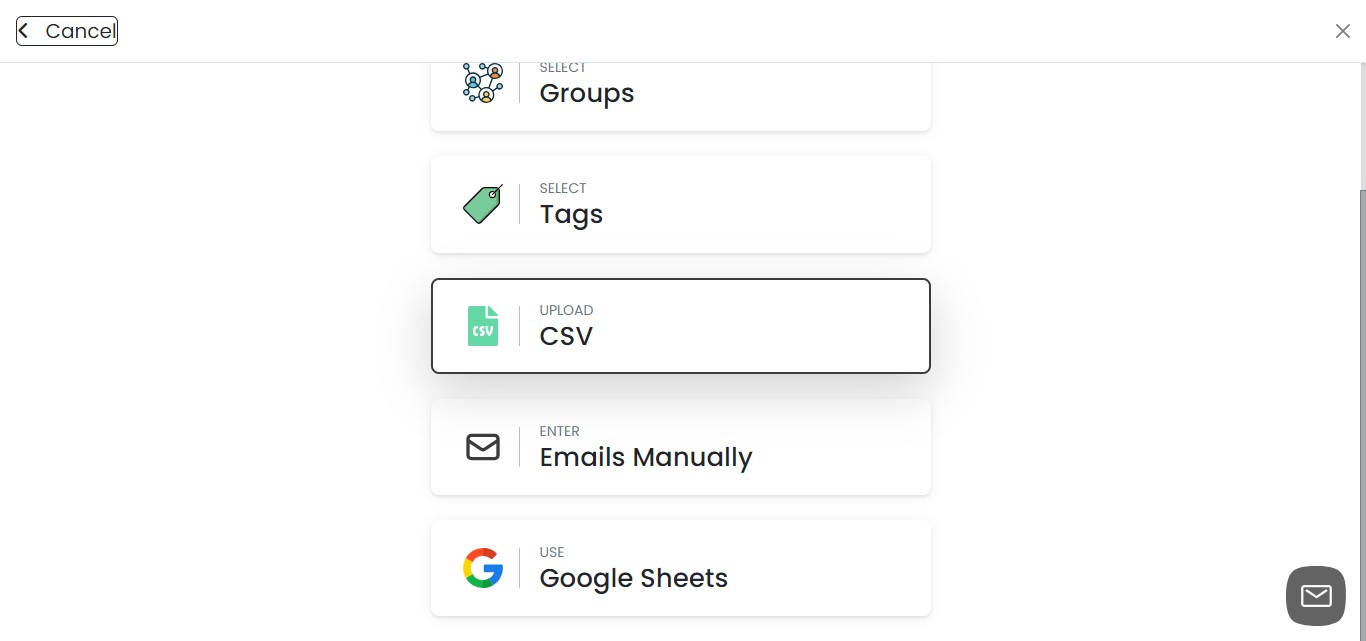
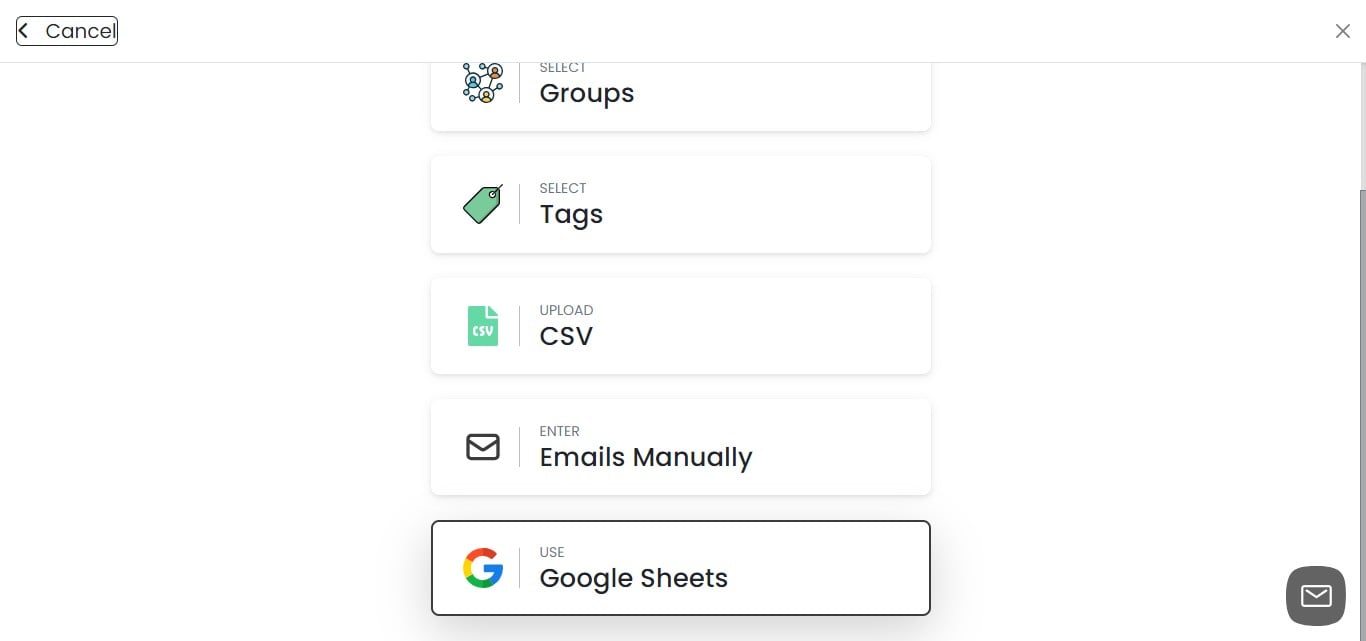
You have six methods available to add leads to your campaign. We'll explore each method in detail. To start, click on "Select Leads" to manually choose contacts from your CRM.

Select Leads manually from CRM
Selecting Leads Manually from CRM: 1. Choose one or more groups of contacts. 2. Select individual contacts from the chosen group(s). 3. Alternatively, add contacts manually from the CRM. 4. After adding the desired contacts, click "Submit" to finalize your selection.
Select Groups
Click on "Groups"
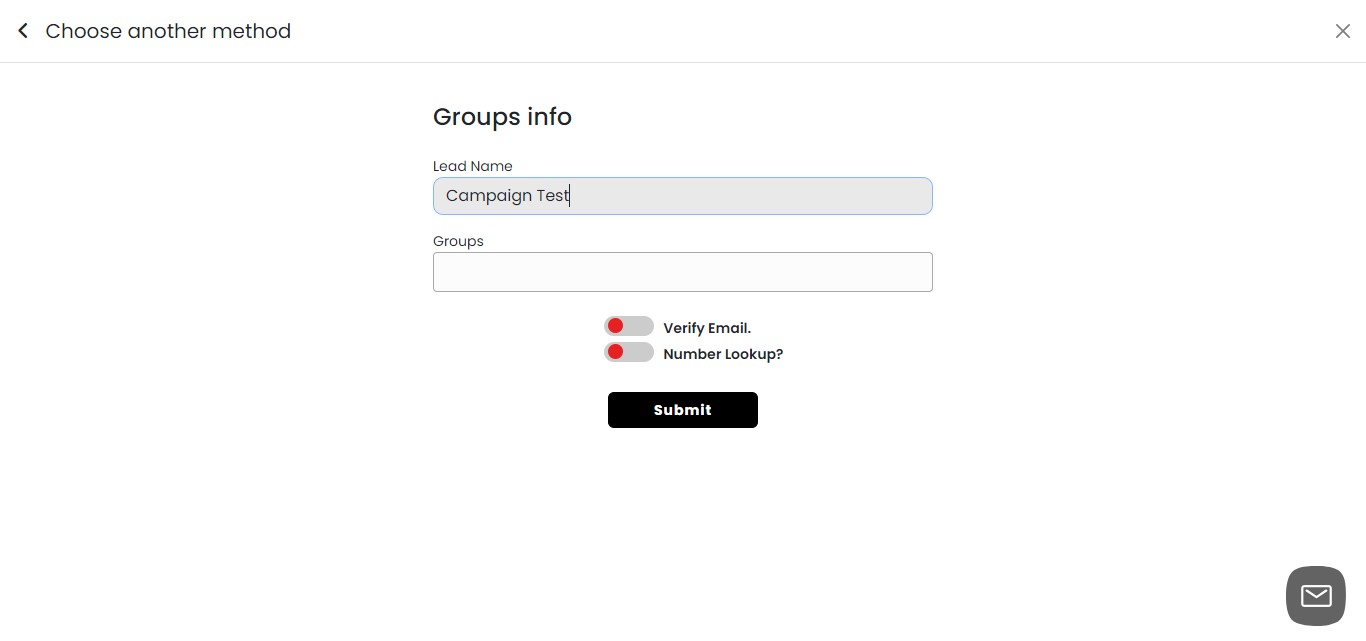
Naming Your Lead Group: 1. Enter a descriptive name for your lead group. 2. Choose a name that reflects the group's characteristics or purpose. 3. This name will help you easily identify and manage your leads within the campaign.
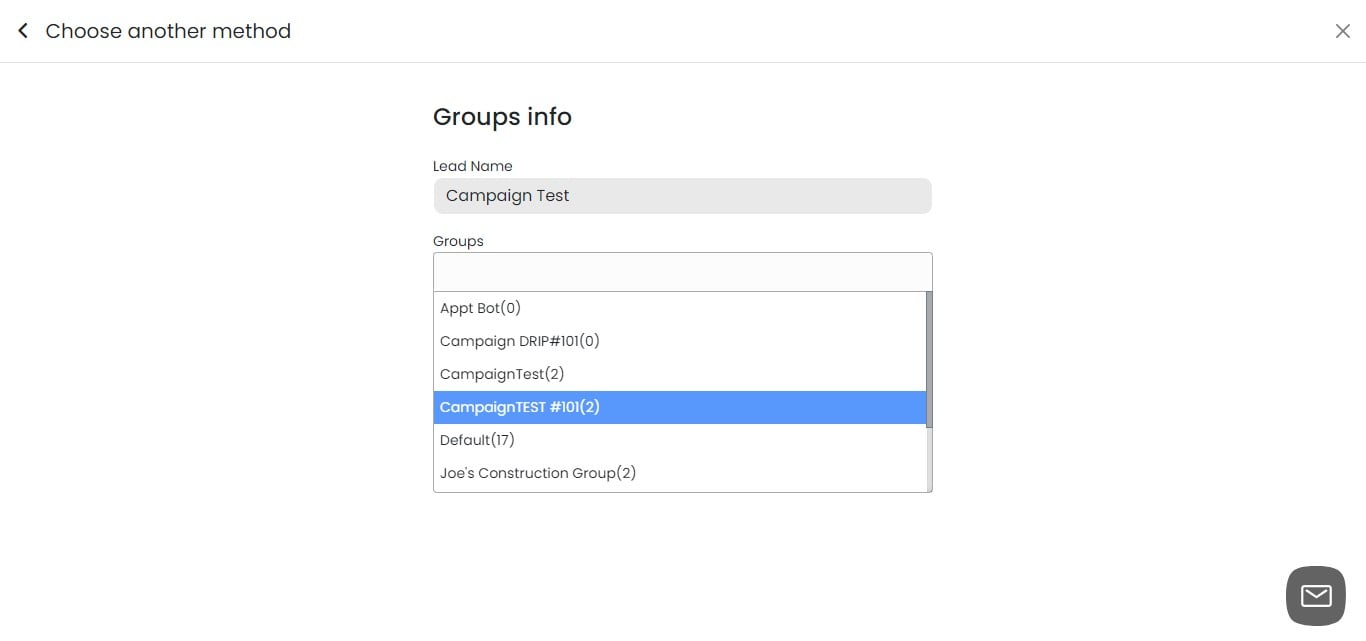
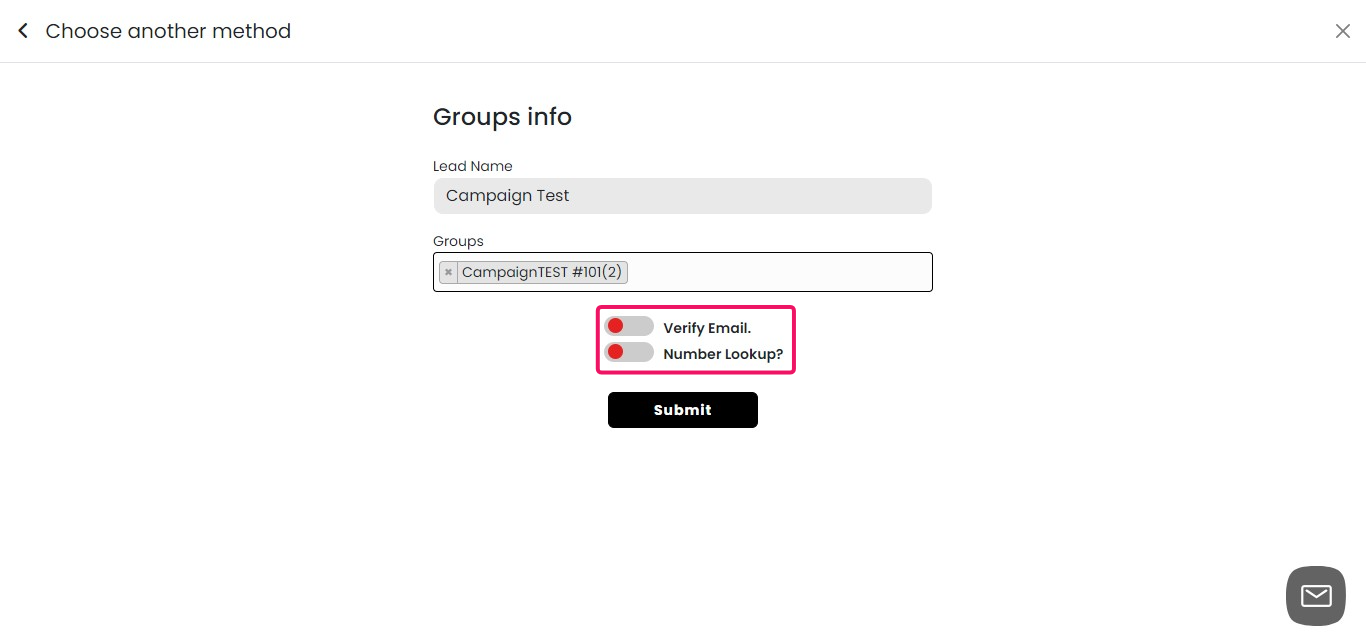
Select a group of contacts inside the CRM
Email and Phone Number Verification 1. Toggle on "Verify Email" to check email address validity. Note: Email verification requires a subscription to SMS-iT's email verification service. 2. Toggle on "Number Lookup" to verify phone numbers. Note: Number lookup uses your carrier's API (e.g., Telynx, Twilio) or third-party services like ClearoutPhone or Numverify. For more information on these features, visit the "Settings" section.
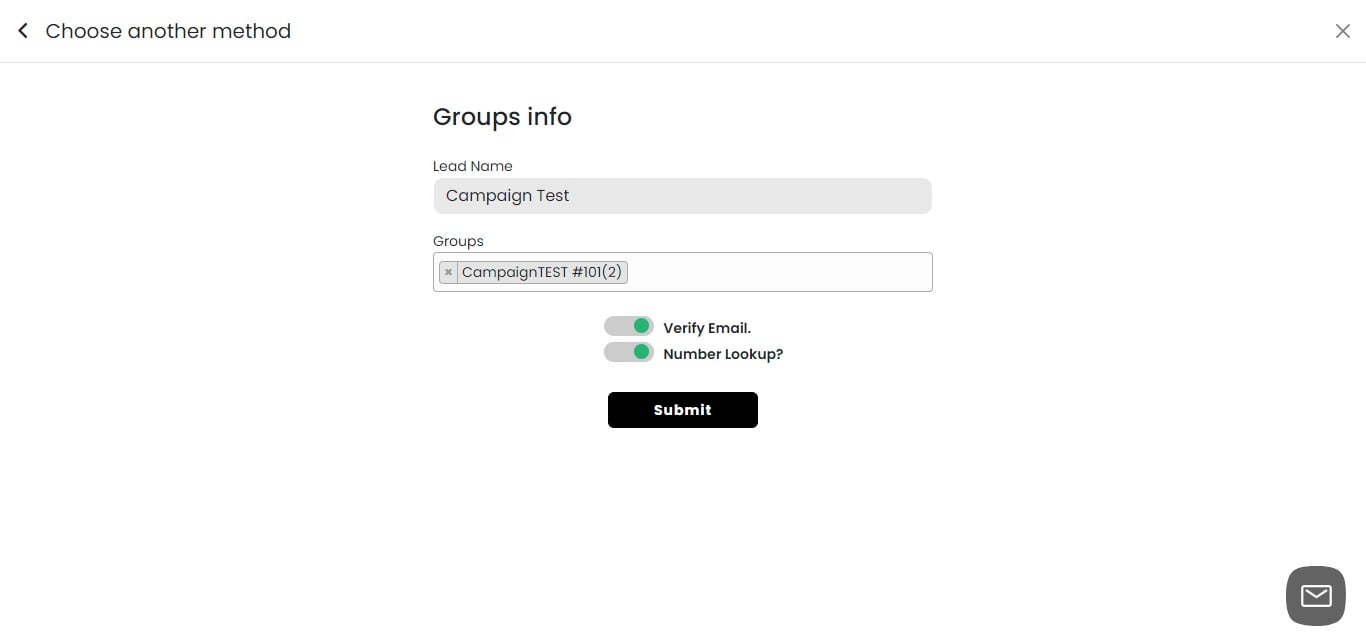
Finalizing Lead Group Selection 1. Review your email and number verification settings. 2. Ensure you've selected the desired group of contacts. 3. Click on "Submit" to add the selected leads to your campaign.
Select Tags
Tags offer a powerful way to segment and target your contacts for specific campaigns: If you've previously tagged your contacts in the CRM, you can easily add them to a campaign using these tags. Benefits of using tags for campaign selection: Quickly target specific segments of your audience Create more personalized and relevant campaigns Easily manage and update contact groups
Click on "Tags"
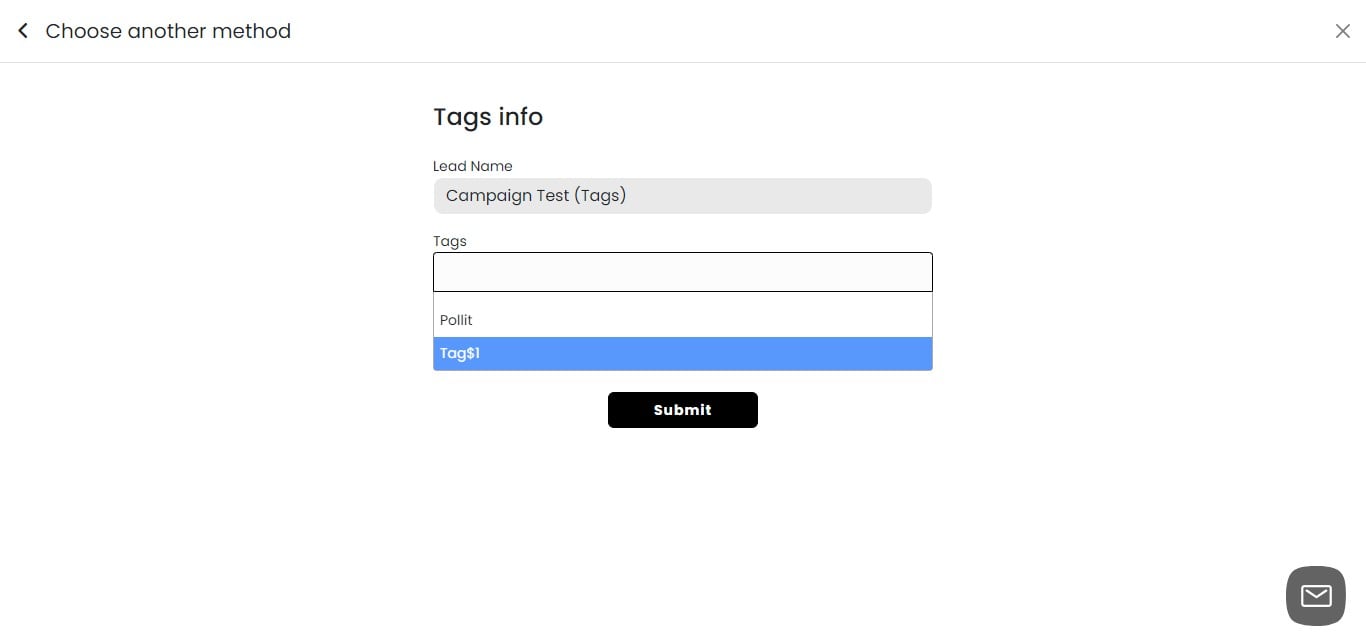
Selecting Leads by Tags 1. Enter a name for your lead group. 2. Choose the relevant tag(s) associated with the contacts you want to include. 3. Tags allow you to select contacts based on specific characteristics or categories.
Email and Number Verification for Tagged Leads 1. Toggle "Verify Email" on or off to check email address validity. 2. Toggle "Number Lookup" on or off to verify phone numbers. 3. Refer to the previous section for more details on these verification processes.
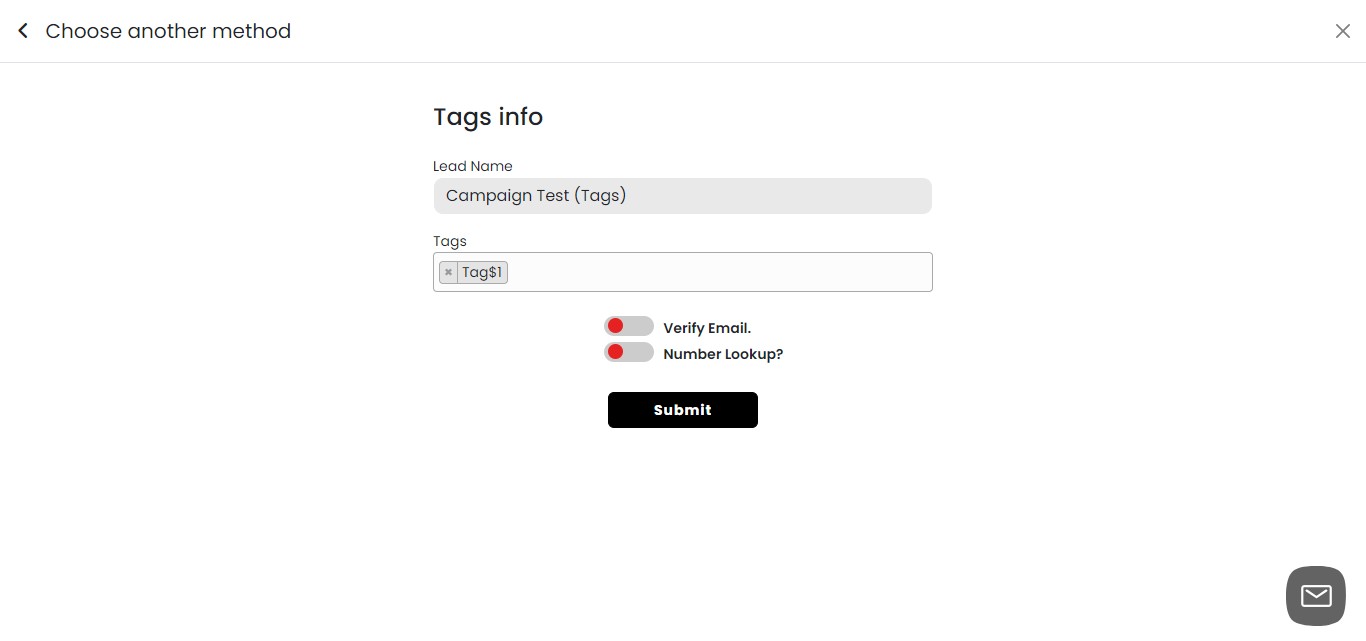
Click on "Submit"

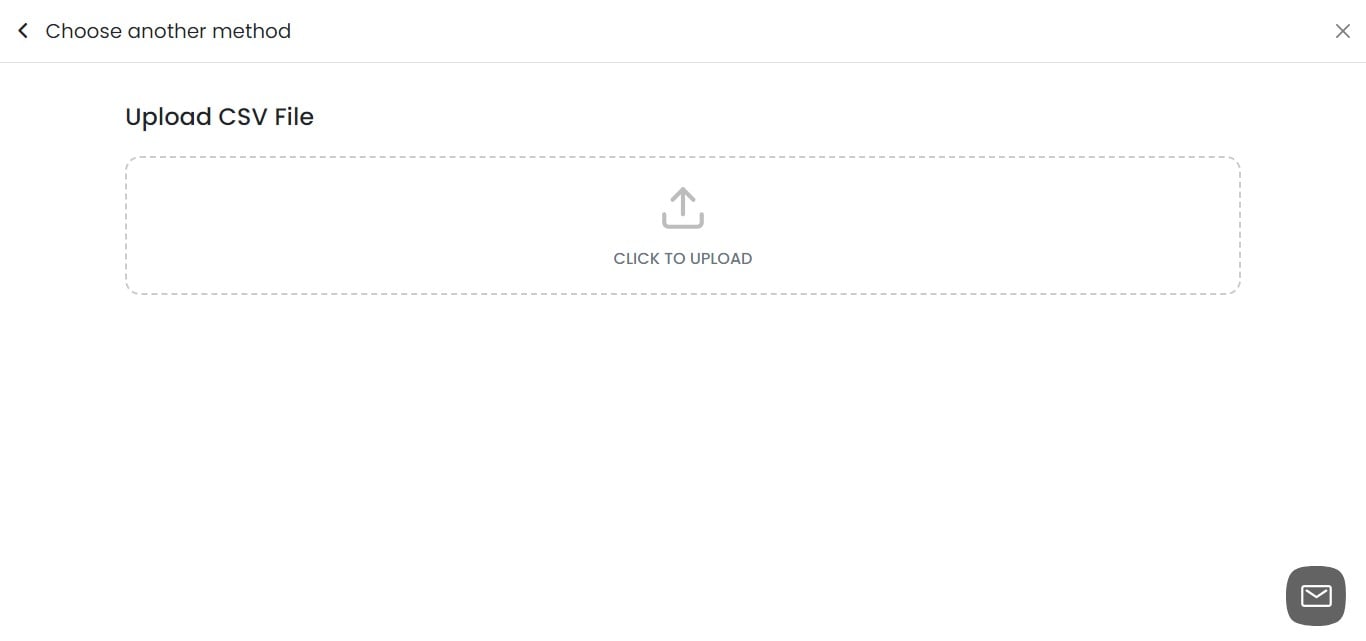
Upload CSV
A CSV (Comma-Separated Values) file is a plain text file that uses commas to separate values. Each line in the file corresponds to a data record, and each record consists of fields separated by commas.
When uploading a CSV file into the SMS-iT CRM system, the data is imported to update or add new customer records, allowing businesses to manage and analyze customer information efficiently.
To save an Excel sheet as a CSV file, open the Excel file, click "File," then "Save As," and choose "CSV (Comma delimited) (*.csv)" from the file format options. This converts the Excel data into a plain text format with values separated by commas.
Click "Upload CSV"
Click on "Click To Upload"
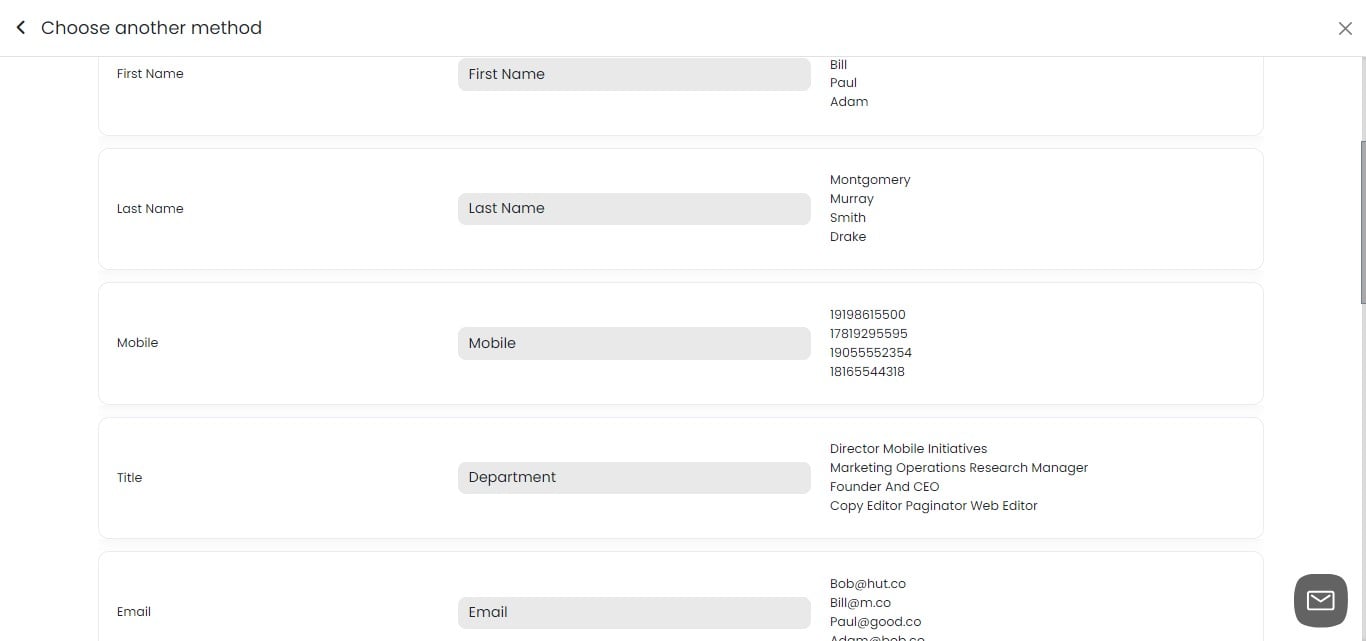
Mapping CSV Columns 1. After successful upload, you'll see the column names from your CSV file. 2. Click on "Select Type" for each column. 3. Choose the appropriate data type for each column (e.g., Name, Email, Phone). 4. This step ensures your CSV data is correctly imported into the campaign.
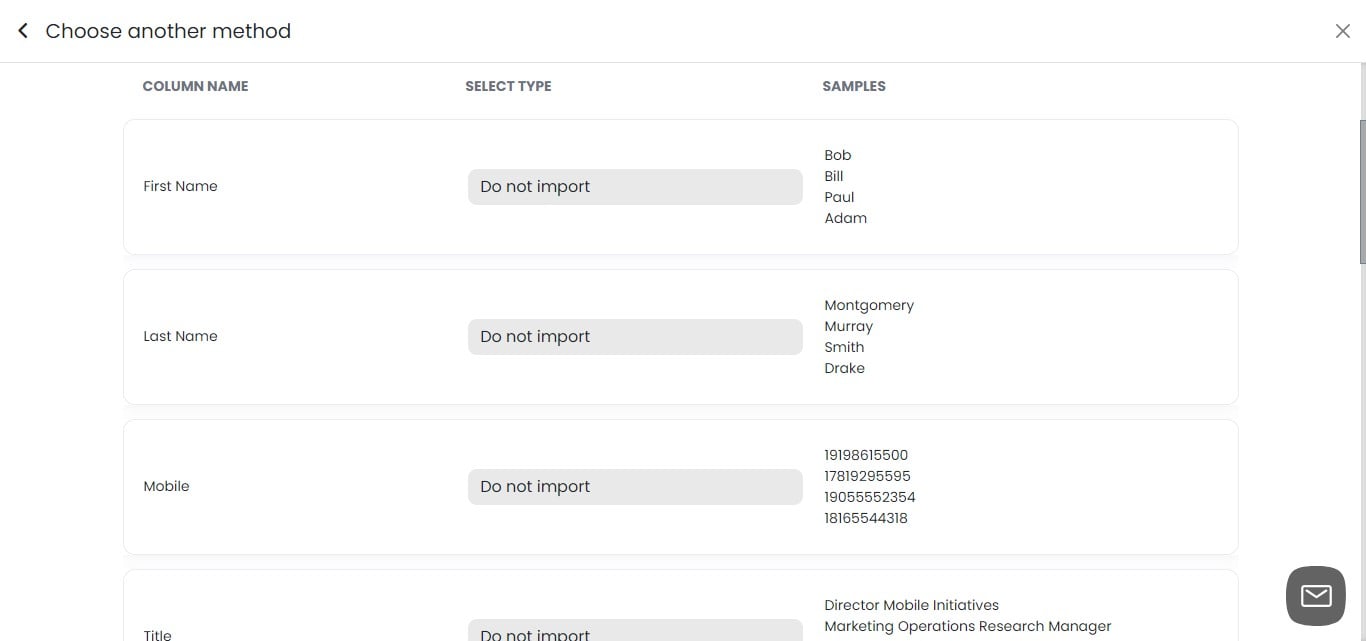
Finalizing CSV Column Mapping 1. Review each column and ensure you've selected the correct data type. 2. Continue mapping all relevant columns for your campaign. 3. If you don't need certain columns, you can leave them unmapped. 4. Double-check your selections before proceeding to the next step.
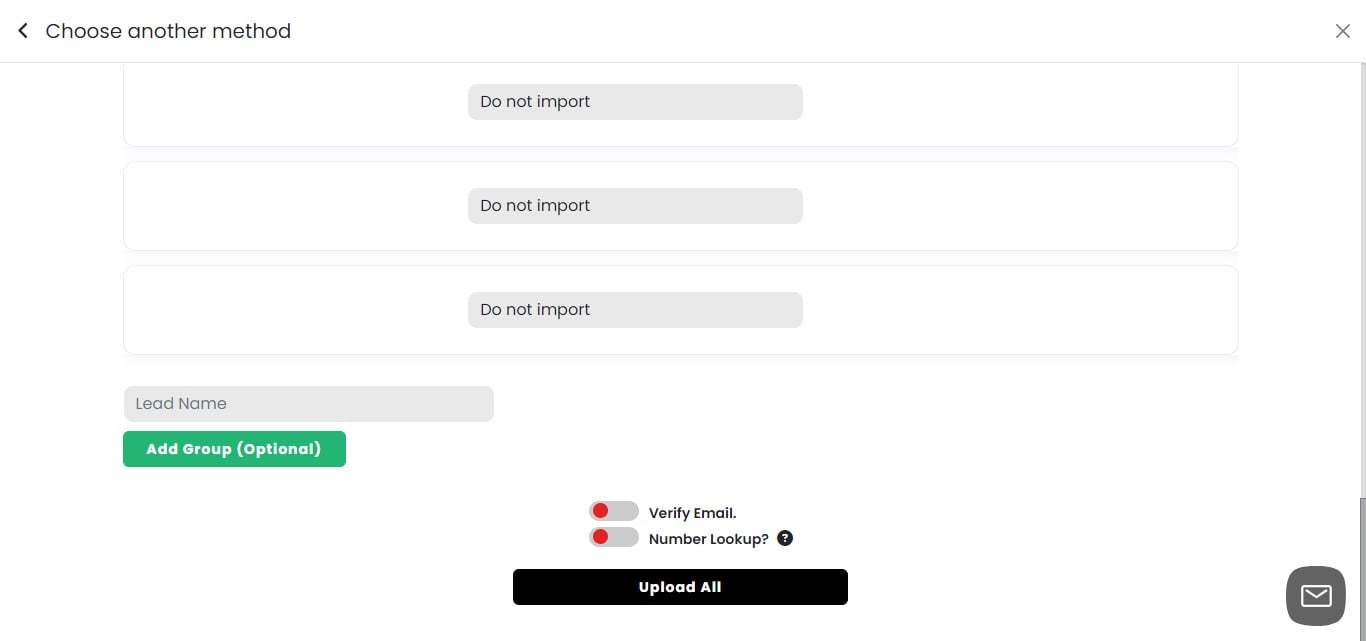
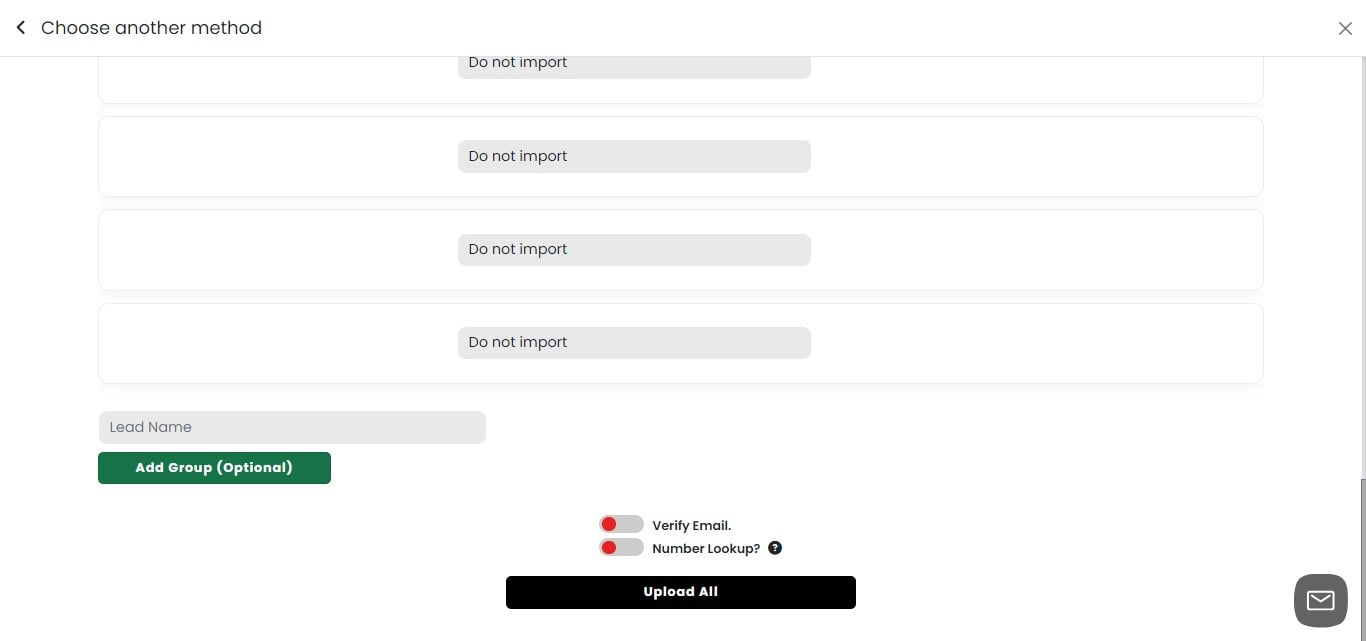
Adding CSV Contacts to CRM Group 1. Decide if you want to add these contacts to your CRM as a group. 2. If yes, provide a name for the new group. 3. Select "Add Group" to create the group in your CRM. 4. This step allows you to use these contacts with other SMS-iT CRM tools and features. 5. Adding to a CRM group enhances your ability to manage and market to these contacts in the future.
Adding to a CRM group
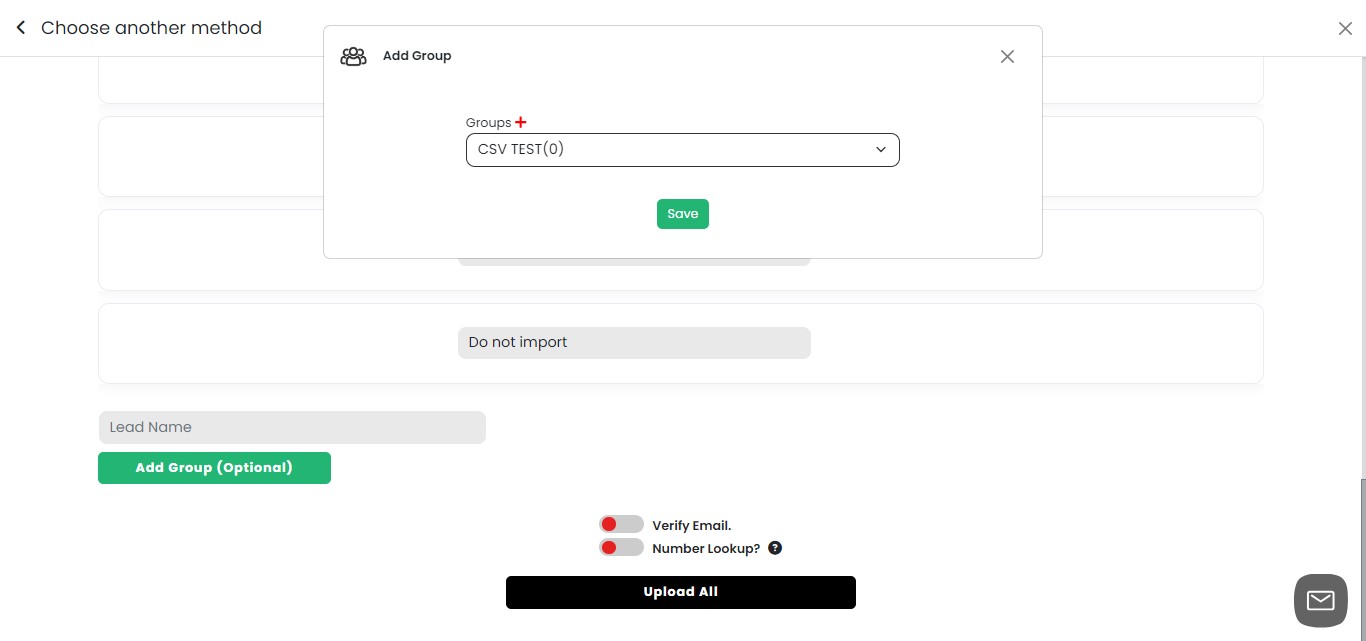
Click on "Add Group (Optional)"
Selecting or Creating a CRM Group 1. Click the dropdown menu to select an existing group. 2. If you need to create a new group, click the red "+" sign. 3. Enter a name for your new group when prompted. 4. Creating a new group allows you to organize these contacts separately in your CRM.
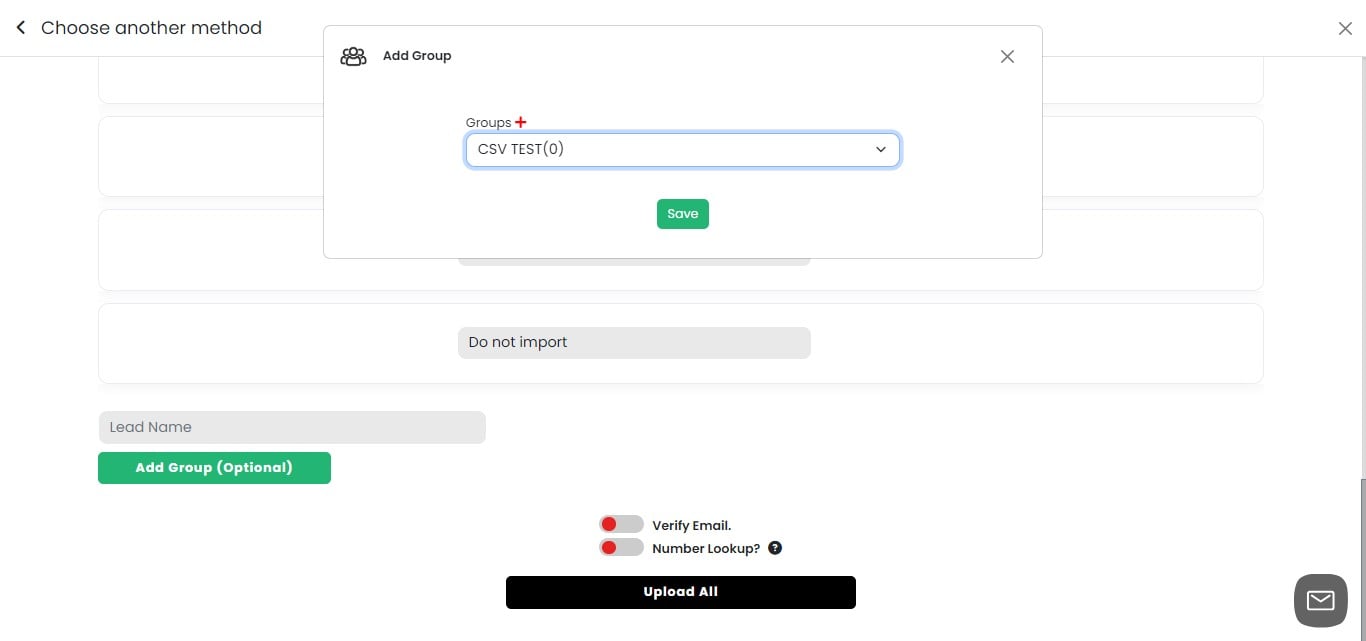
Click on "Save"
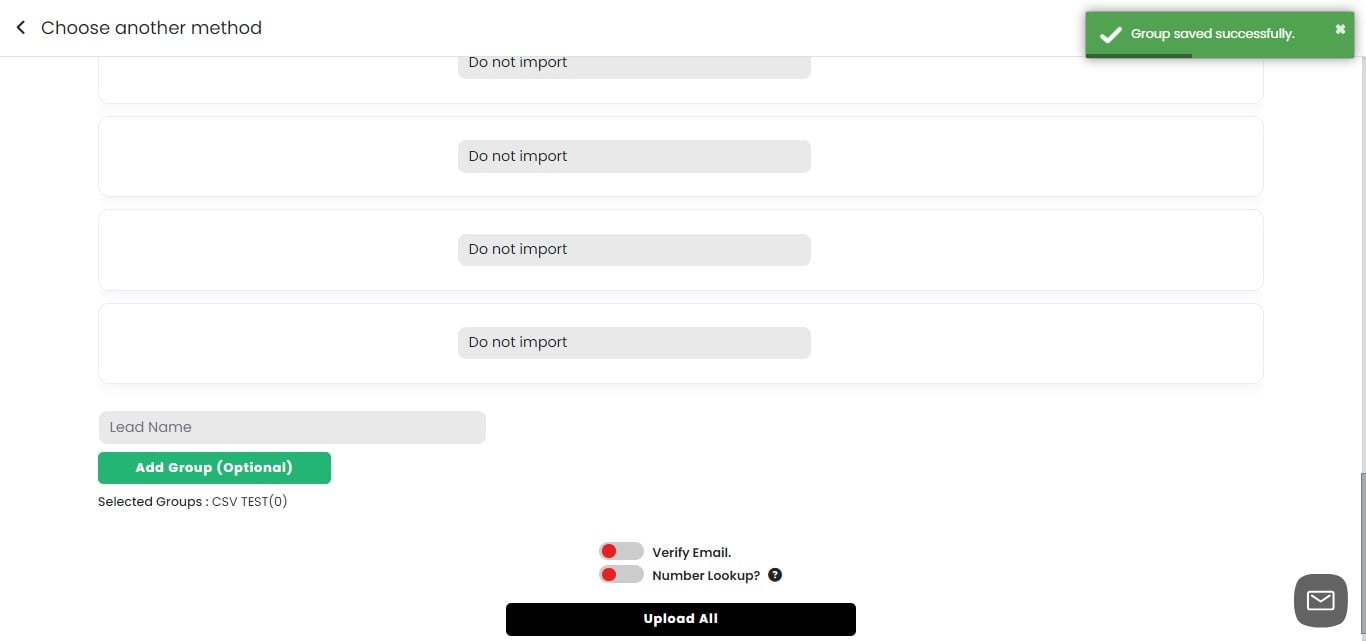
Confirming Group Selection 1. After saving, the selected or newly created group will appear under the "Add Group" section. 2. Verify that the correct group is displayed. 3. This confirmation ensures your contacts will be added to the intended CRM group
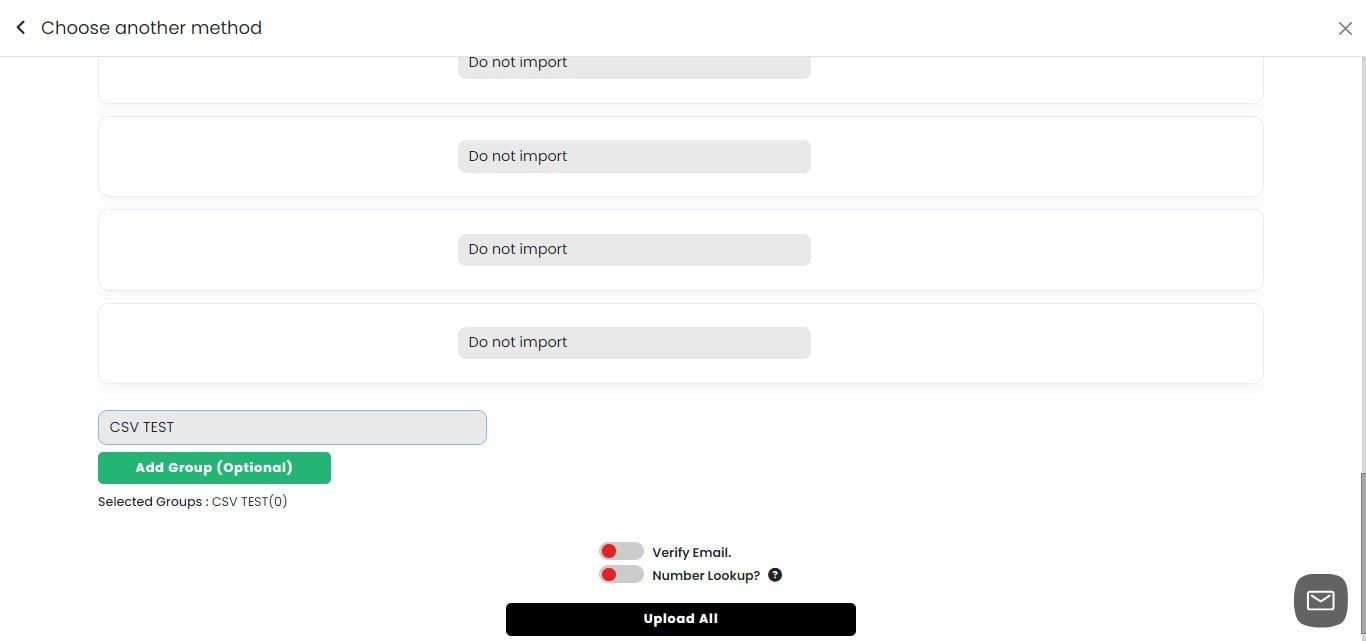
Naming Your Lead Source 1. Enter a descriptive name for your lead source. 2. Choose a name that identifies where these contacts came from (e.g., "CSV Import July 2024"). 3. This helps you track the origin of your leads within the campaign.
Setting Verification Options for CSV Upload
Toggle "Verify Email" on or off to check email address validity. Toggle "Number Lookup" on or off to verify phone numbers. Refer to the "Select Groups" section for more details on these verification processes.

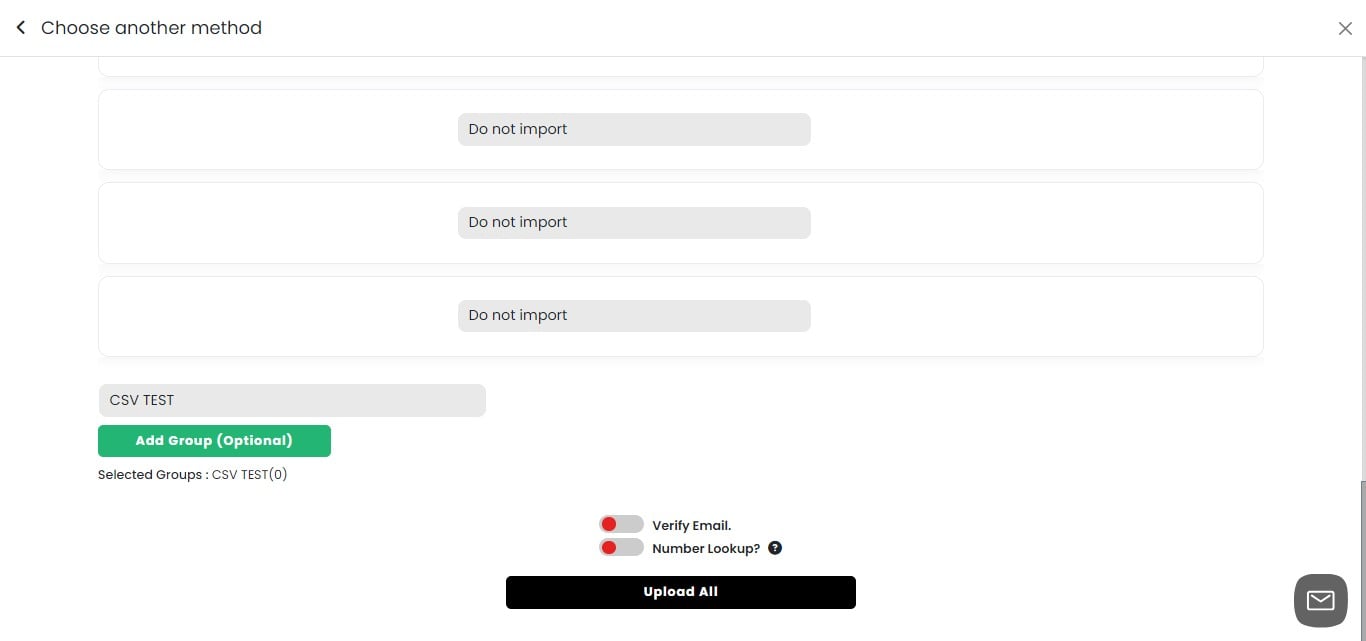
Finalizing CSV Upload 1. Review all settings: lead source name, group selection, and verification options. 2. Ensure all variables are set according to your preferences. 3. When satisfied with your selections, click on "Upload All" to import your CSV contacts. 4. This action will add the contacts to your campaign and, if selected, to your CRM group.
Emails Manually
Click on "Add Leads"
Click on "Emails Manually"
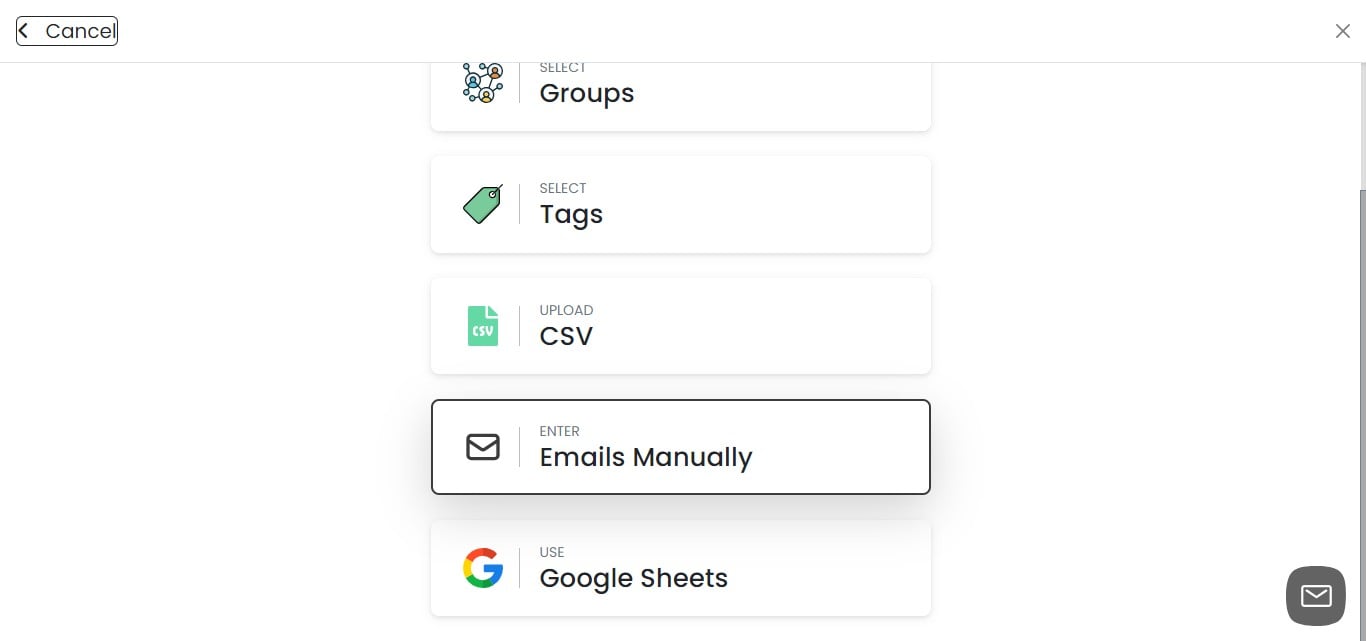
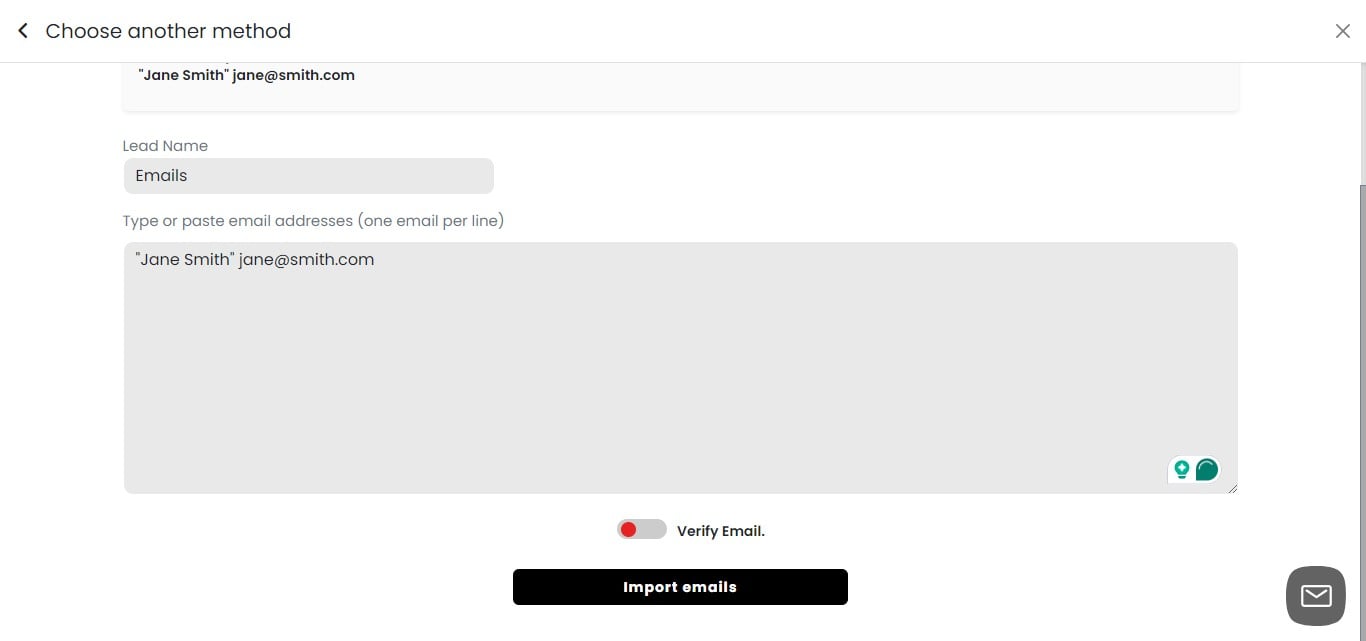
Selecting Email Input Format
You have two options for manually adding email addresses: "John Doe" [email protected] "Jane Smith" [email protected]
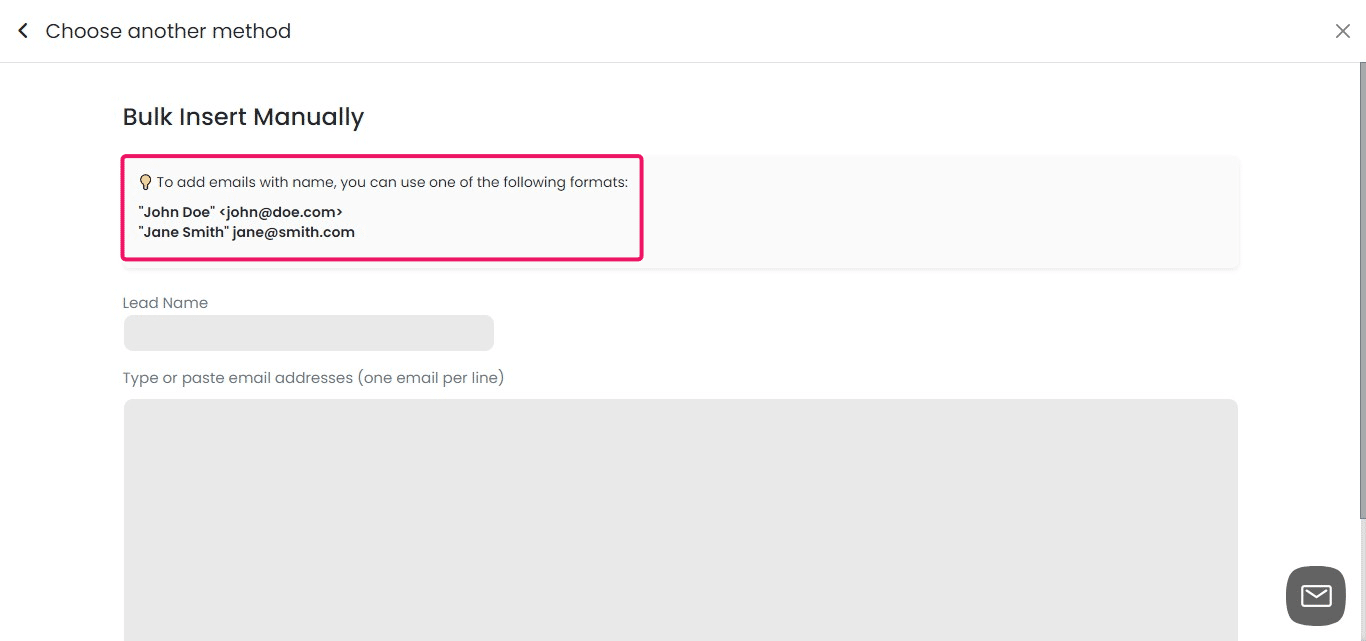
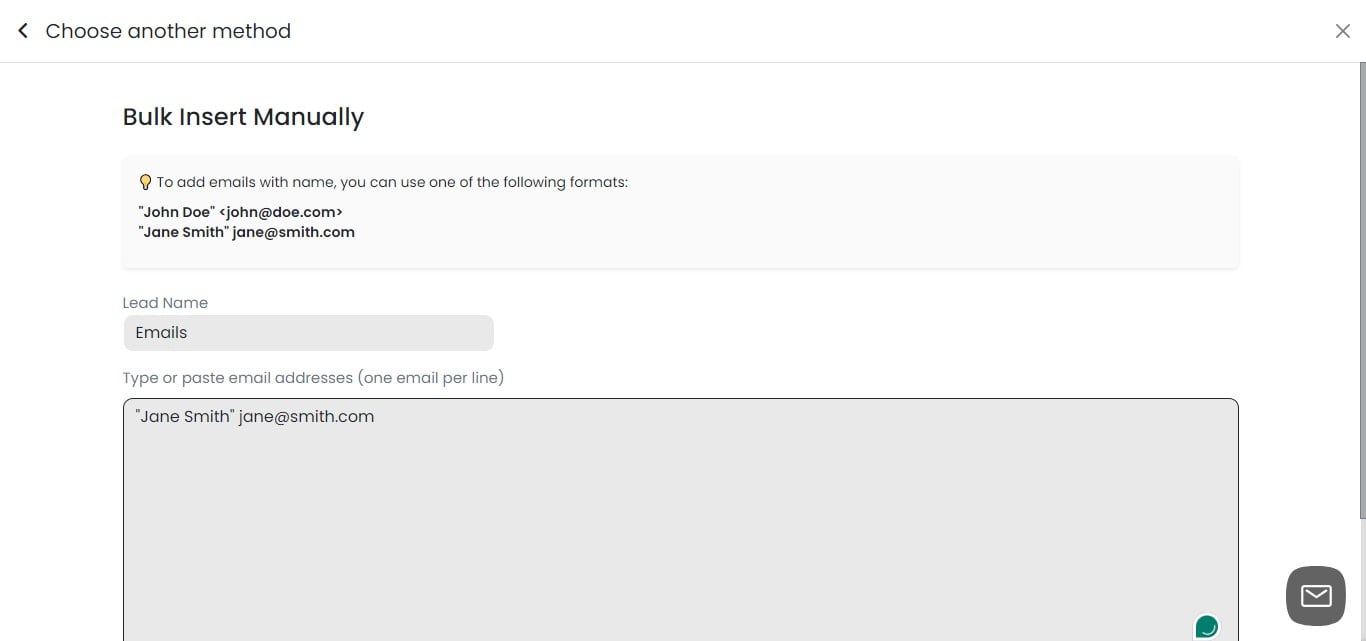
Adding Emails Manually 1. Enter a name for this group of leads. 2. Add email addresses to the text box. 3. Use the single line format: one email address per line. 4. Ensure there are no extra spaces or characters between email addresses.
Importing Manually Added Emails
Decide whether to verify the email addresses:
Toggle on "Verify Email" to check validity (recommended). Toggle off if you're confident in the email list accuracy.
After entering all emails and setting verification preference, click "Import emails". This action will add the manually entered emails to your campaign.
Your emails have been added
Google Sheets
Click on "Add Leads"

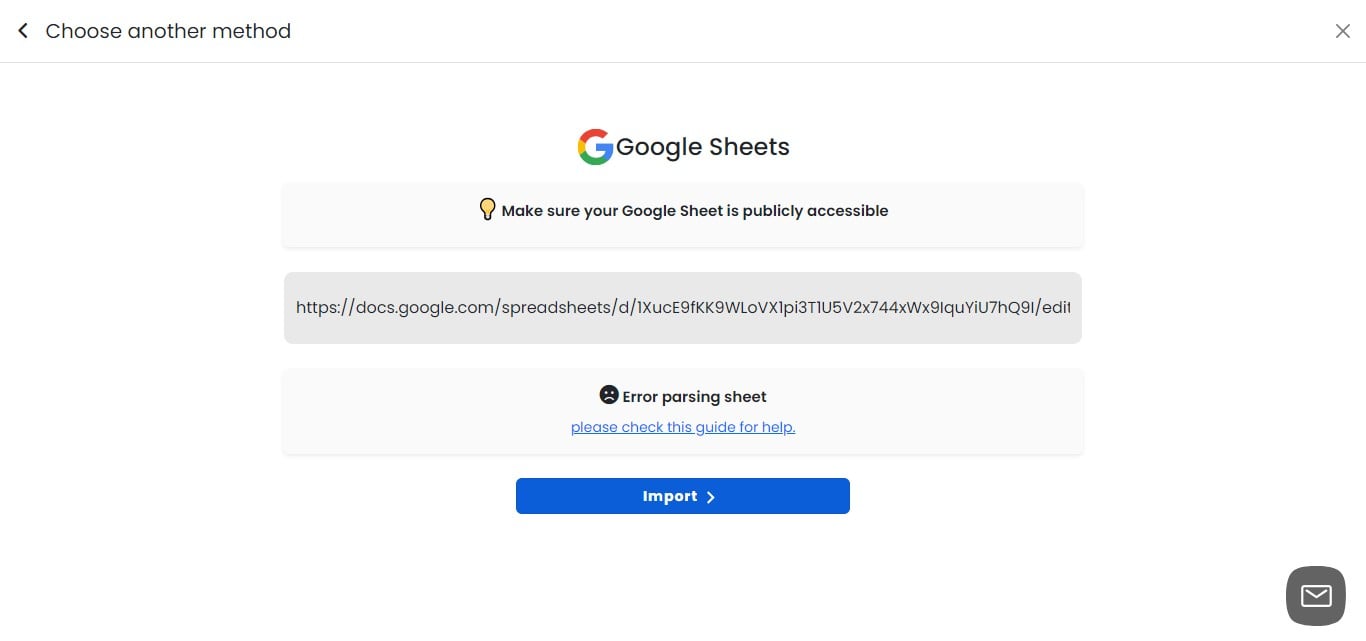
Click on "Google Sheets"
Importing Leads from Google Sheets 1. Ensure your Google Sheet is set to "Anyone with the link can view". 2. Copy the full URL of your Google Sheet. 3. Paste the URL into the provided field. 4. Click "Import" to begin the import process. 5. Important: The sheet must be publicly accessible for successful import.
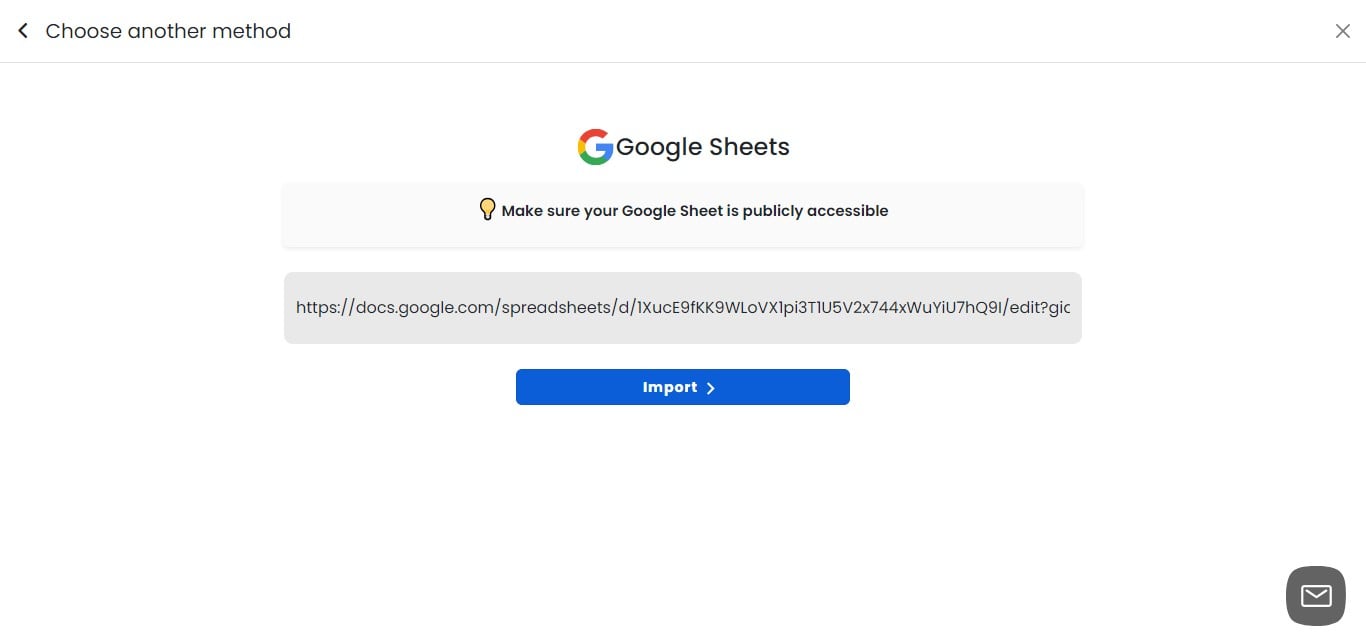
Troubleshooting Google Sheets Import
If your Google Sheet imports successfully, proceed to the next step. If the import fails, follow these steps: a. Check the sheet's sharing settings. b. Ensure the URL is correct and complete. c. Verify that the sheet contains valid data in the expected format. For detailed troubleshooting, refer to our comprehensive guide at: https://training.smsit.ai/guides/30b24f32-ce1e-46d0-97c7-3c9da907a864
Flexible Lead Import Options for Campaigns SMS-iT CRM offers versatile methods to import leads into your campaigns: 1. Multiple import sources: You can import leads from various sources into a single campaign, including: - CRM groups - Google Sheets - CSV files - Individual selections from your CRM 2. Combine import methods: Mix and match import methods to create comprehensive contact lists. For example: - Import from CRM groups and Google Sheets simultaneously - Combine CSV file imports with individually selected CRM contacts 3. Benefits of flexible importing: - Create more targeted and diverse campaign audiences - Utilize data from different platforms and sources - Streamline the process of building complex contact lists 4. Best practices: - Ensure data consistency across different import sources - Review and deduplicate contacts if importing from multiple sources - Use tags or custom fields to track the origin of imported contacts This flexibility allows you to create highly customized and effective campaign audiences by leveraging all available data sources.
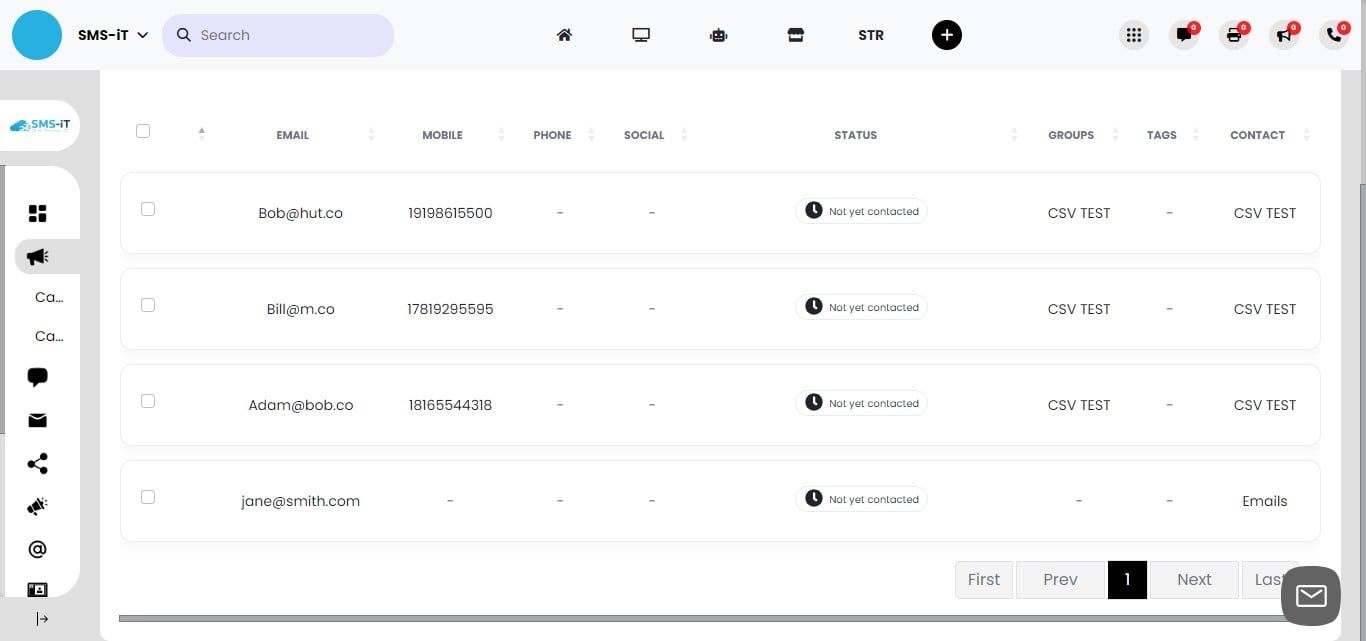
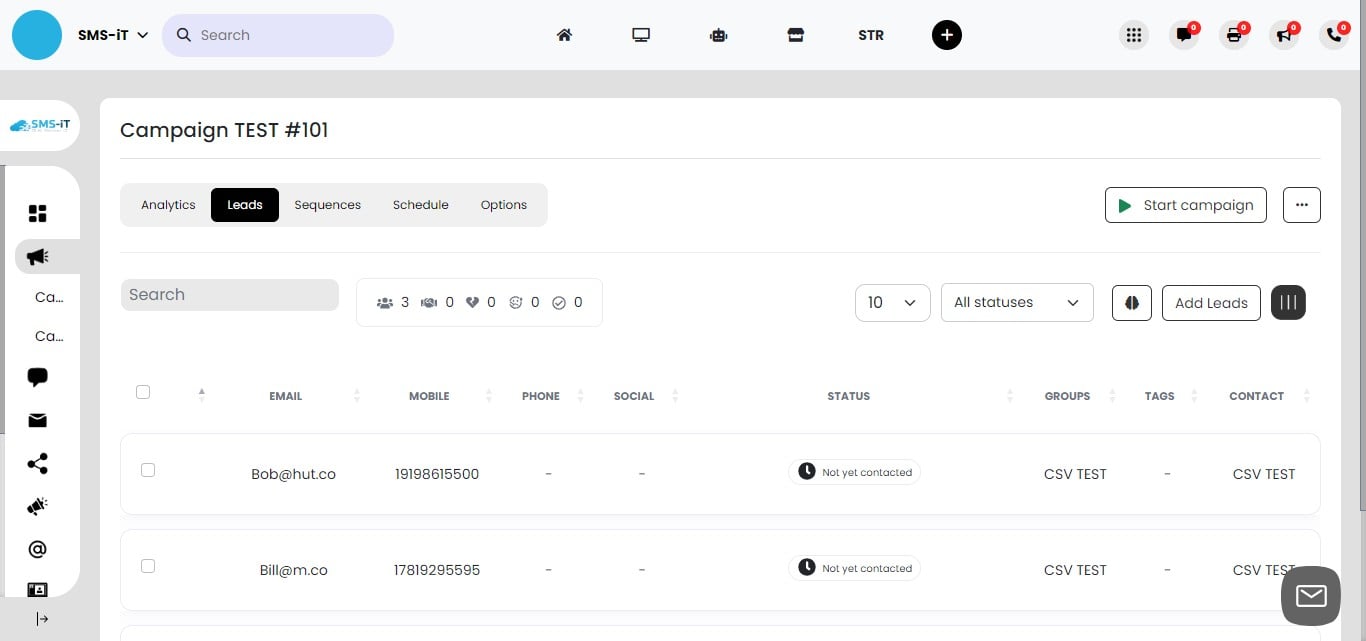
Managing Imported Leads
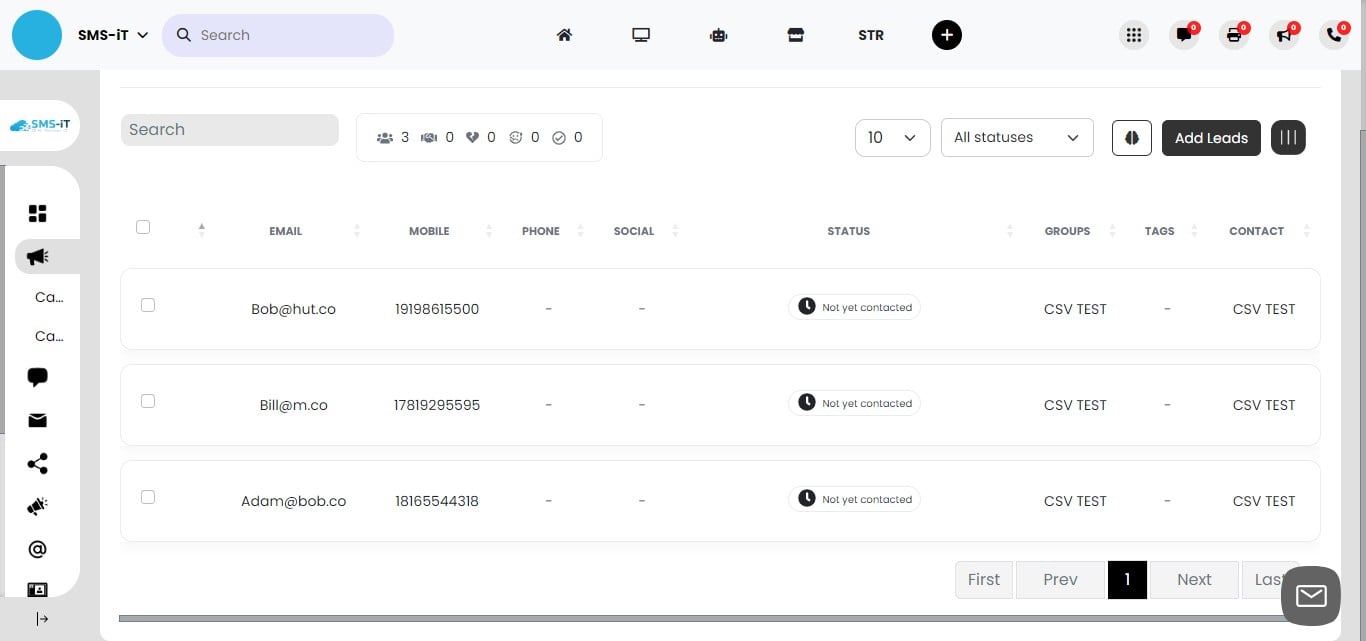
After importing, your leads will appear in the campaign database. In this view, you can: a. Delete individual leads if needed. b. Check the status of each lead. c. See the source of each lead (e.g., CRM, CSV, Google Sheets). d. View all available data for each lead. Use this interface to ensure your campaign includes the correct leads and information.
Section 3: Sequences
Understanding Sequences in SMS-iT CRM Sequences are powerful automation tools for streamlining your communication strategy: 1. Definition: Sequences are customizable workflows that automate communications with your contacts. 2. Versatility: They can incorporate various communication channels, including: - Timed text messages - Emails - Voice calls - Social media communications 3. Flexibility: Create sequences using a single channel or combine multiple channels for a multi-touch approach. 4. Timing: Set specific timings for each step in the sequence to optimize engagement. 5. Benefits: - Ensure consistent follow-ups - Personalize communication at scale - Save time by automating repetitive tasks - Improve engagement through strategic multi-channel outreach 6. Use cases: - Lead nurturing campaigns - Customer onboarding processes - Event reminder series - Post-purchase follow-ups
By leveraging sequences, you can create sophisticated, automated communication flows that enhance your relationship with contacts while increasing efficiency.
Click on "Sequences"
Creating a Basic Campaign Sequence
We'll walk through the process of creating a simple, effective campaign sequence. This basic structure can be expanded upon for more complex campaigns later.
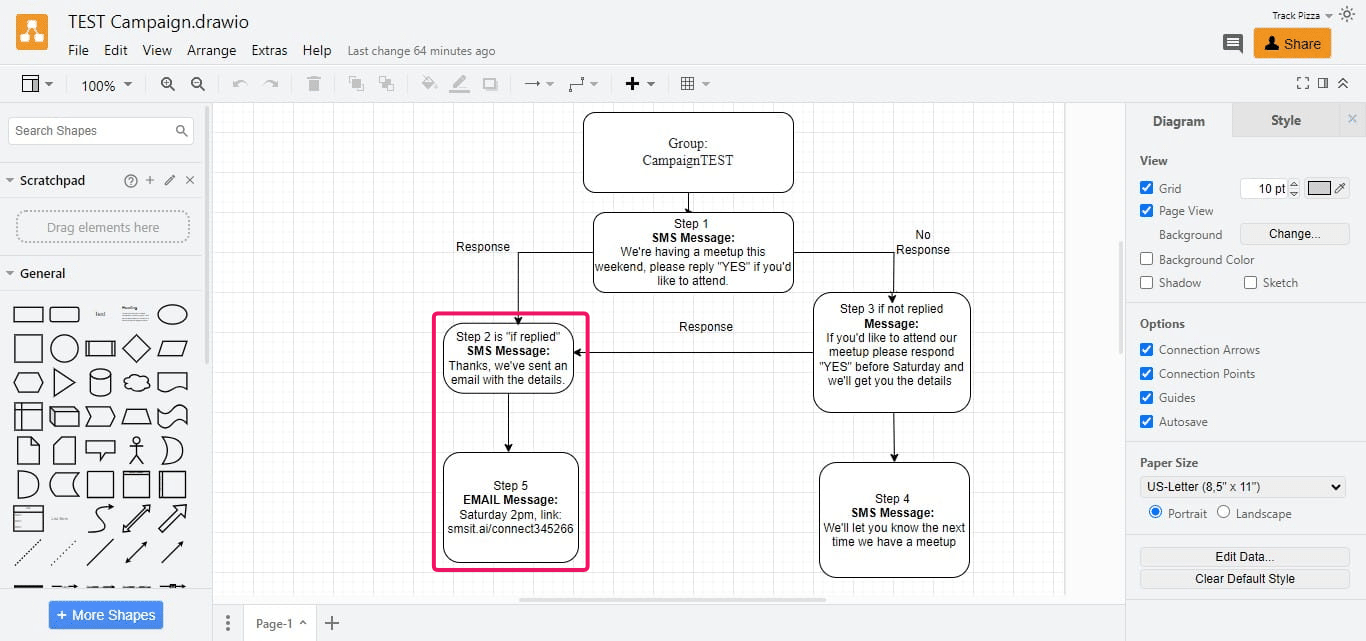
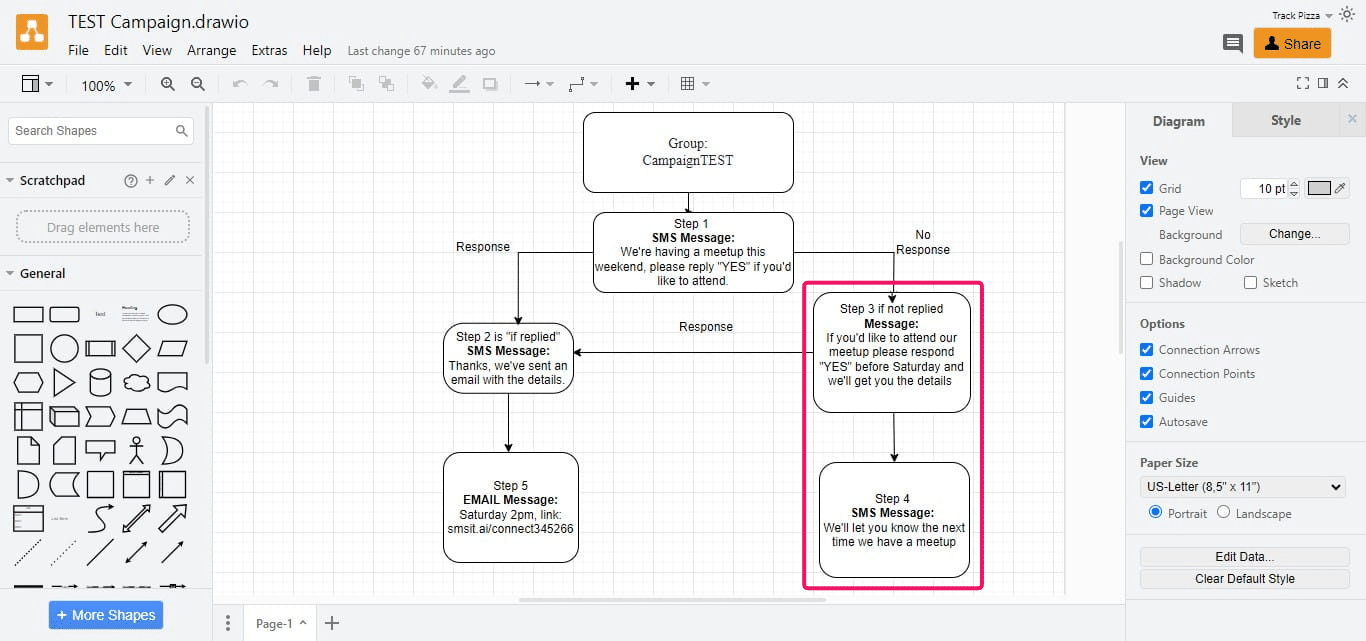
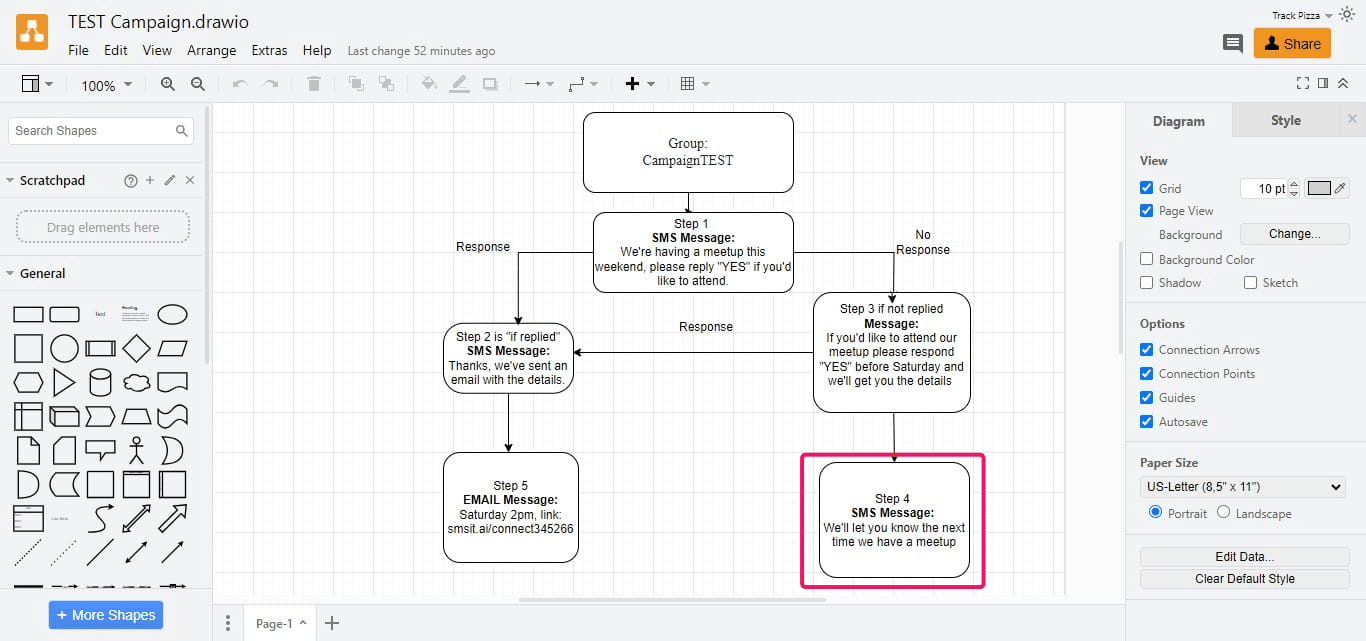
Using a Workflow Diagram 1. Consider starting with a visual workflow diagram to plan your campaign. 2. You can use free tools like draw.io (a Google plugin) to create your diagram. 3. A visual representation helps better illustrate and understand the campaign flow. 4. We'll use a pre-created workflow diagram for this example. 5. Remember, we've already imported leads, so we'll start with Step 1 of the sequence.
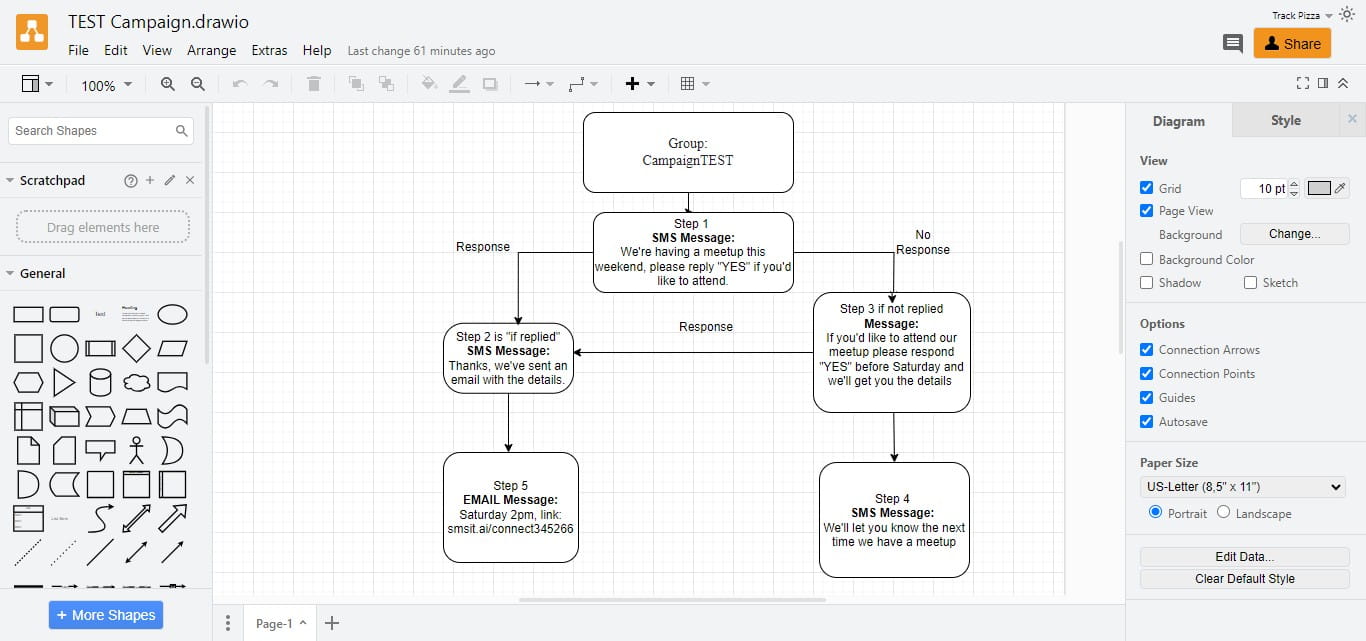
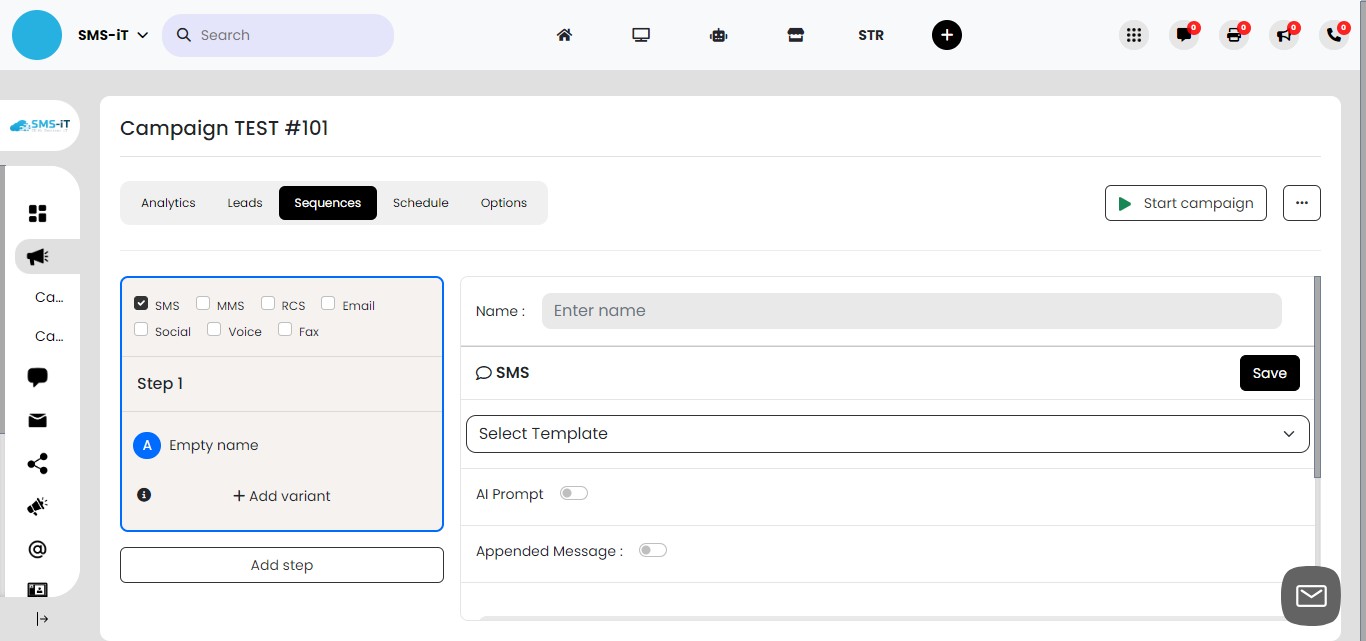
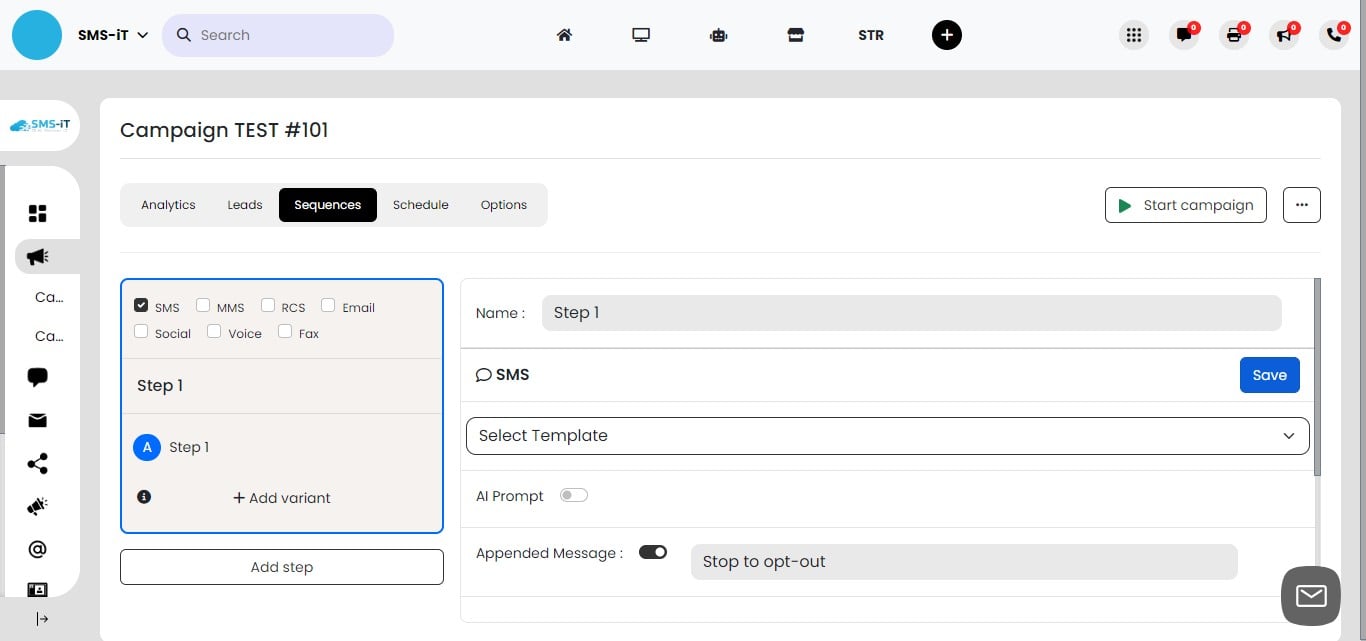
Step 1
Setting Up Step 1 of the Sequence 1. Choose SMS as the communication channel for this step. 2. Name this step "Step 1" to align with our workflow diagram. 3. Note: In practice, you can use more descriptive names for each step. 4. Select the most appropriate communication channel for your campaign goals.
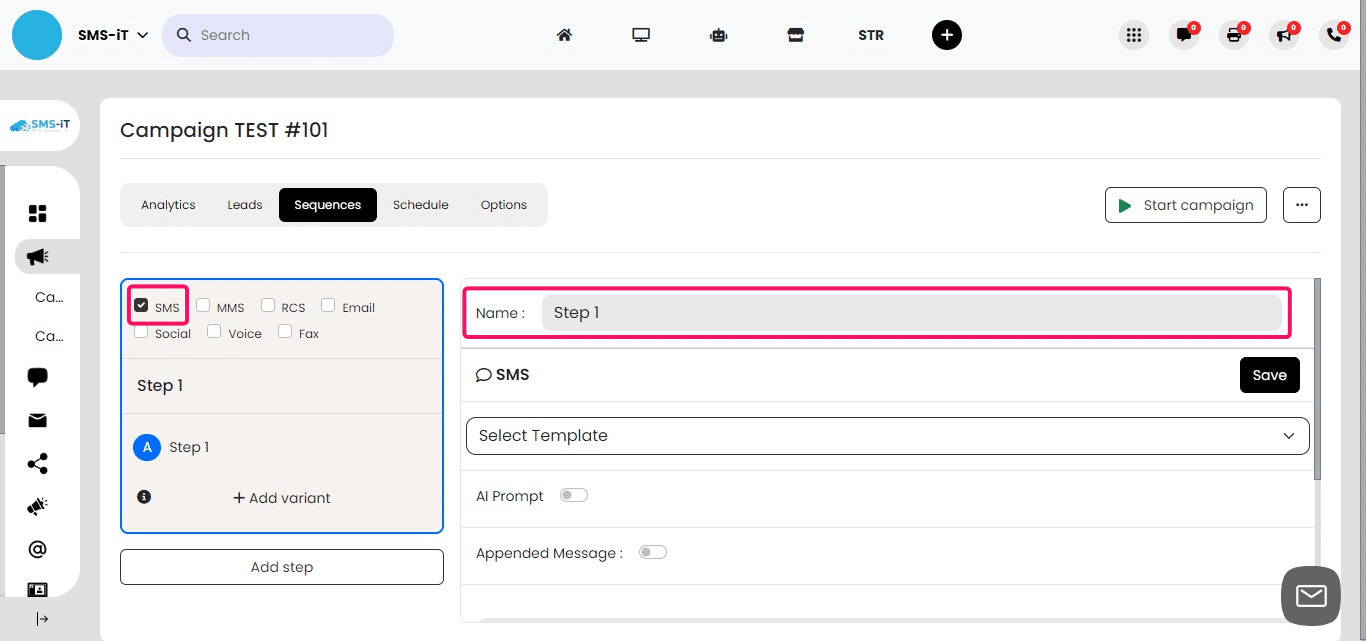
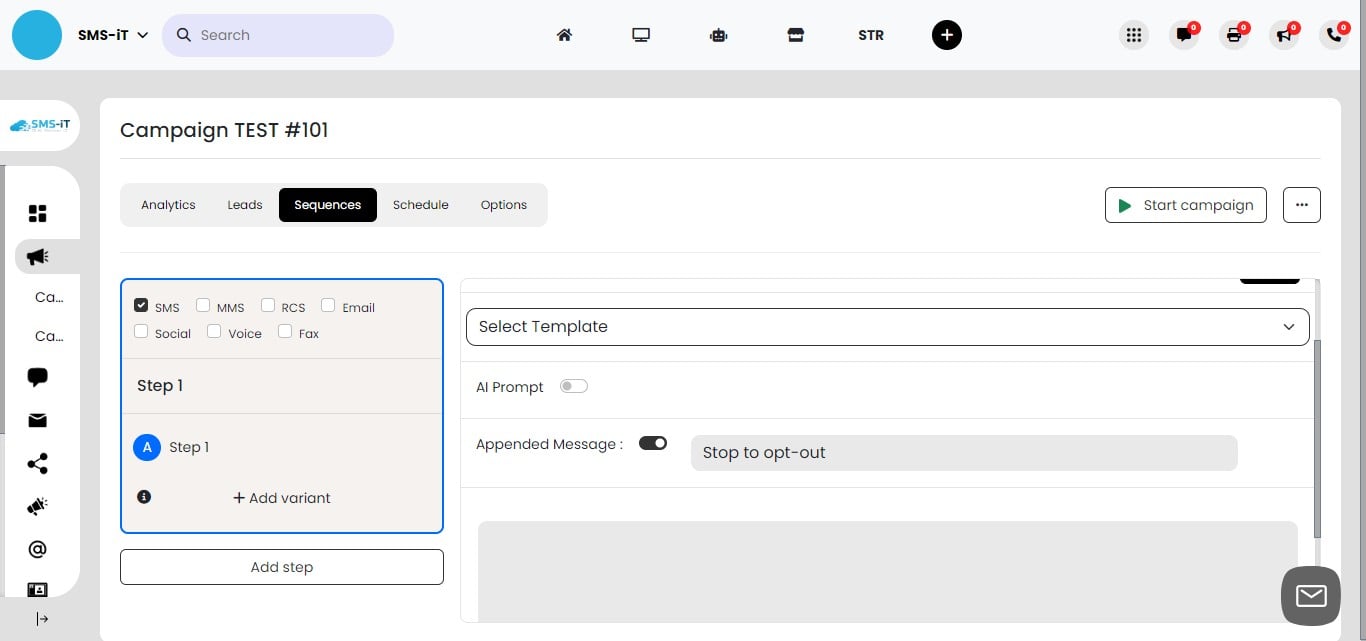
Enabling Opt-Out Message
Toggle on the "Appended Message" option. This adds an automatic opt-out option to your message. Including an opt-out option is crucial for compliance with messaging regulations. Always check your country's specific guidelines to ensure full compliance.
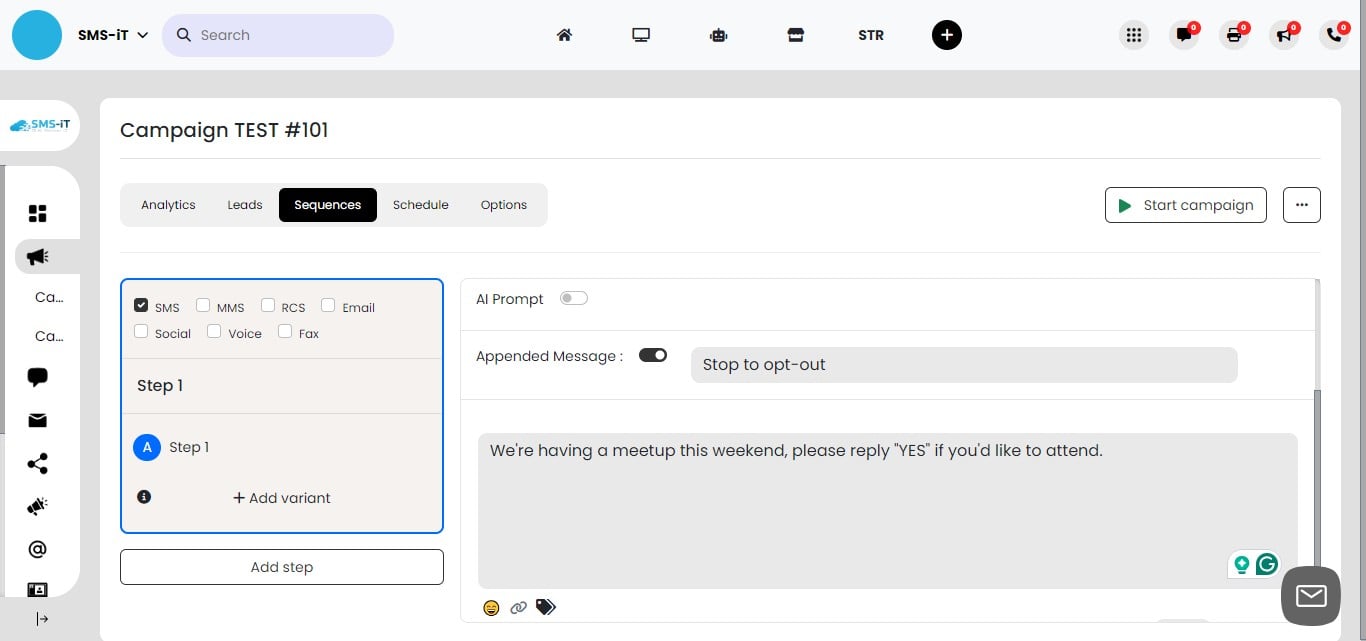
Composing Your First Message
In the provided text area, compose the first message recipients will receive. Keep the message clear, concise, and engaging. Ensure the content aligns with your campaign goals. Double-check for any typos or errors before proceeding.
Click on "Save"
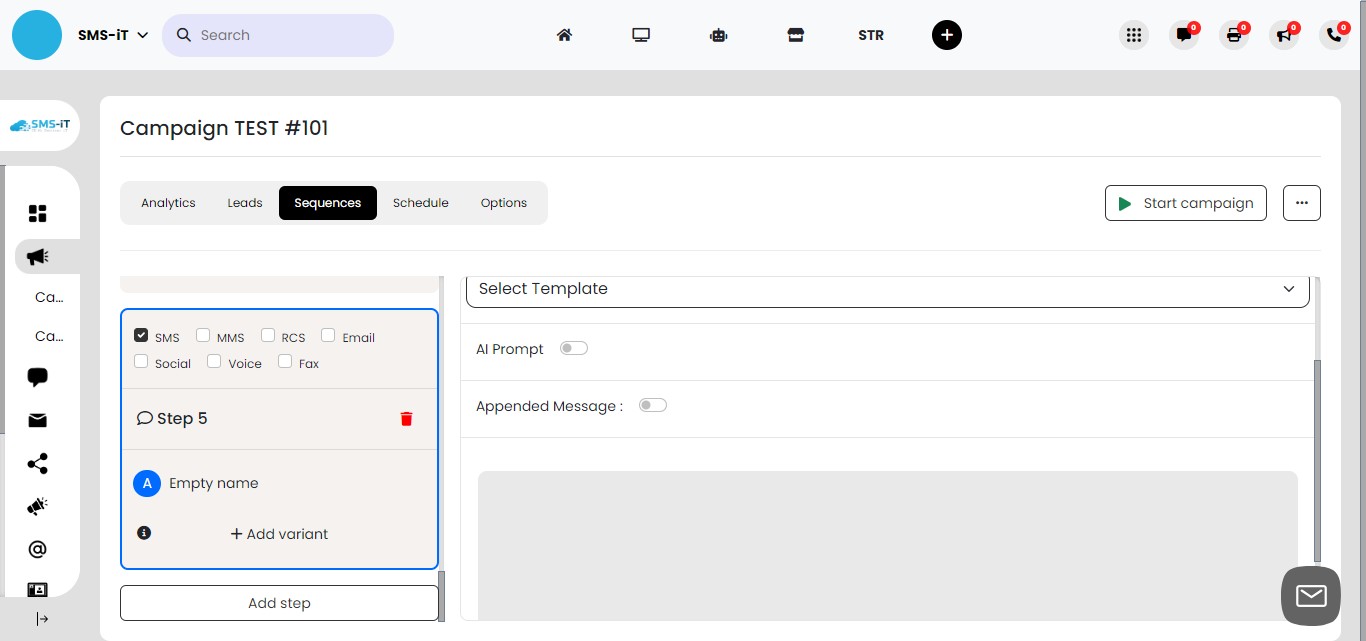
Adding Multiple Steps to Your Sequence
Click on "Add step" to begin creating additional steps in your sequence. We'll add a total of 5 steps to match our workflow diagram. Each step represents a different action or decision point in your campaign. After adding all steps, scroll back up to Step 1 to continue configuring the sequence.
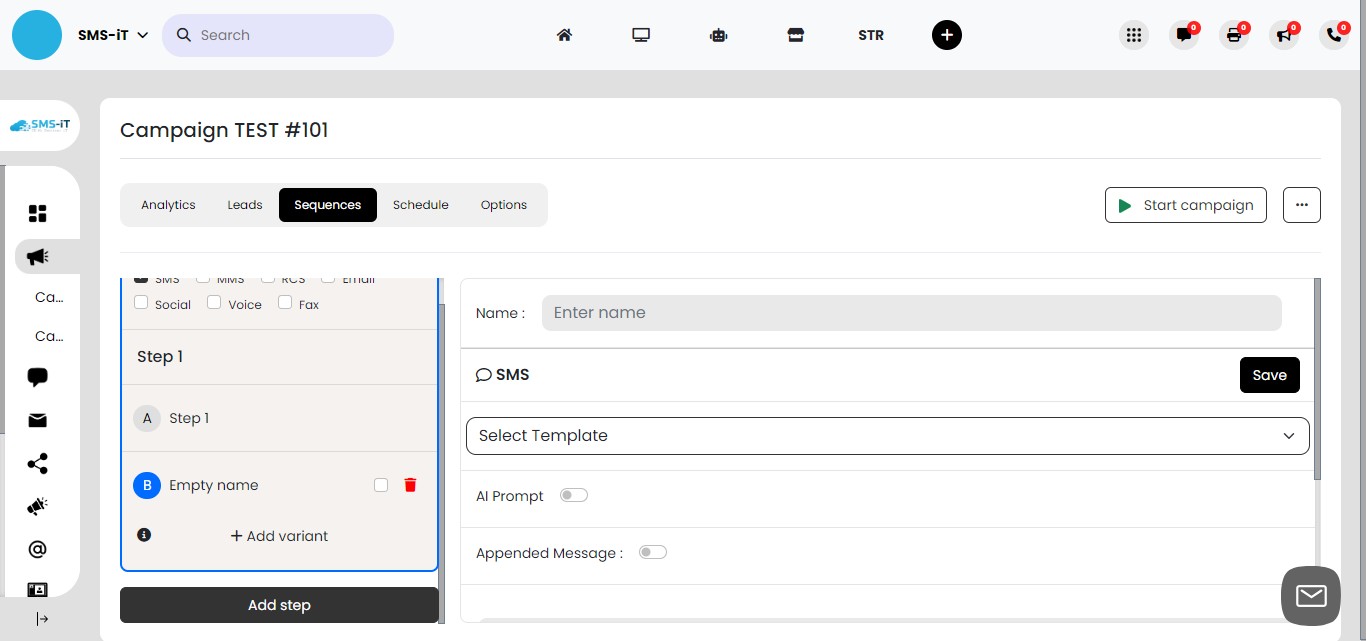
We've added 5 steps, now scroll up to step 1
Understanding Sequence Variants
When you add steps to your sequence, the system automatically creates variants. Variants allow you to create different paths based on recipient actions. These paths help personalize the campaign experience for each contact. We'll configure these variants in the following steps.

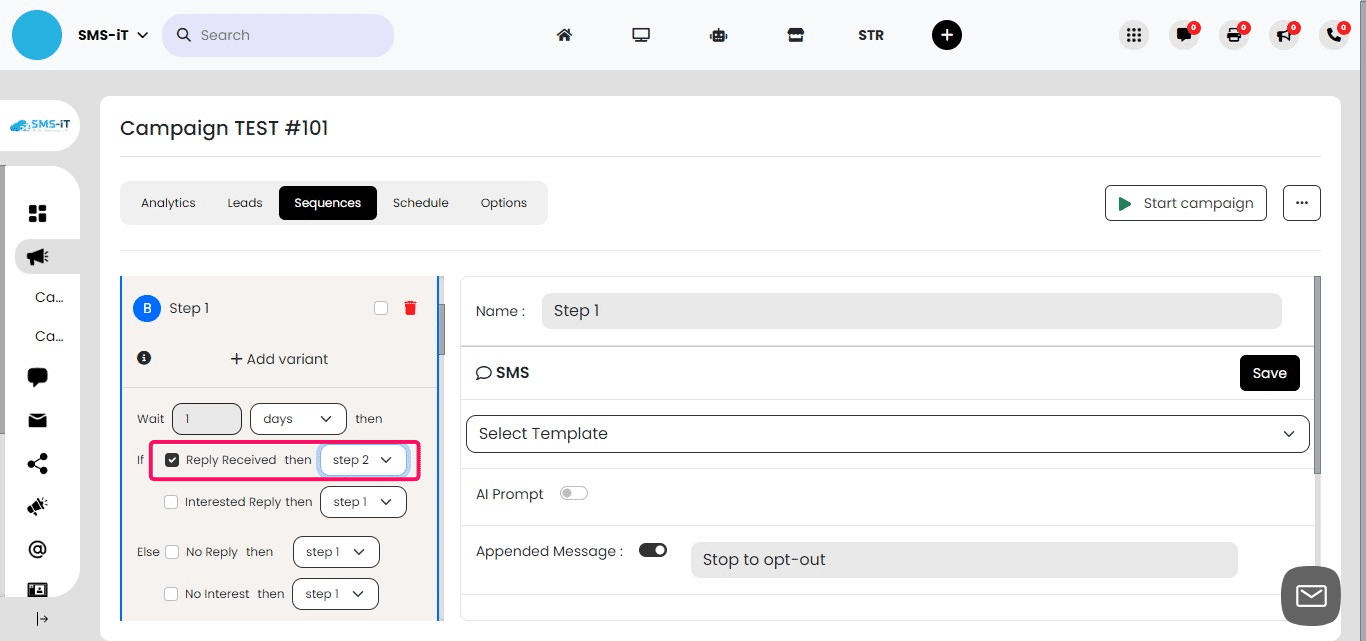
Configuring Step 1 Variants
For Step 1, we'll set up two variants based on recipient response: a. If a contact responds to the text, they'll proceed to Step 2. b. If there's no response, they'll be directed to Step 3. This branching logic allows for a more personalized campaign experience.
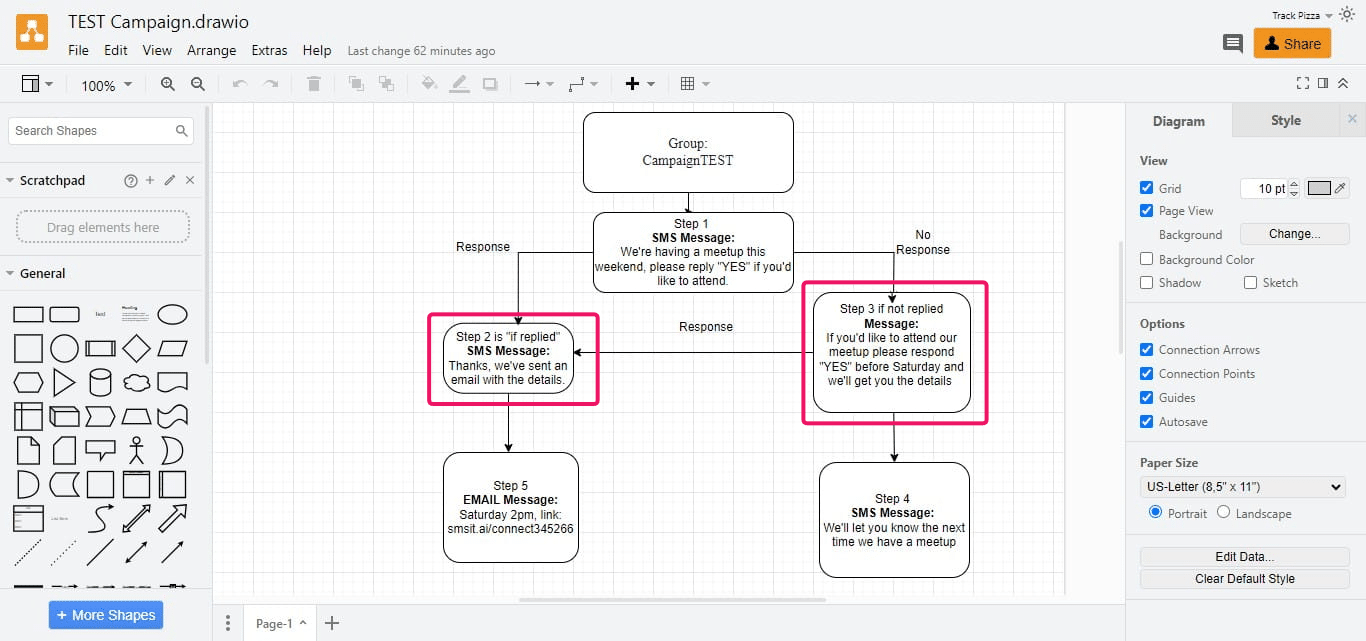
Setting the Wait Time for Step 1
The "Wait" setting determines how long the system waits for a response before proceeding. For Step 1, we'll set the wait time to 1 day. If there's no response after 1 day, the contact will be sent to Step 3. Immediate responses will be handled differently, as explained in the next slide.

Handling Immediate Responses
If a contact replies to your message at any point during the wait time: a. They will be immediately sent to Step 2. b. This ensures prompt follow-up for engaged contacts. Set the "If reply" option to direct to Step 2.
Handling No Response Scenario If no reply is received after the 1-day wait period: a. The contact will be automatically directed to Step 3. b. Set the "If no reply" option to direct to Step 3. This ensures that non-responsive contacts receive a follow-up message.
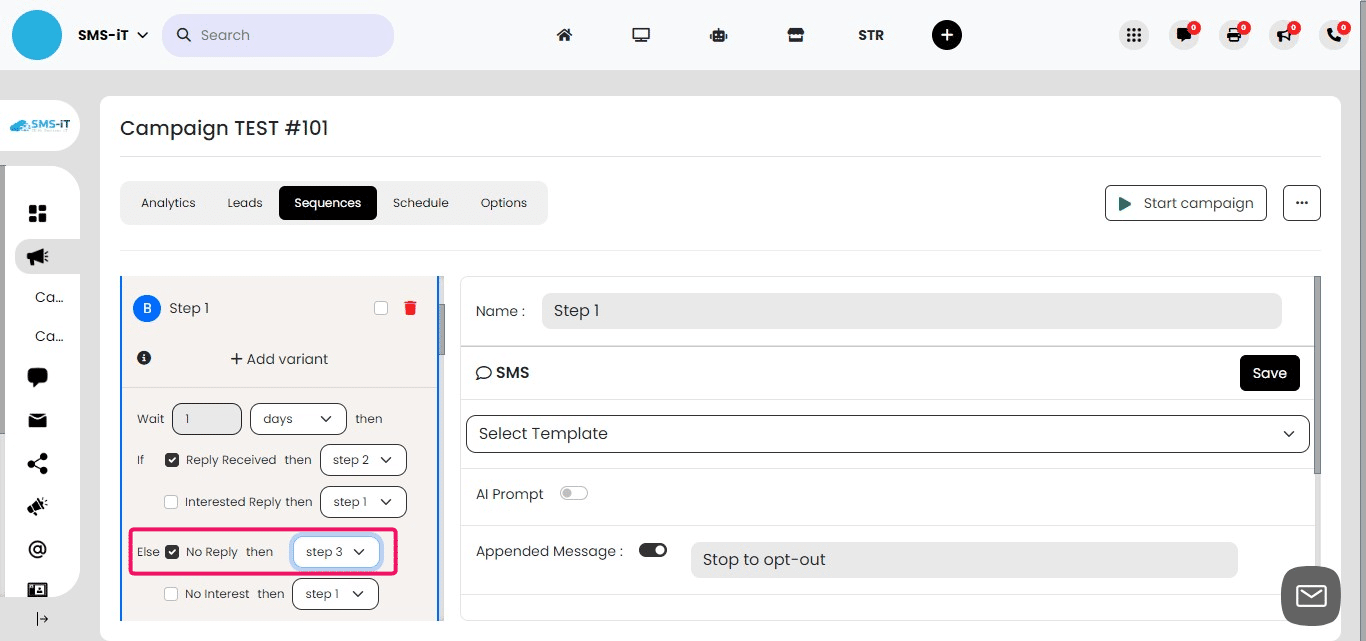
Step 1 Recap: Wait Time and Response Handling
Wait time: Set to 1 day Response scenarios: a. Immediate reply: Contact sent to Step 2 b. Reply within 1 day: Contact sent to Step 2 c. No reply after 1 day: Contact sent to Step 3 This setup allows for timely follow-up while giving contacts a reasonable response window.

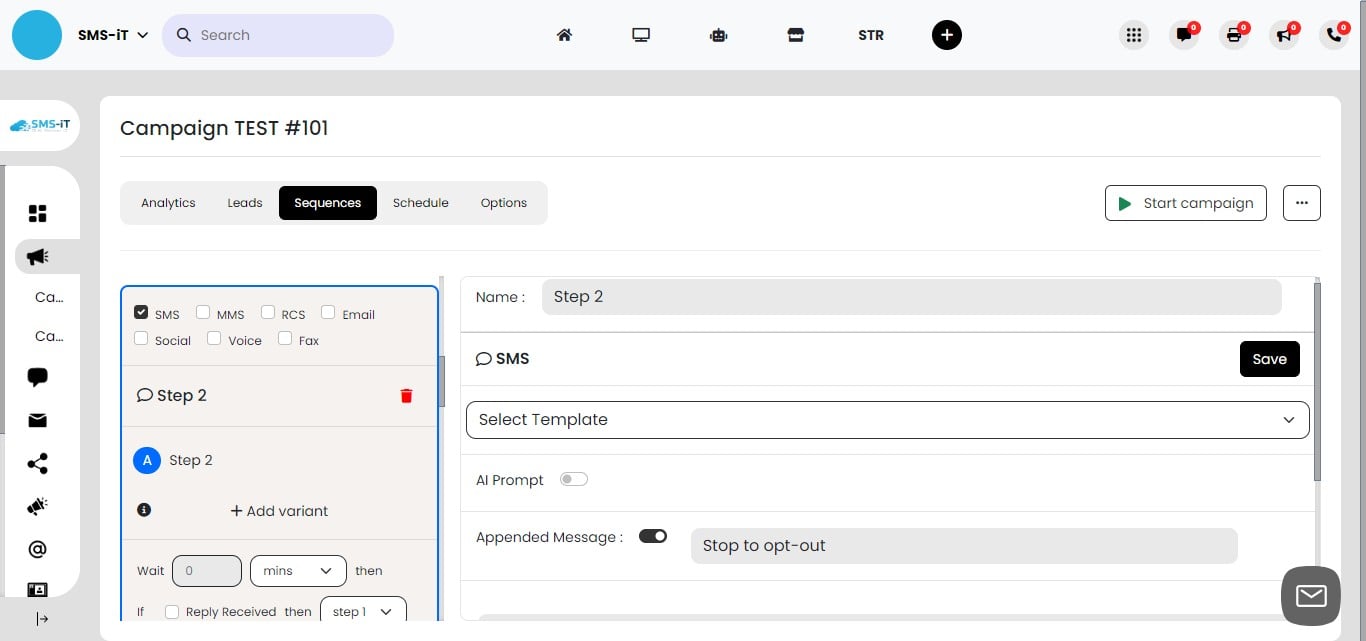
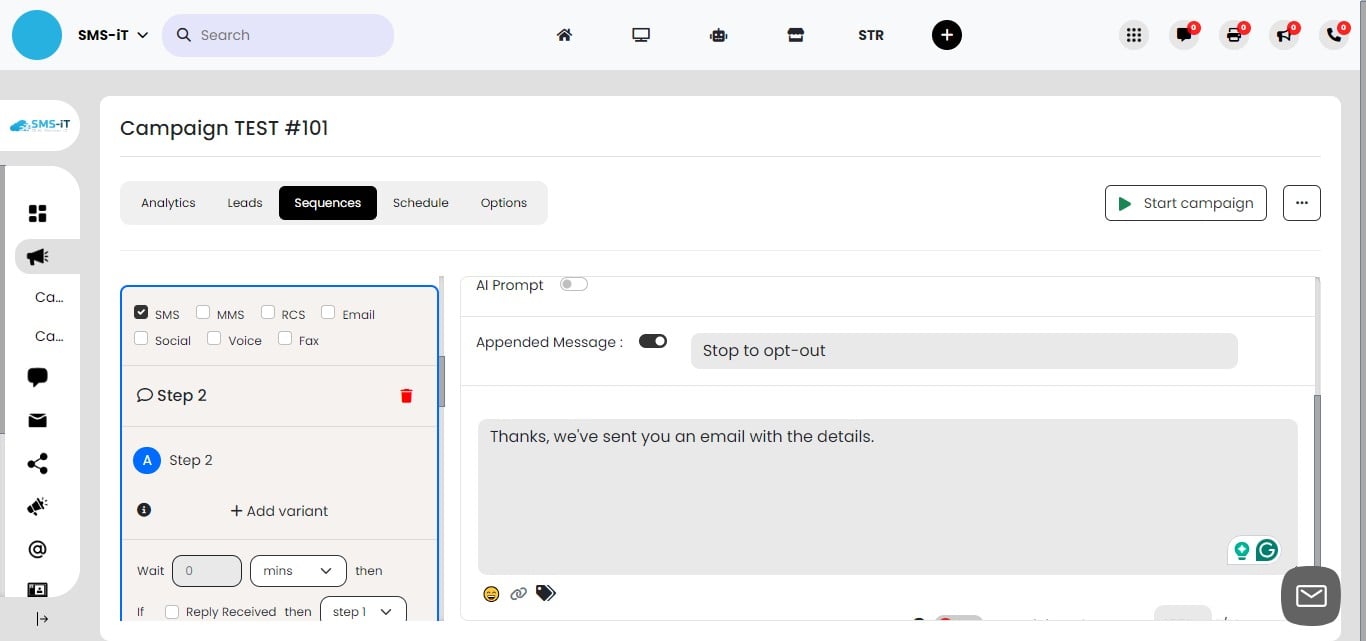
Step 2
Configuring Step 2 and Step 5
Focus on Step 2: Immediate response handling Step 5: Final step for contacts who replied These steps form the positive engagement path of your workflow
Setting Up Step 2
Enter a name for Step 2 (e.g., "Positive Response Follow-up") Decide on the opt-out message: a. Toggle on to include an opt-out option b. Keep off if already included in Step 1 or not required Consider your audience and compliance requirements when deciding on the opt-out message
Crafting Your Response Message for Step 2
Include relevant information or next steps based on their engagement Ensure the message aligns with the overall goal of your campaign
Setting Wait Time for Step 2
Set the "Wait" time to 0 days Purpose: Ensure immediate progression to the next step This setting allows for quick follow-up, maintaining engagement momentum
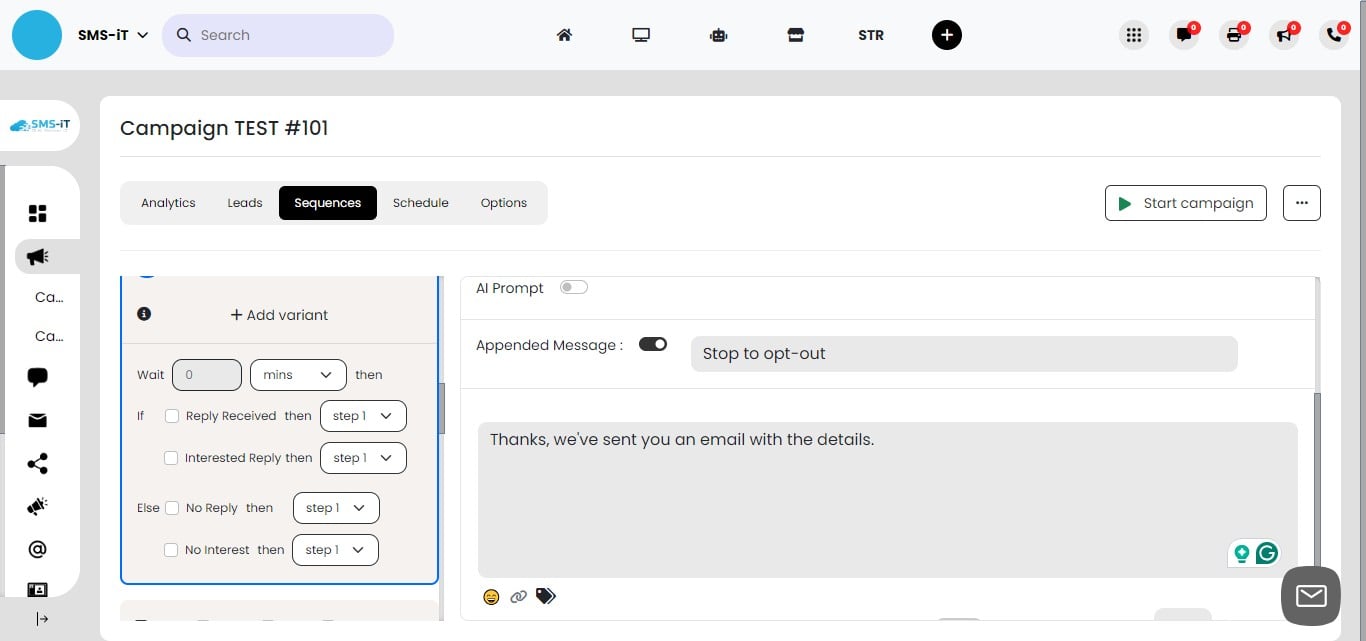
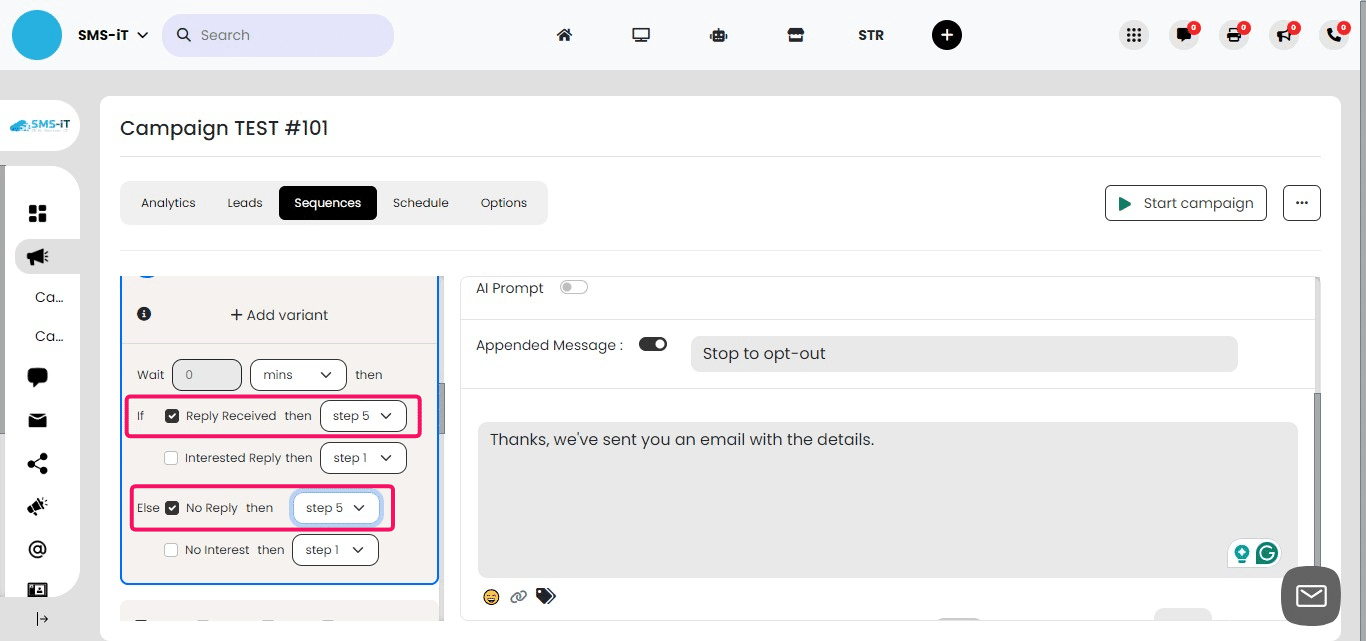
Configuring Step 2 Response Handling
Set both "If reply" and "If no reply" options to go to Step 5 Rationale: Ensures progression to Step 5 regardless of secondary response (e.g. Thank you) Step 5 (email with meetup link) will be triggered immediately due to zero wait time Note: Consider using your domain for links if you use just SMS to avoid potential blocking by networks
Step 5
Finalizing the Workflow: Skipping to Step 5 1. Workflow progression: We're now moving directly to Step 5 in our sequence. 2. Purpose: This step will complete the current leg of the workflow.
Setting Up Step 5: Email Communication
For Step 5, select "Email" as the communication channel This change allows you to send more detailed information or links Emails are often better for sending links that might be blocked in SMS
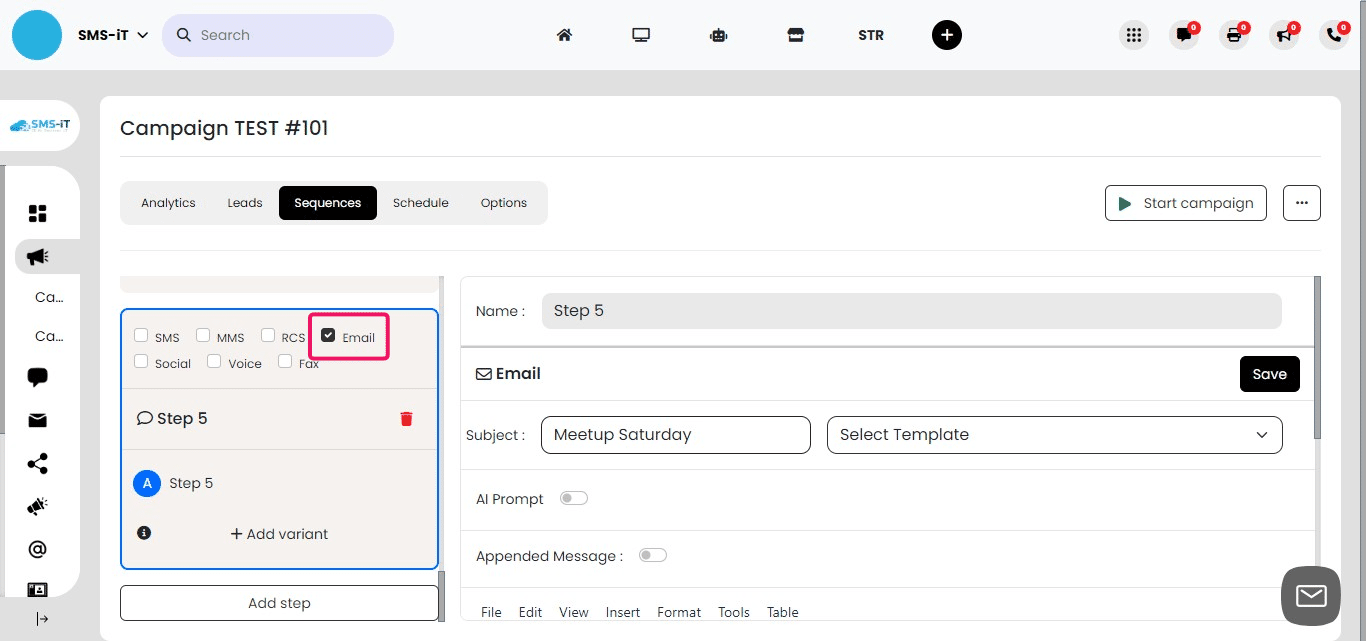
Configuring Step 5 Email Details 1. Name the step (e.g., "Meetup Link Email") 2. Create a clear, engaging subject line for the email 3. Ensure the subject line is relevant to the meetup and entices the recipient to open the email
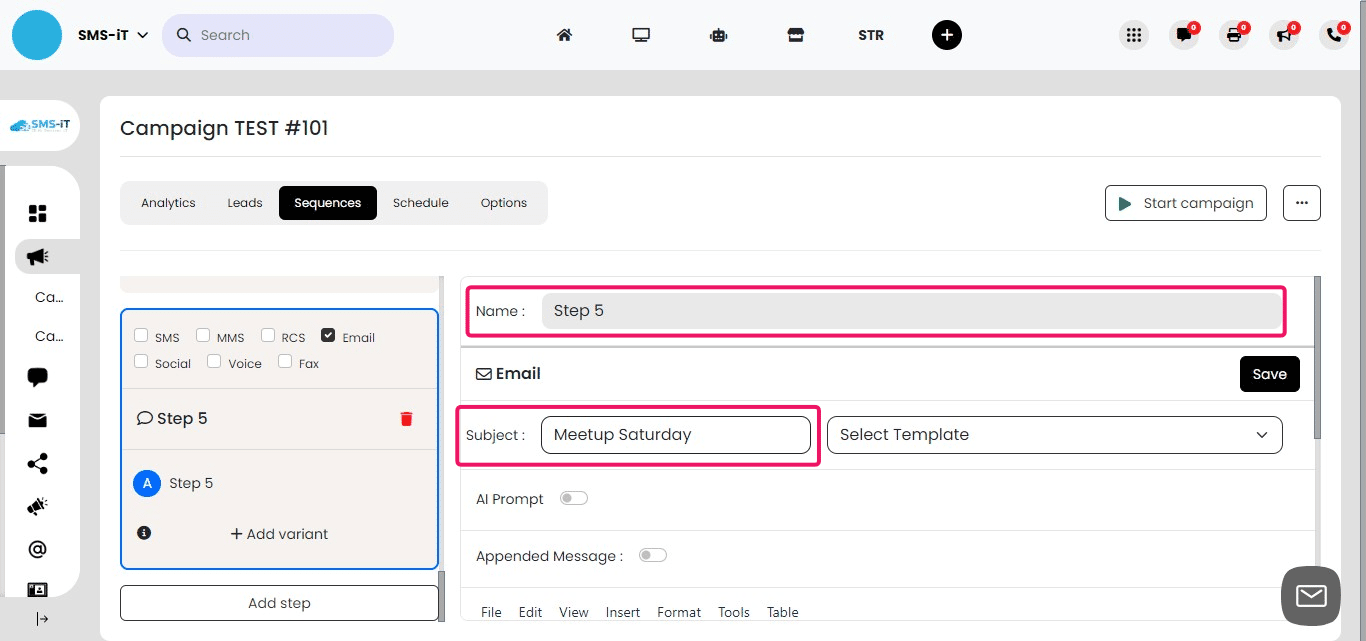
Composing the Email Body for Step 5
Draft the main content of your email
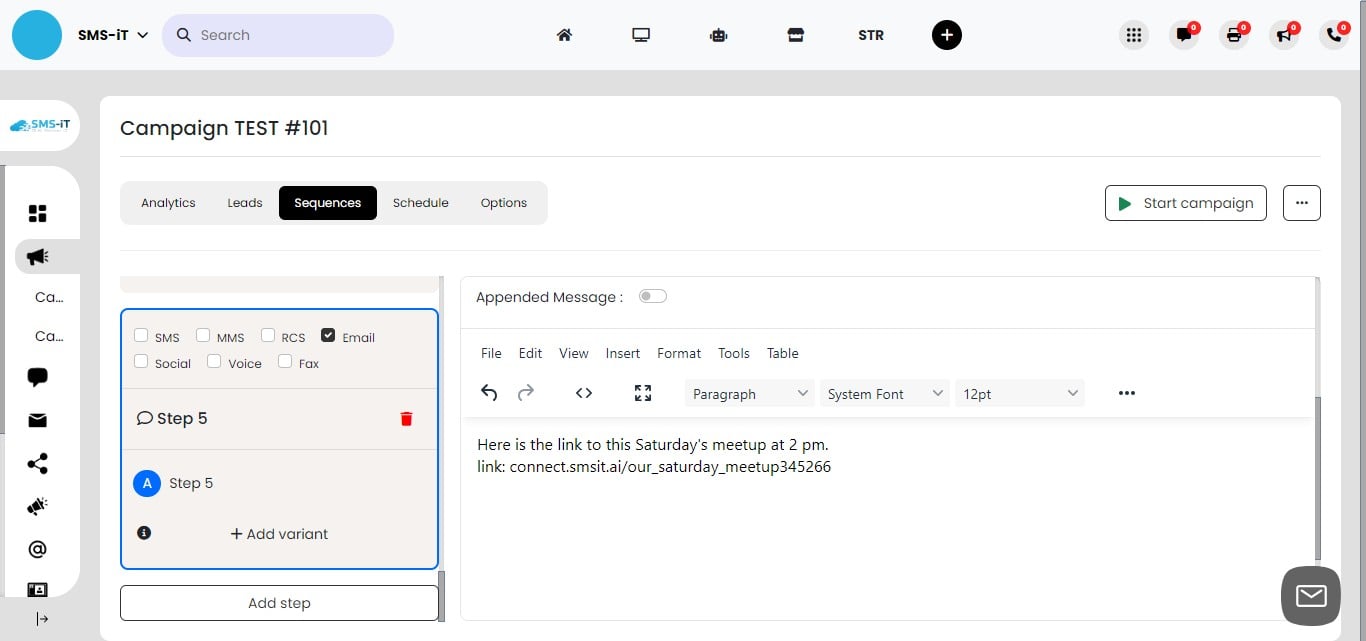
Finalizing Step 5 and Positive Response Workflow
Click "Save" to store your email content and settings This completes the setup for Step 5 The positive response workflow is now complete: a. Initial text (Step 1) → Positive response → Immediate reply (Step 2) → Meetup link email (Step 5) This path ensures engaged contacts receive prompt and relevant follow-up

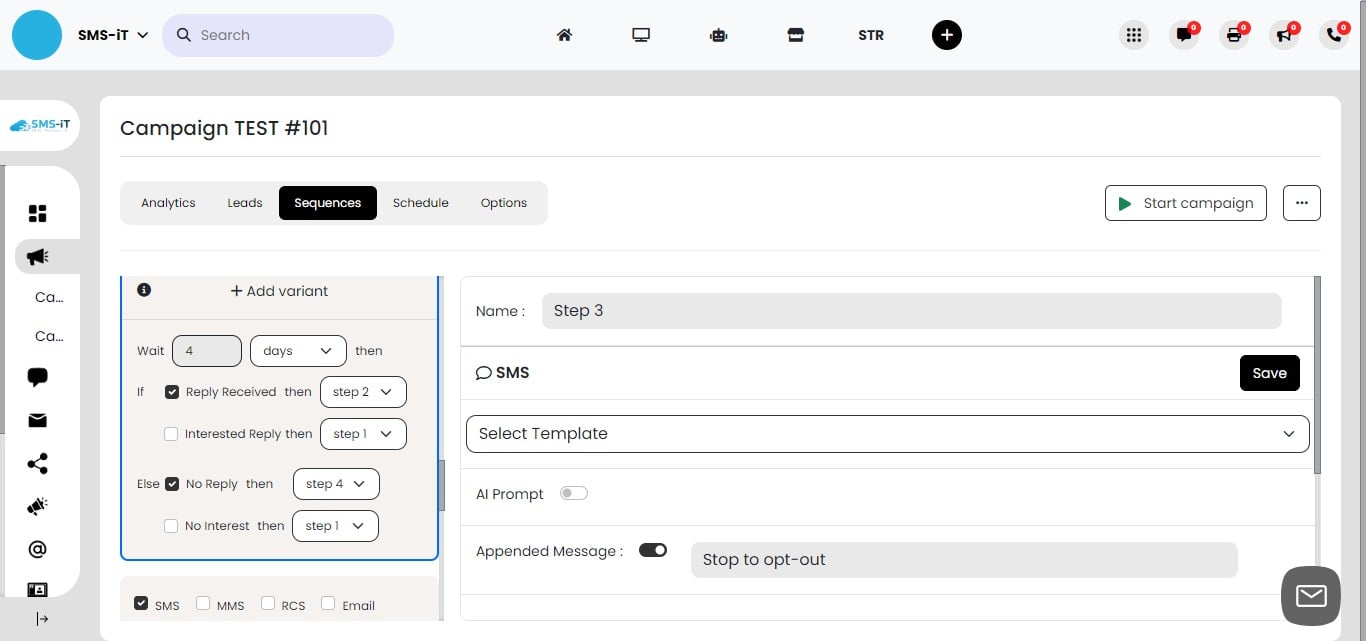
Step 3
Setting Up the No-Response Path
Review the workflow diagram to understand the no-response scenario. We'll now configure Steps 3 and 4 to handle contacts who didn't respond initially. This path ensures follow-up with less engaged contacts.
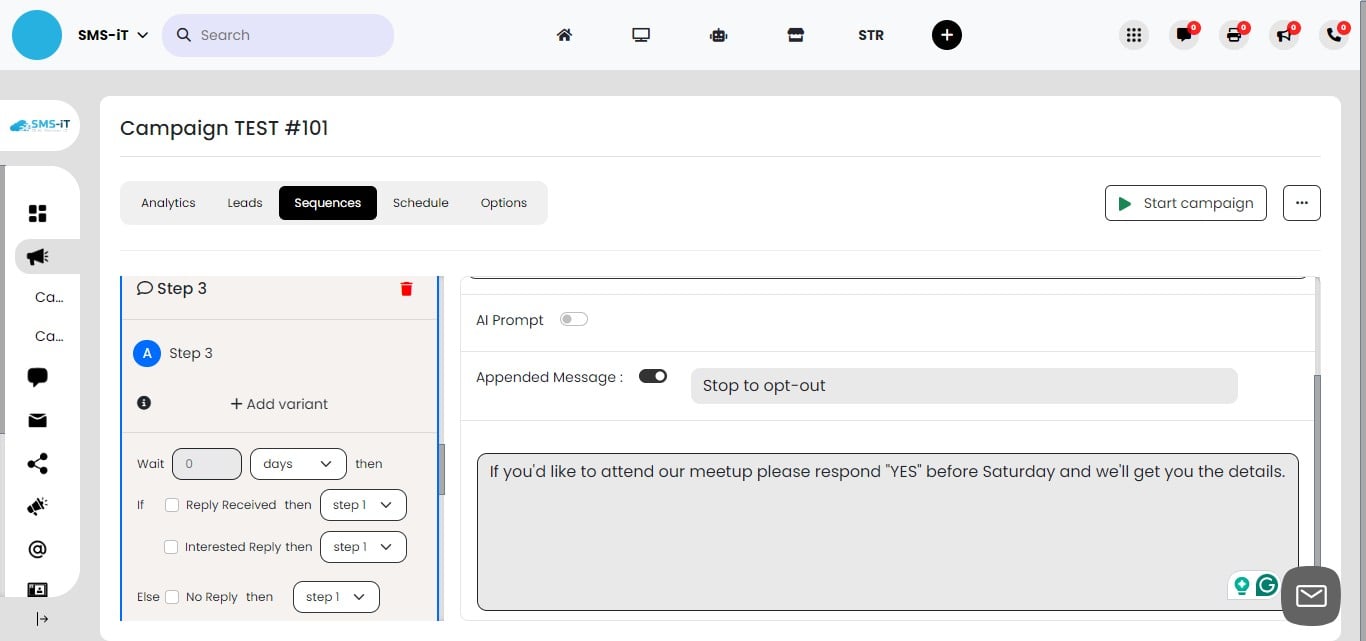
Configuring Step 3
Enter a name for Step 3 (e.g., "Follow-up for Non-Responders"). Decide whether to include an appended opt-out message

Crafting the Follow-up Message for Step 3
Compose a follow-up message for contacts who didn't respond initially. Key elements to include: a. Gentle reminder of the initial message. b. Restate the value proposition or offer. c. Encourage response with a clear call-to-action.
Click on "Save"
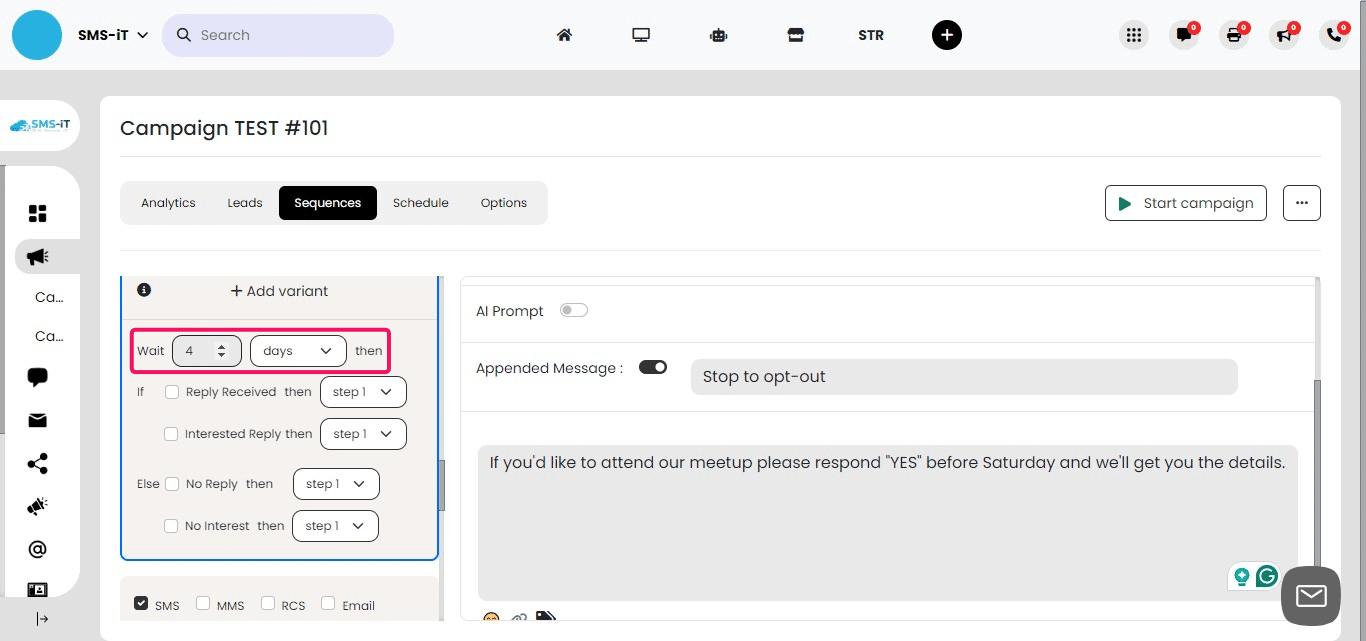
Setting Wait Time for Step 3
Set the "Wait" time to 4 days. Rationale: This timing allows: a. Sufficient time for the contact to respond. b. Sends the final message after the meetup. Adjust this timing based on your specific campaign needs and timeline.
Configuring Response Handling for Step 3
Set "If reply": a. Direct the contact to Step 2 (positive response handling). b. From Step 2, they'll proceed to Step 5 (meetup link email). This ensures that late responders still receive the meetup information.

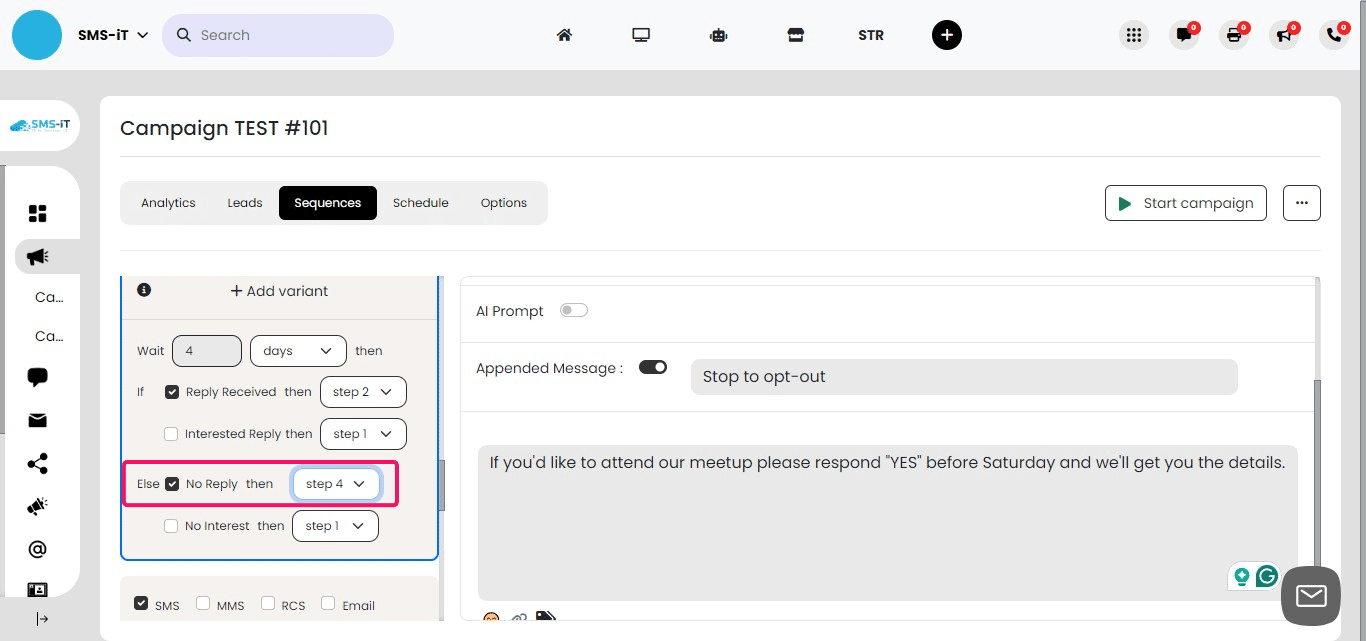
Handling No Response in Step 3
Set "If no reply": a. Direct the contact to Step 4. This final step handles contacts who haven't engaged throughout the campaign.
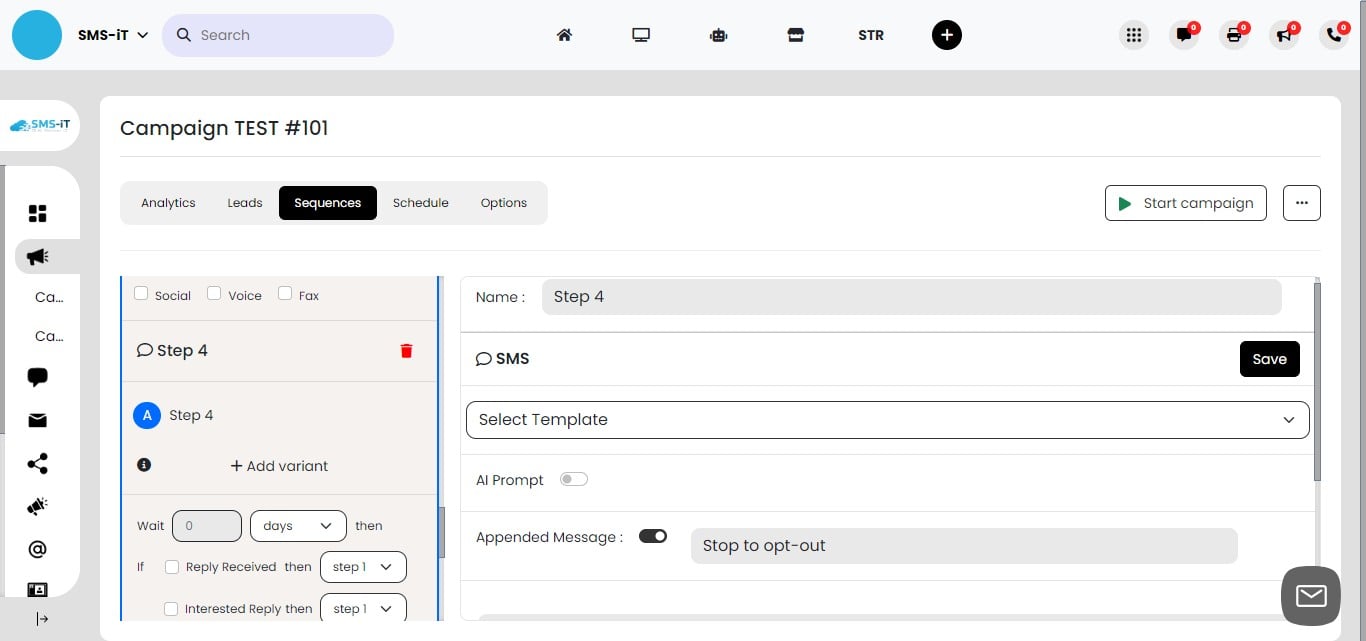
Step 4
Understanding Step 4: Final Follow-up
Step 4 serves as the termination point for non-responsive contacts. This step provides a final opportunity to engage before concluding the campaign sequence.
Setting Up Step 4
Enter a name for Step 4 (e.g., "Final Outreach"). Decide on the appended message: a. Toggle on to include a final opt-out reminder. b. Toggle off if not necessary at this stage. Consider the overall campaign context when making this decision.
Crafting the Final Message for Step 4
Compose your final outreach message: a. Acknowledge the lack of previous response. b. Provide a brief, final recap of your offer or information. c. Include a clear, low-pressure call-to-action. d. Consider adding an option for future contact if appropriate.
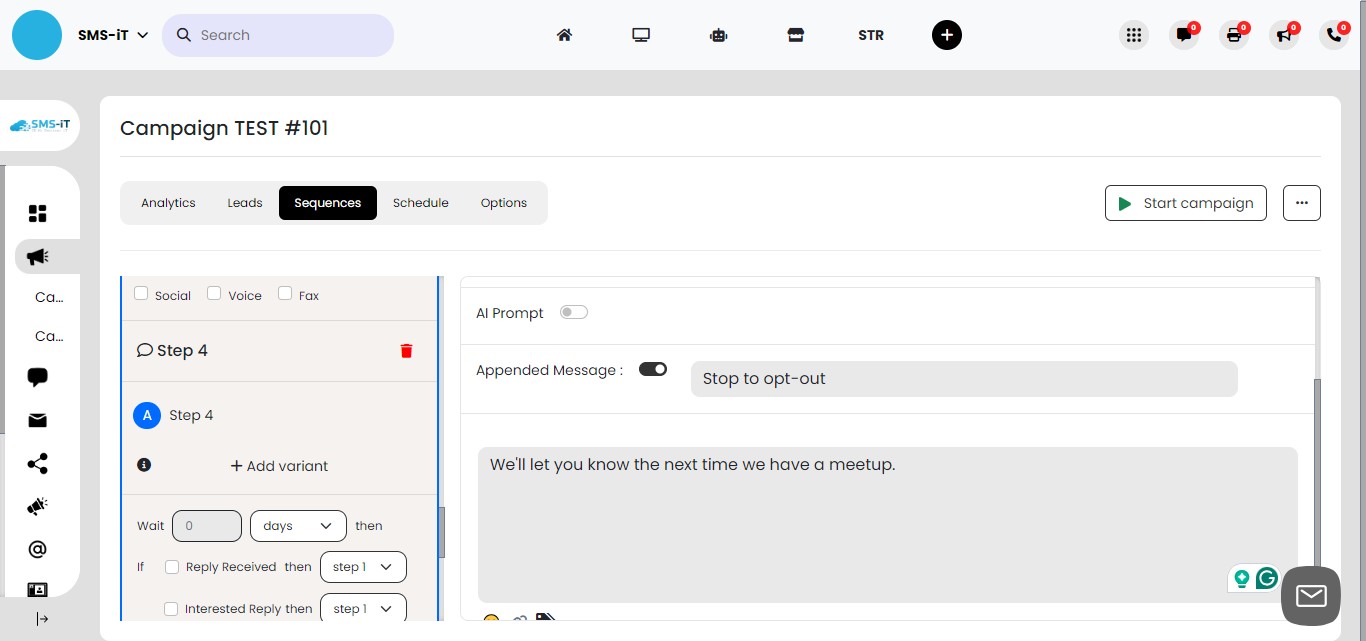
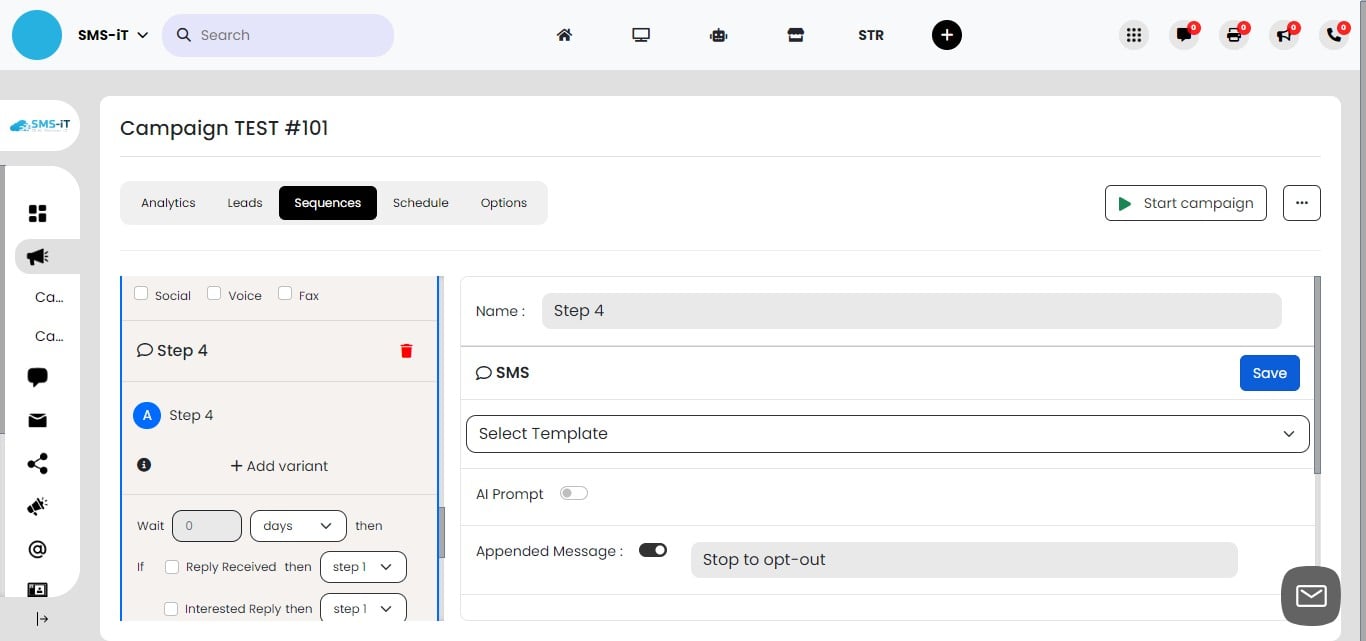
Click on "Save"

Finalizing Step 4: Campaign Termination Point
As this is the final step, there are no further variants to configure. After this message, the contact's journey in this campaign ends. Consider adding these contacts to a different campaign or follow-up list for future outreach.
Expanding Your Campaign Workflow This example demonstrates a basic 5-step workflow, but SMS-iT's campaign feature is highly flexible:
Add more steps for complex sequences. Incorporate additional touchpoints, such as: a. Event reminders (e.g., 1 day before, 1 hour before). b. Post-event follow-ups. c. Feedback requests. Utilize multiple communication channels (SMS, email, voice) within one campaign. Create branching paths based on specific user actions or responses.
Remember, the SMS-iT campaign section can accommodate a wide range of sophisticated automation strategies to suit your unique business needs.
Section 4: Schedule
Scheduling Your Campaign
Date Range Selection:
Set a start date for your campaign launch. Choose an end date to automatically conclude the campaign.
Send Time Customization:
Specify optimal times for sending messages within your campaign. Tailor send times to maximize engagement based on your audience's habits.
Benefits of Scheduling:
Ensure consistent timing across your campaign. Align message delivery with your overall marketing strategy. Respect recipient time zones and preferences.
Best Practices: Consider industry-specific timing (e.g., B2B vs B2C). Test different send times to optimize open and response rates. Align campaign duration with your sales cycle or promotional period.
Flexibility:
Adjust dates and times as needed throughout the campaign. Set different send times for various stages of your sequence if required.
By carefully selecting start and end dates along with strategic send times, you can enhance the effectiveness of your campaign and improve recipient engagement.
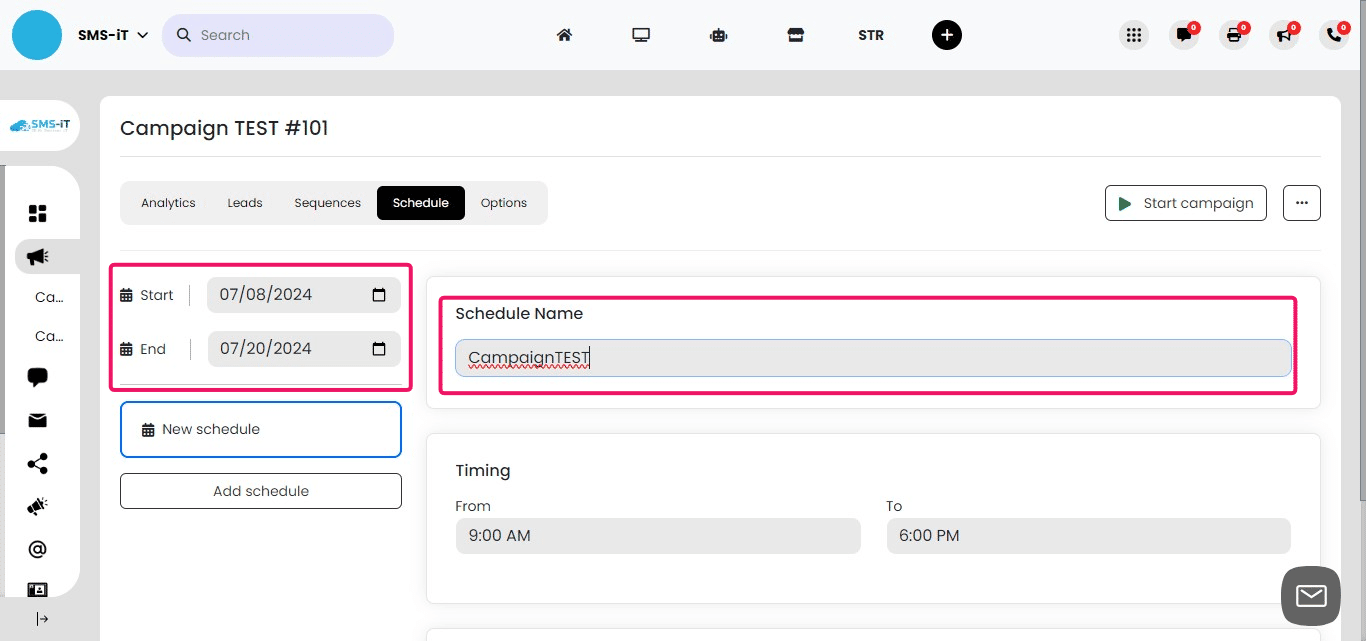
Click on "Schedule"
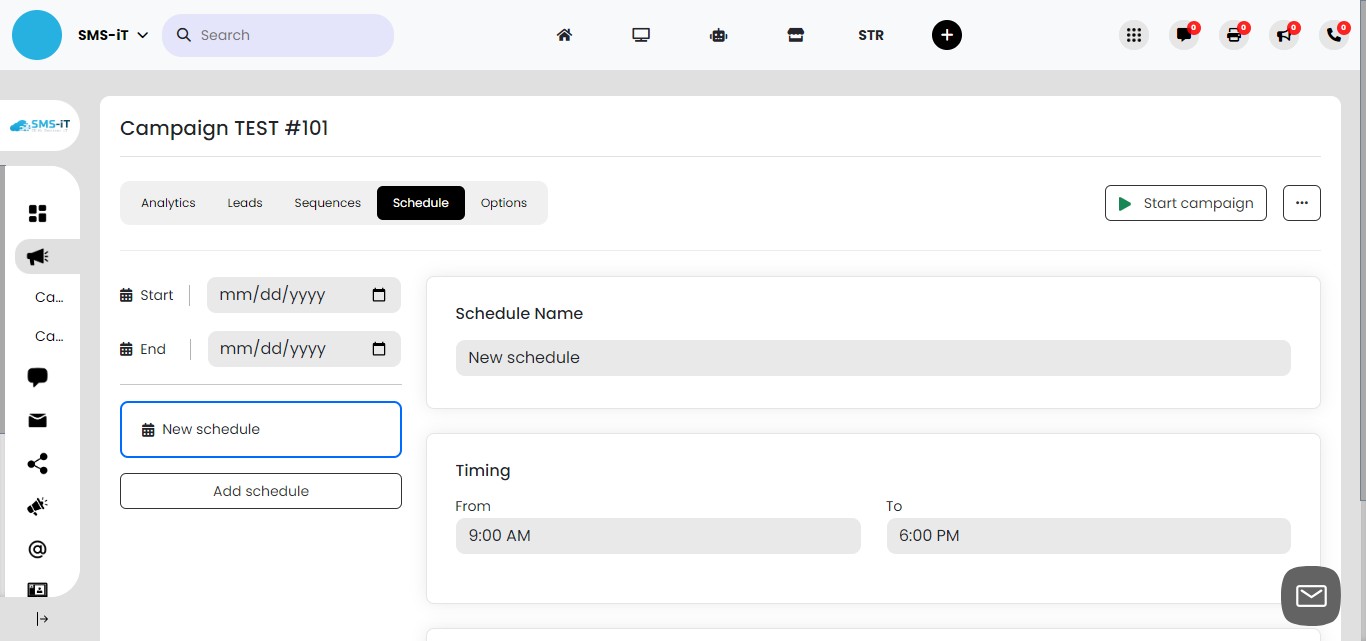
Setting Up Your Campaign Schedule 1. Enter a descriptive name for your schedule (e.g., "July 2024 Outreach"). Select the campaign start date: 2. Choose a date that aligns with your marketing strategy. 3. Select the campaign end date: Consider the length of your sequence and any follow-up periods.
- Ensure the date range covers the entire intended campaign duration.
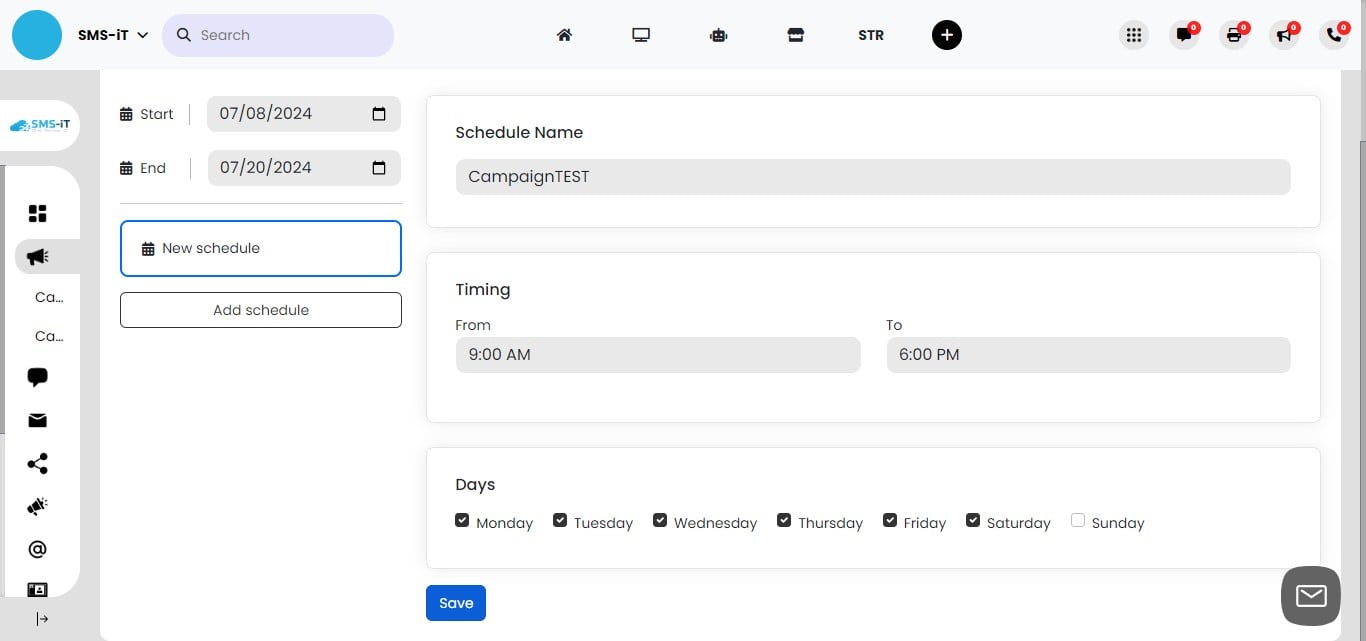
Configuring Message Timing and Days 1. Set the time range for sending messages: Choose appropriate hours (e.g., 9 AM to 7 PM) to respect recipients' schedules. 2. Select the days of the week for message delivery: Consider your audience's preferences and industry norms. You may choose to exclude weekends or specific days. 3. This scheduling ensures your messages are sent at optimal times for engagement.
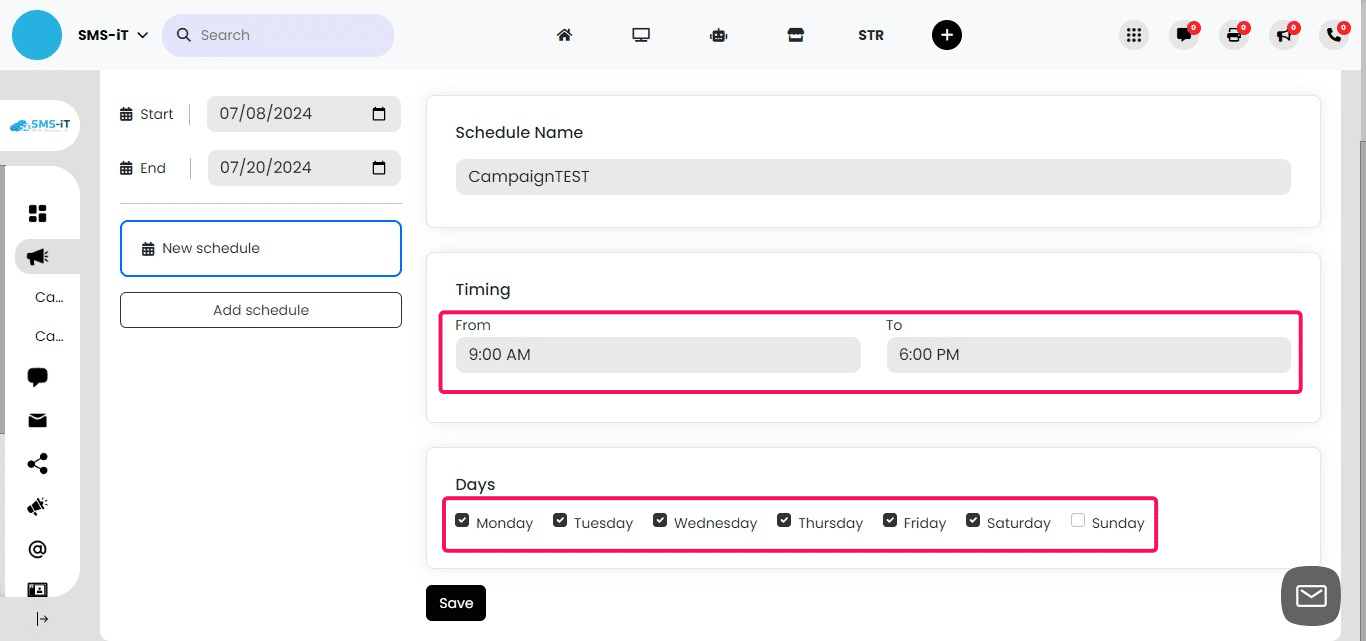
Click on "Save"
Section 5: Options
SMS-iT CRM empowers you to customize a wide range of options across all your communication channels. Whether you're using SMS, email, voice calls, or social media messaging, you can fine-tune settings such as sender numbers, delivery speeds, authentication protocols, and content formats. These options allow you to optimize performance, ensure compliance, and tailor your outreach strategy for each channel. By adjusting these settings, you can create highly targeted campaigns that respect recipient preferences and regulatory requirements, ultimately enhancing the effectiveness of your multi-channel communication efforts.
SMS Text Options Overview SMS remains a highly effective communication channel. Here are key options to configure for your SMS campaigns: - Sender number selection - Link tracking - Daily message limits -Advanced sending patterns
These options allow you to optimize your SMS strategy for maximum impact and compliance.
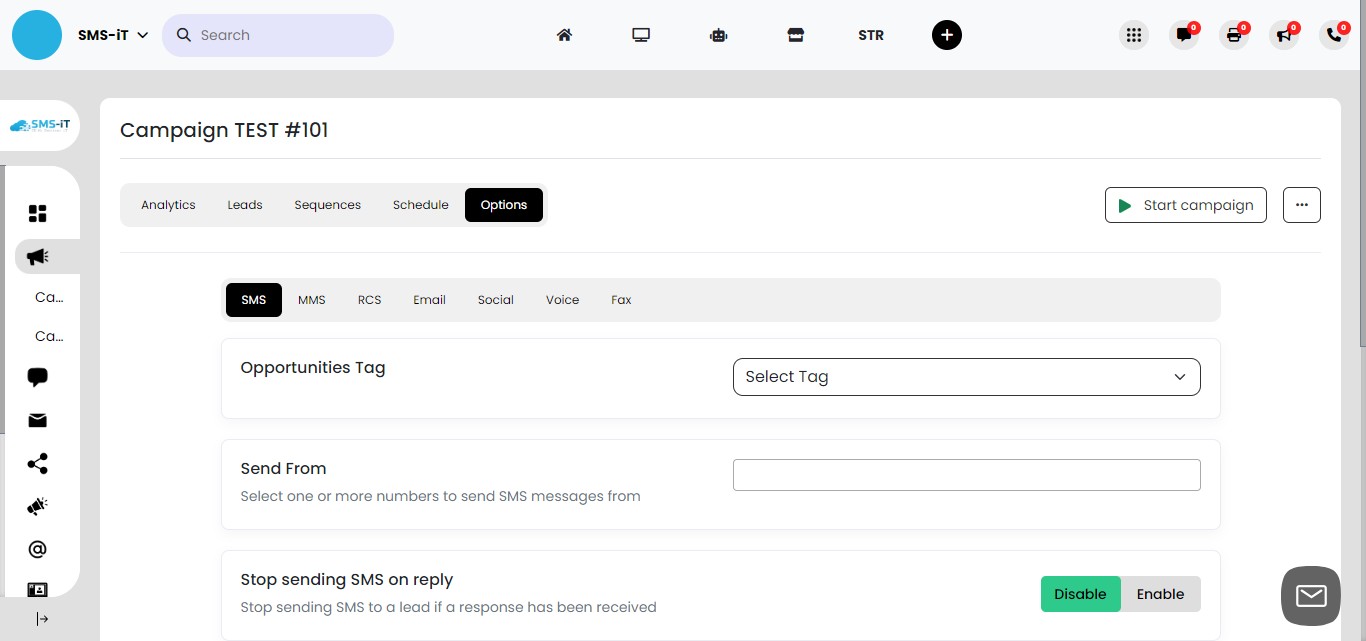
Choosing Your SMS Sender Number 1. Click on the dropdown menu labeled "Send From". 2. Select the appropriate number for your campaign: This could be a gateway number or a SIM card number. 3. The chosen number will appear as the sender for all SMS messages in this campaign. 4. Ensure the selected number complies with local regulations and best practices.
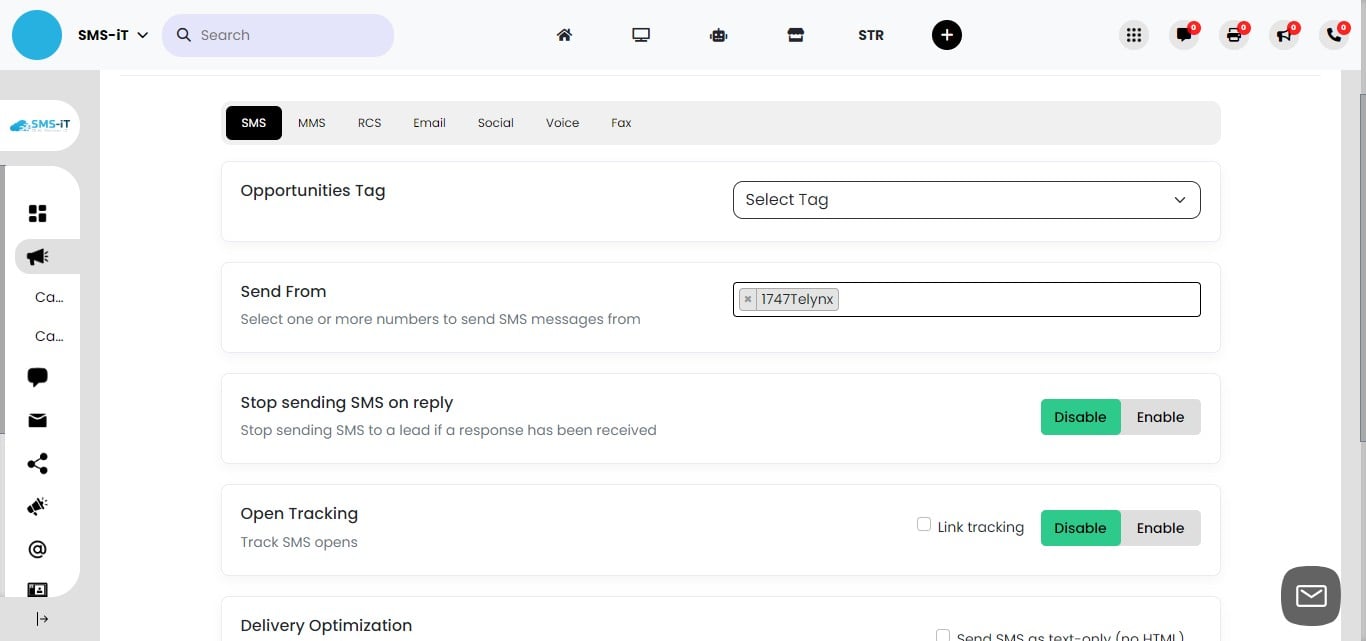
Enabling Link Tracking for SMS 1. If your SMS messages contain links: Toggle on the link tracking feature. 2. Prerequisite: Ensure you've set up the link in the Link-iT system. 3. Benefits of link tracking: Measure click-through rates. Gain insights into recipient engagement. Optimize your messaging based on link performance. 4. Note: This feature only works for links previously configured in Link-iT.
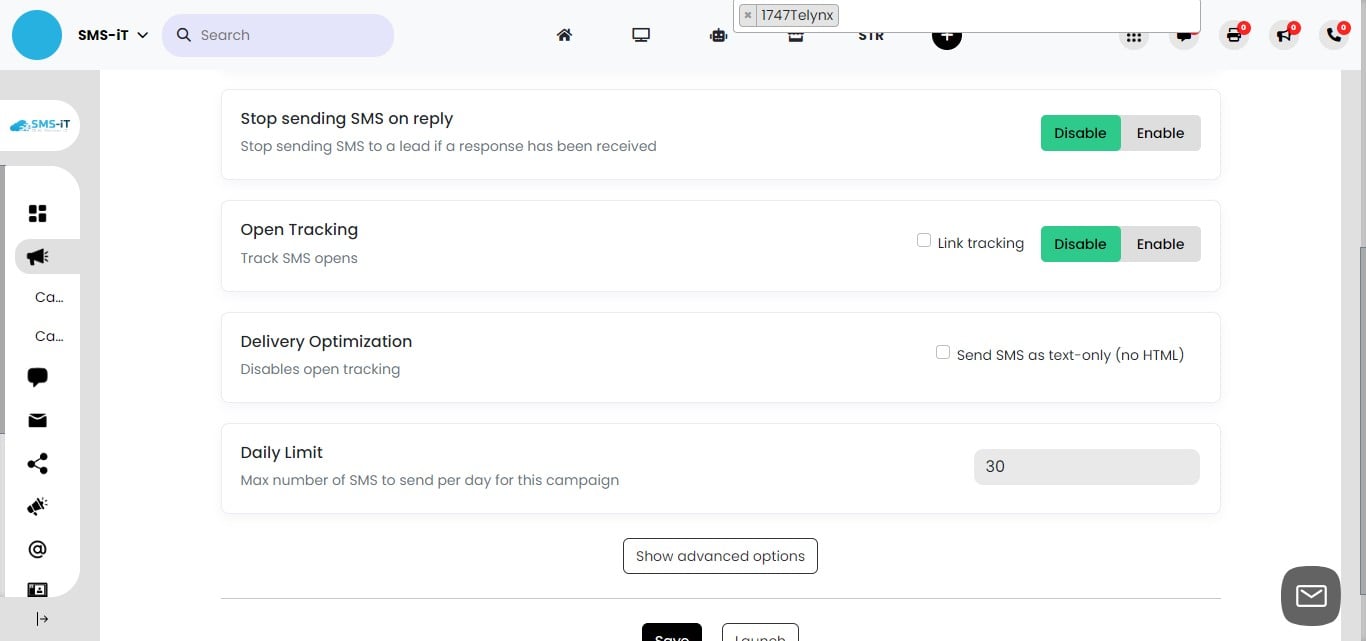
Setting Daily SMS Sending Limits 1. Locate the "Max number of SMS to send per day for this campaign" option. 2. Enter a numerical value to set your daily sending limit. 3. Consider factors when setting this limit: Your SMS plan capacity. Regulatory requirements. Recipient engagement patterns. 4. This limit helps prevent overwhelming recipients and ensures compliance with SMS regulations.
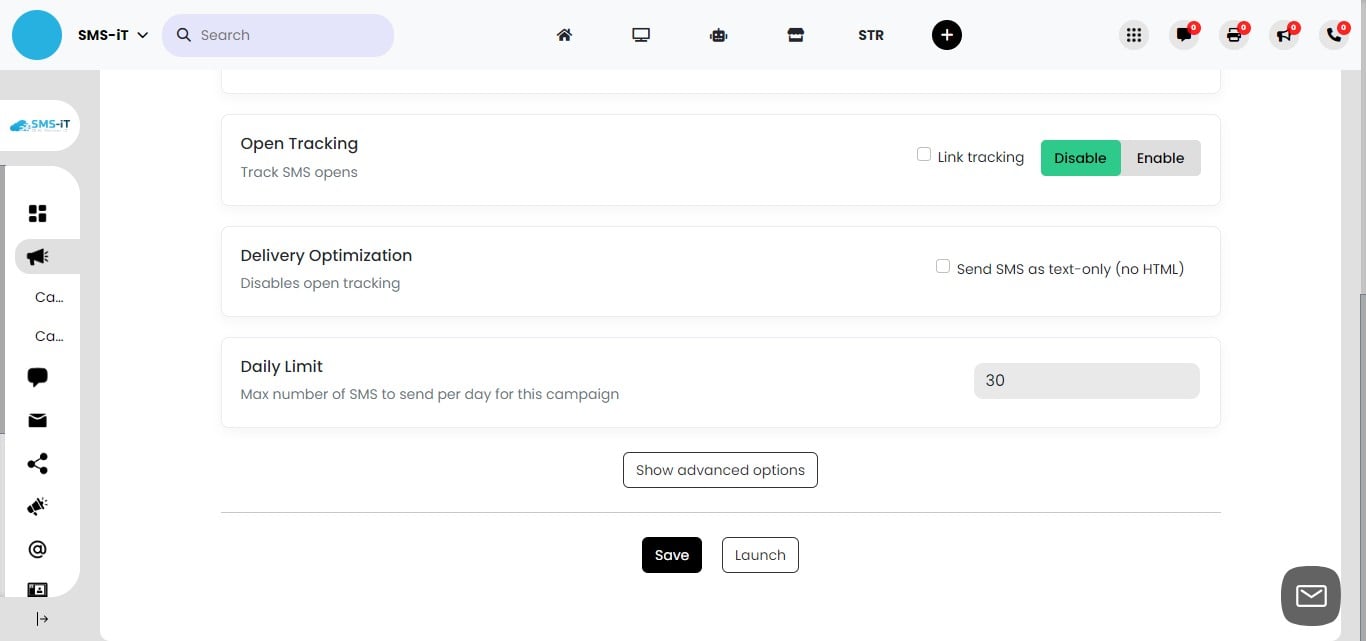
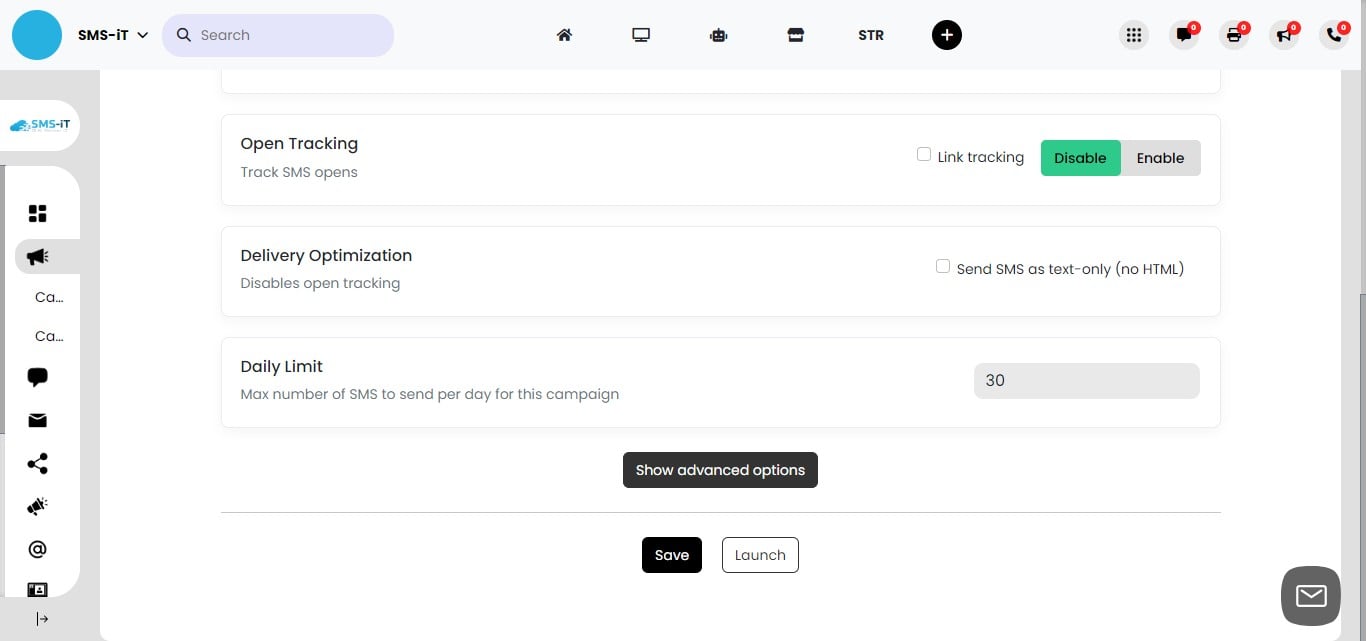
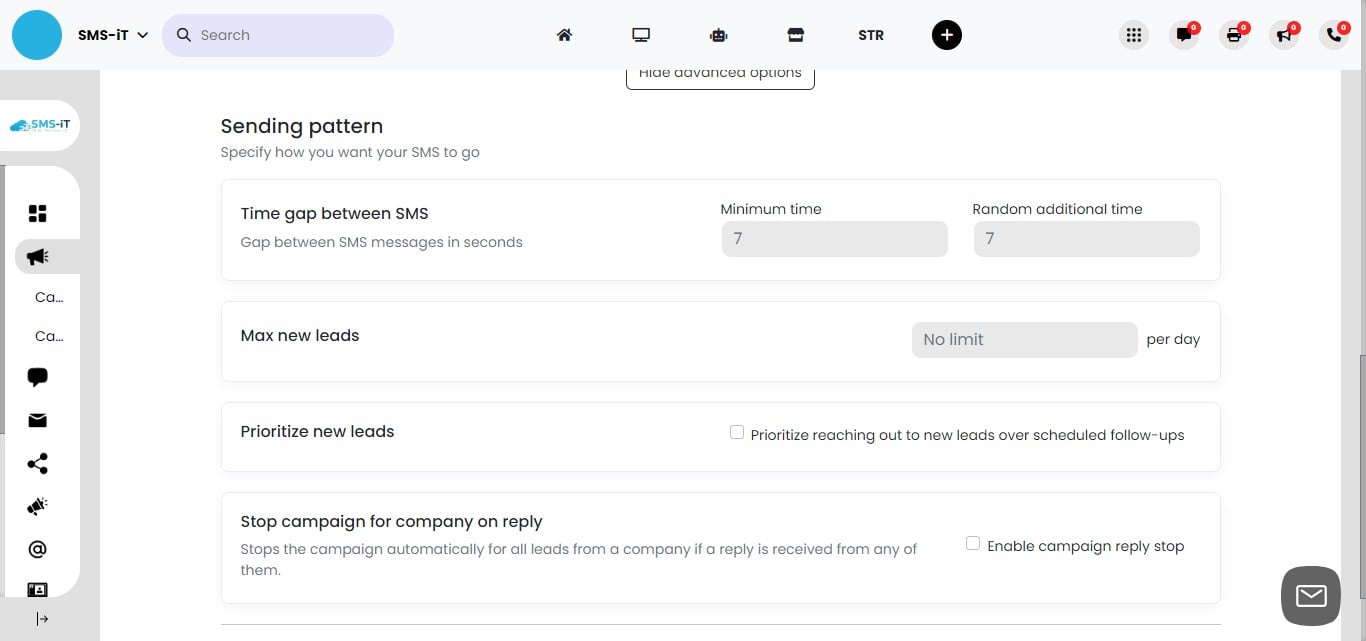
Click on "Show advanced options"
Configuring Advanced SMS Sending Patterns 1. Set the minimum number of SMS to send per minute. 2. Configure a randomizer for additional seconds between messages: Example: Messages might send at intervals of 10, 14, or 12 seconds. 3. This randomized pattern is particularly useful when using SIM cards for sending. 4. Benefits of randomized sending: Mimics natural sending patterns. May improve delivery rates. Helps avoid carrier throttling or blocking.
Finalizing Campaign Communication Channels 1. Repeat the configuration process for each communication channel in your campaign: Email settings Voice call options Social media message configurations 2. Ensure each channel is optimized for your campaign goals. 3. Review all settings for consistency and alignment with your overall strategy. 4. Test each channel before launching the full campaign.
Closing Statement:
Congratulations! You've now completed the comprehensive tutorial on creating and managing campaigns with SMS-iT CRM. This powerful tool empowers you to craft sophisticated, multi-channel communication strategies that can significantly enhance your outreach efforts.
Key takeaways: 1. SMS-iT CRM offers flexible campaign creation across various channels (SMS, email, voice, and social media). 2. The platform allows for detailed customization of each step in your communication workflow. 3. Advanced features like lead management, sequence building, and scheduling provide robust control over your campaigns. 4. Analytics and optimization tools help you refine your strategies for maximum impact. Remember, the true power of SMS-iT CRM lies in its adaptability to your unique business needs. Whether you're a sales team looking to nurture leads, a marketing agency crafting multi-faceted campaigns, or a small business aiming to strengthen customer relationships, this platform provides the tools you need to succeed. As you begin to implement your own campaigns, don't hesitate to experiment with different approaches and utilize the full range of features available. Regular analysis of your campaign performance will help you continuously improve your communication strategies. Thank you for choosing SMS-iT CRM. We're excited to see how you'll leverage this powerful tool to drive engagement, boost conversions, and grow your business. Happy campaigning!