
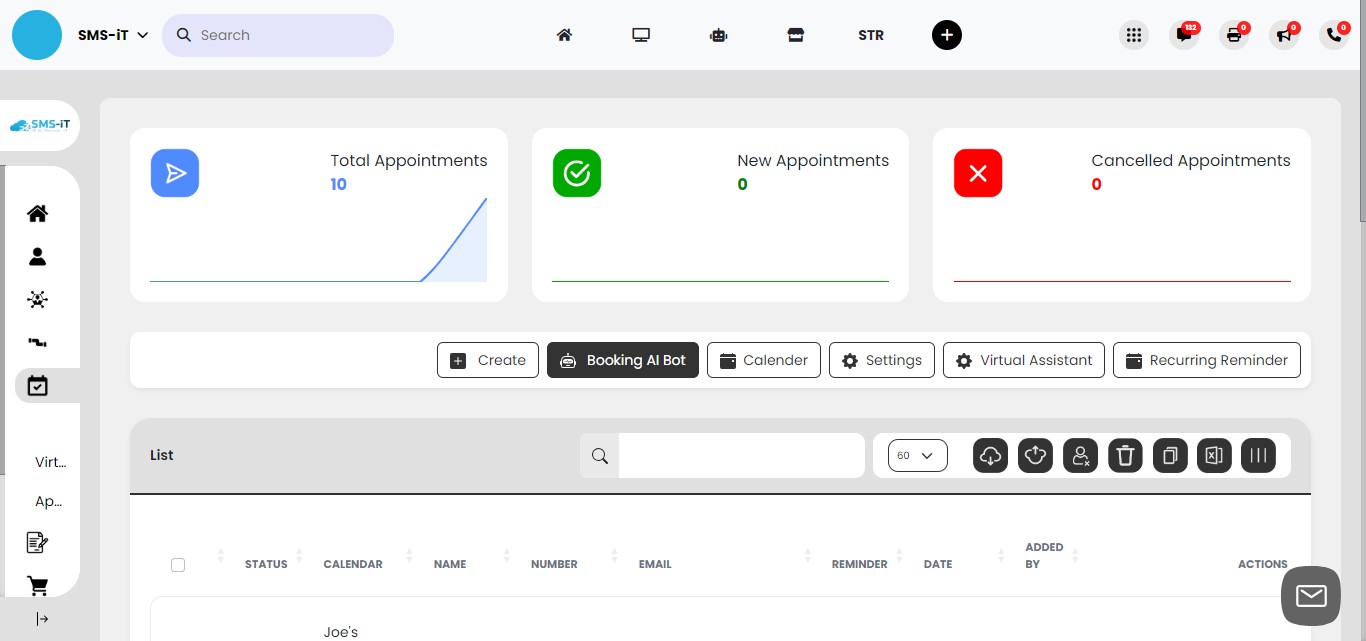
Appointments
Navigate to https://aicpanel.smsit.ai/home
Overview:
The SMS-iT CRM Appointments module is a powerful, all-in-one solution for managing client interactions and scheduling. This comprehensive tutorial will guide you through setting up and utilizing key features such as multi-calendar management, AI-powered booking, virtual assistants, and automated reminders.
Benefits for various SMS-iT users: 1. Marketing Companies: - Streamline lead capture and nurturing - Automate follow-ups and appointment scheduling - Integrate booking systems with marketing campaigns 2. Solo Entrepreneurs: - Manage multiple business ventures from a single platform - Present a professional image with branded booking pages - Save time with AI-assisted scheduling 3. Small Business Owners: - Reduce administrative workload - Improve customer service with multi-channel communication - Minimize no-shows with automated reminders 4. Professionals (e.g., Doctors and Therapists): - Efficiently manage complex scheduling needs - Maintain client privacy with secure communication channels - Offer convenient self-scheduling options to clients By implementing the SMS-iT CRM Appointments module, users can expect increased efficiency, improved client satisfaction, and more time to focus on core business activities. This powerful tool adapts to various business needs, making it an invaluable asset for growing and managing your client base.
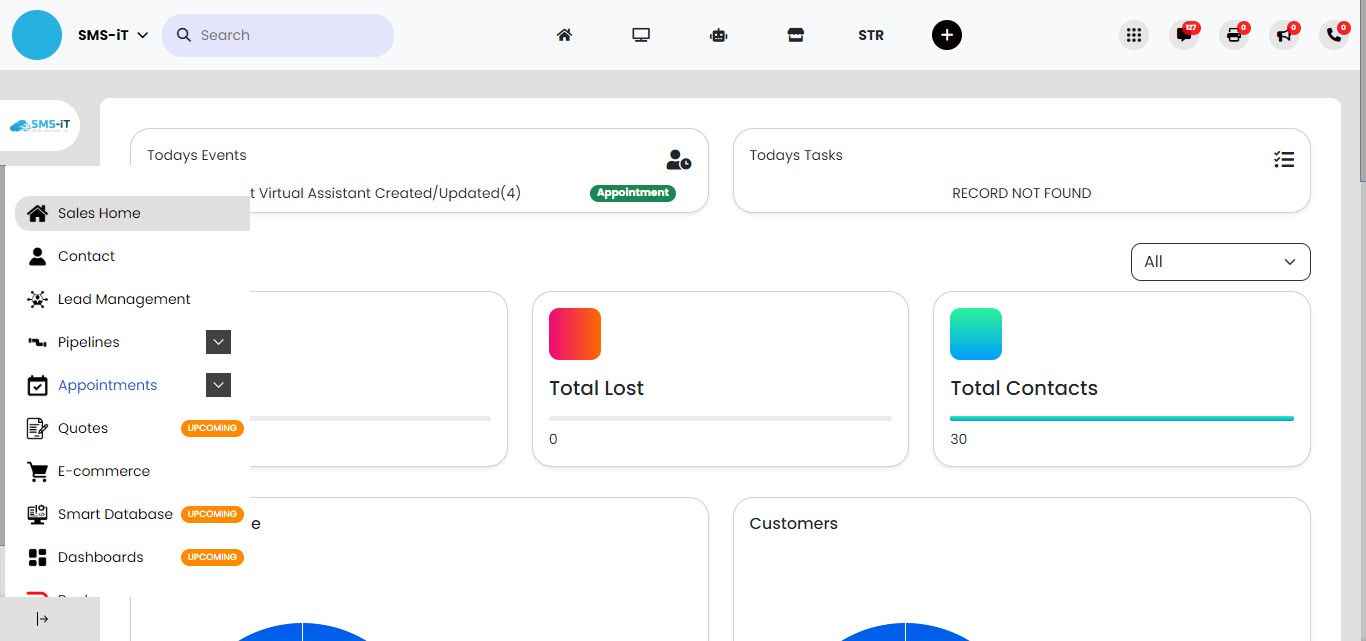
Click on "Sales"

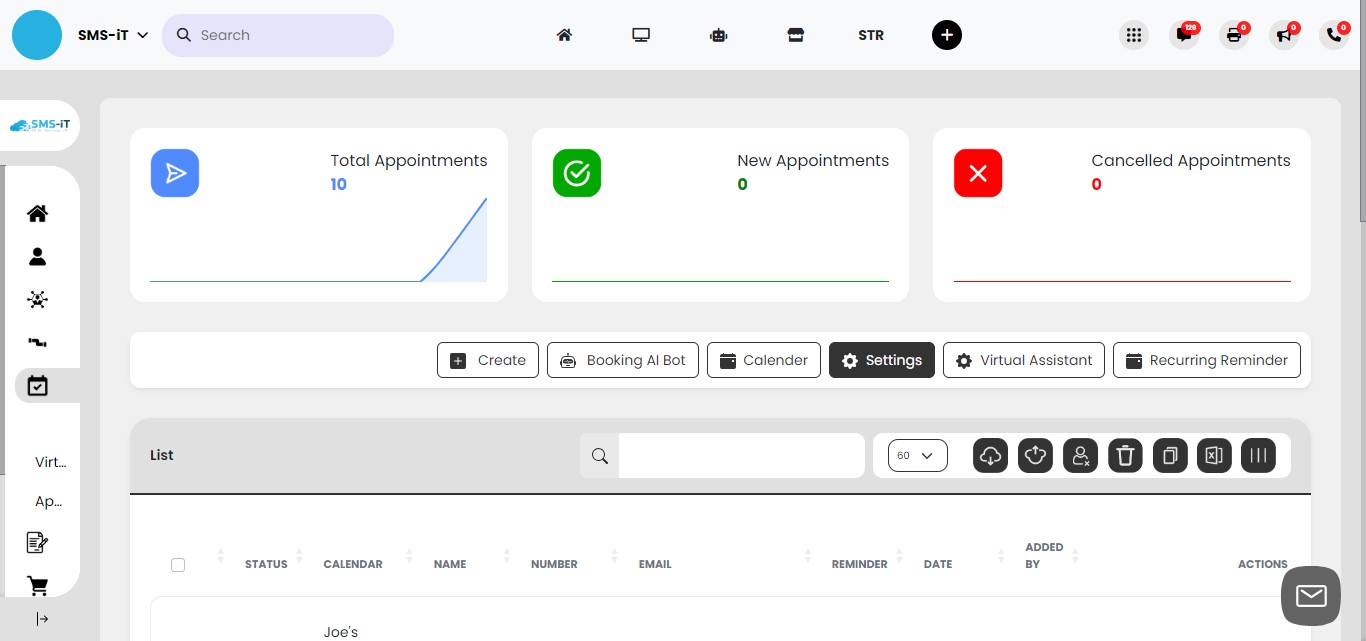
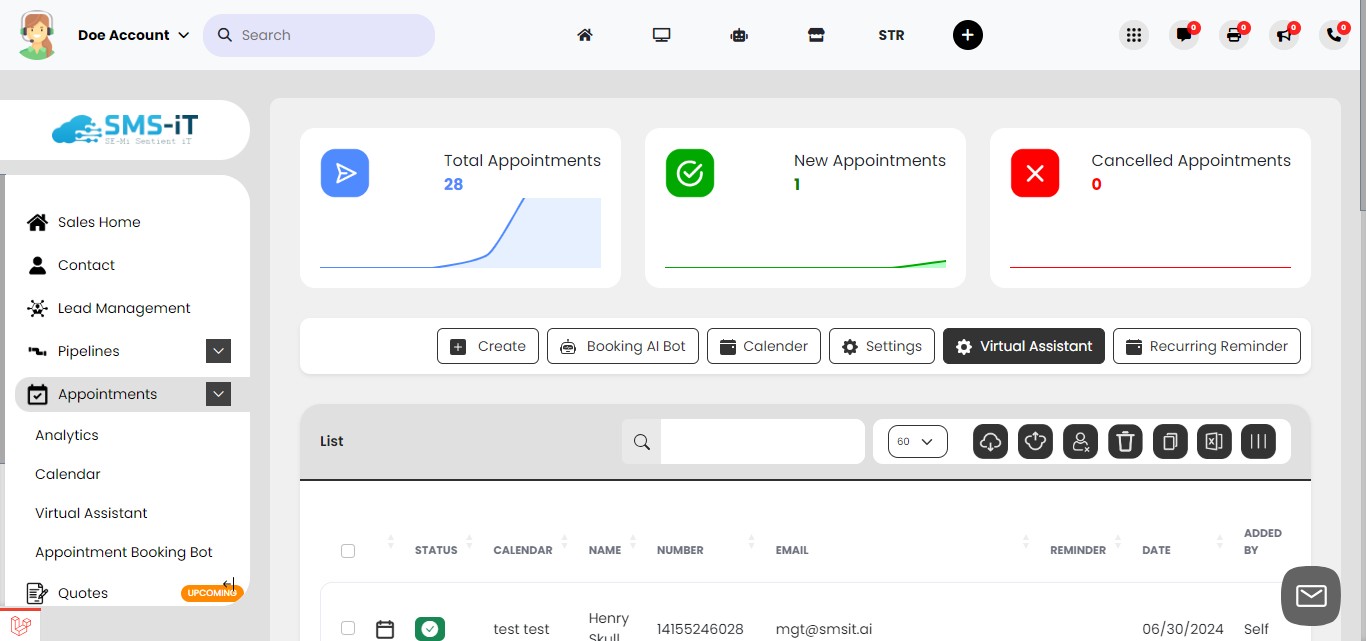
Click on "Appointments"
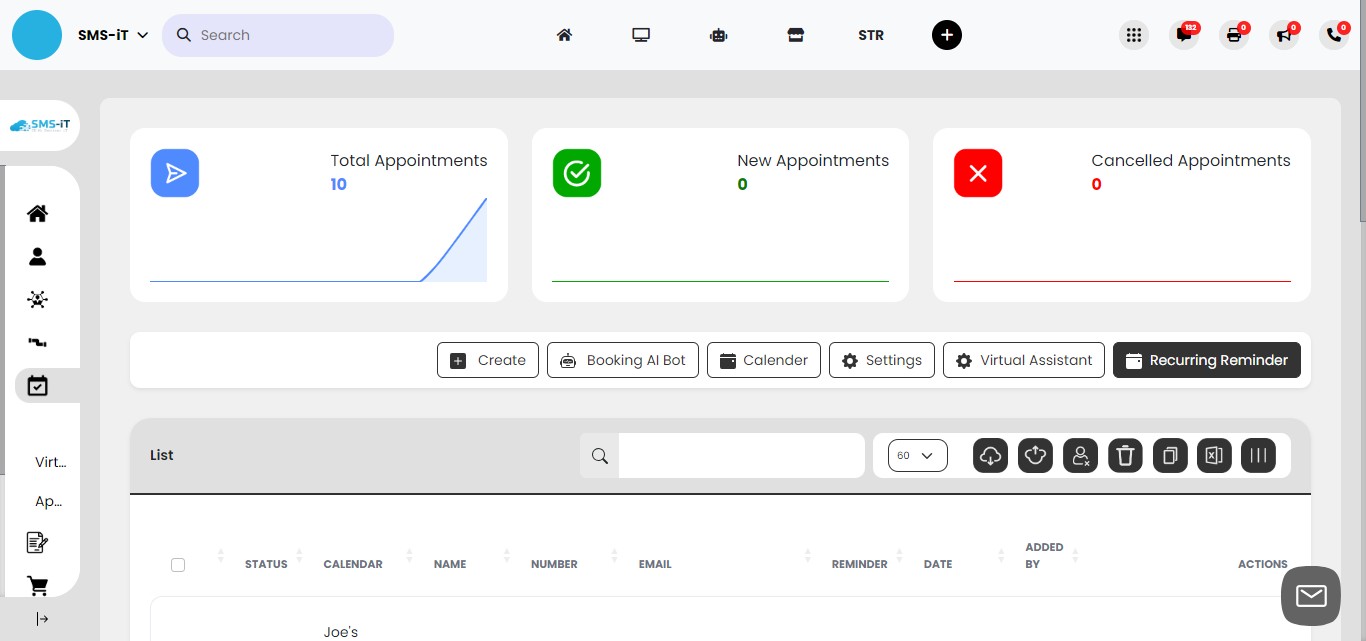
The Appointments section offers six key features:
Create: Set up new client appointments Booking AI Bot: Utilize AI to book appointments via text or email Calendar: View and modify upcoming appointments Settings: Configure basic options like confirm, cancel, and reschedule Virtual Assistant: Set availability and create booking links or embeds for client self-scheduling Recurring Reminder: Set up automated reminders for upcoming appointments
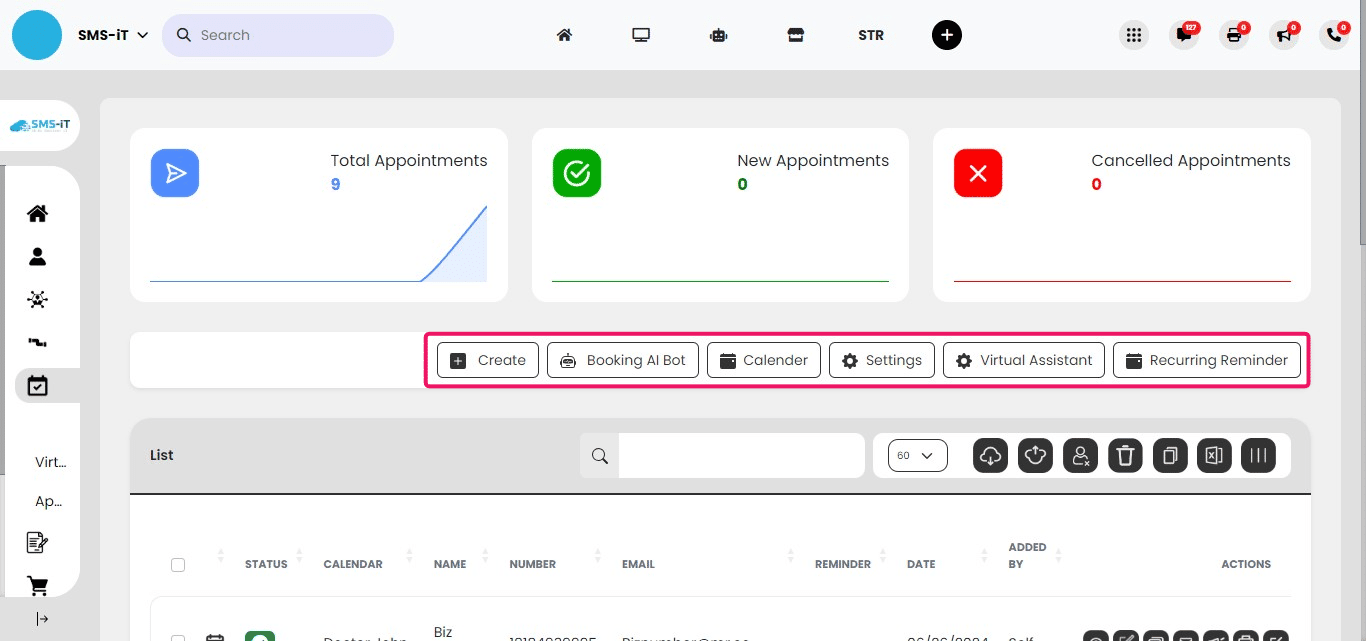
Summary: The SMS-iT CRM Appointments feature provides a comprehensive suite of tools for managing your client interactions. By offering multiple booking methods, including AI-assisted booking and self-scheduling options, you can streamline your appointment process and reduce administrative overhead. The system's flexibility allows you to tailor your appointment management to your specific business needs, potentially increasing client satisfaction and overall efficiency.
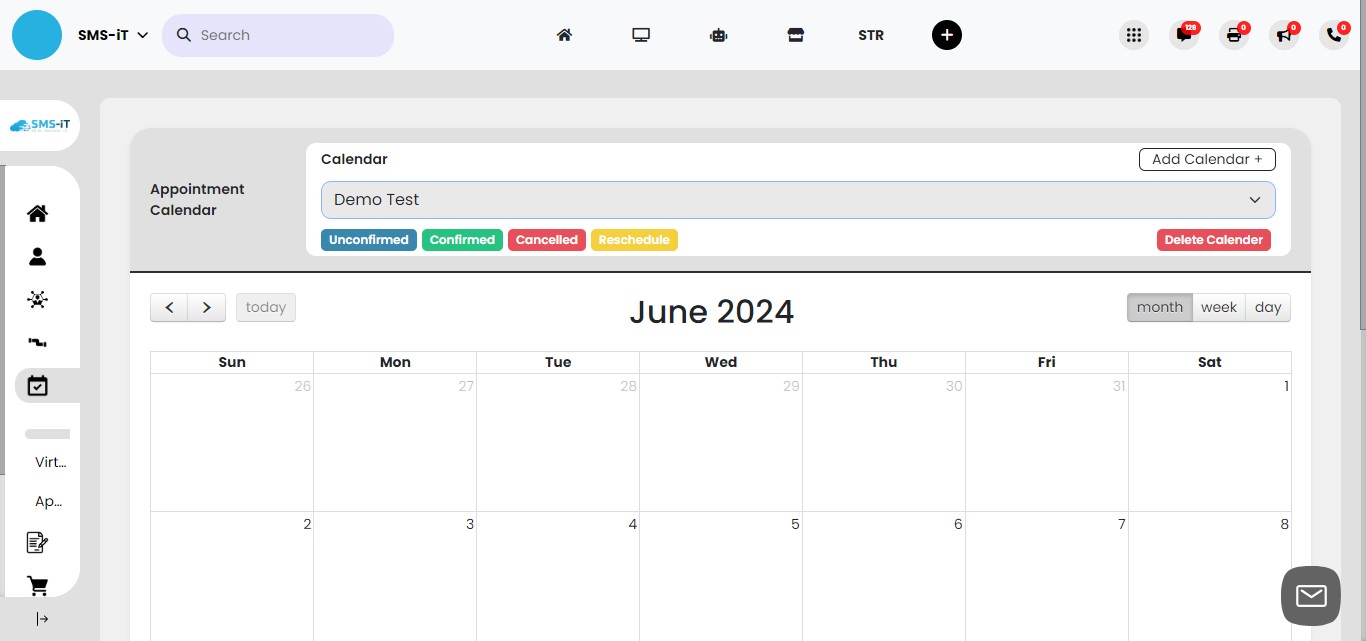
Create a new calendar
Creating Multiple Calendars The SMS-iT CRM allows you to create as many calendars as needed to effectively manage your business operations. Key benefits include: 1. Separate calendars for different businesses or projects 2. Customizable availability settings for each calendar 3. Granular control over business hours and scheduling 4. Ability to manage calendars for multiple clients
This flexibility enables entrepreneurs and multi-business owners to keep their schedules organized and separate, enhancing overall time management and professionalism.
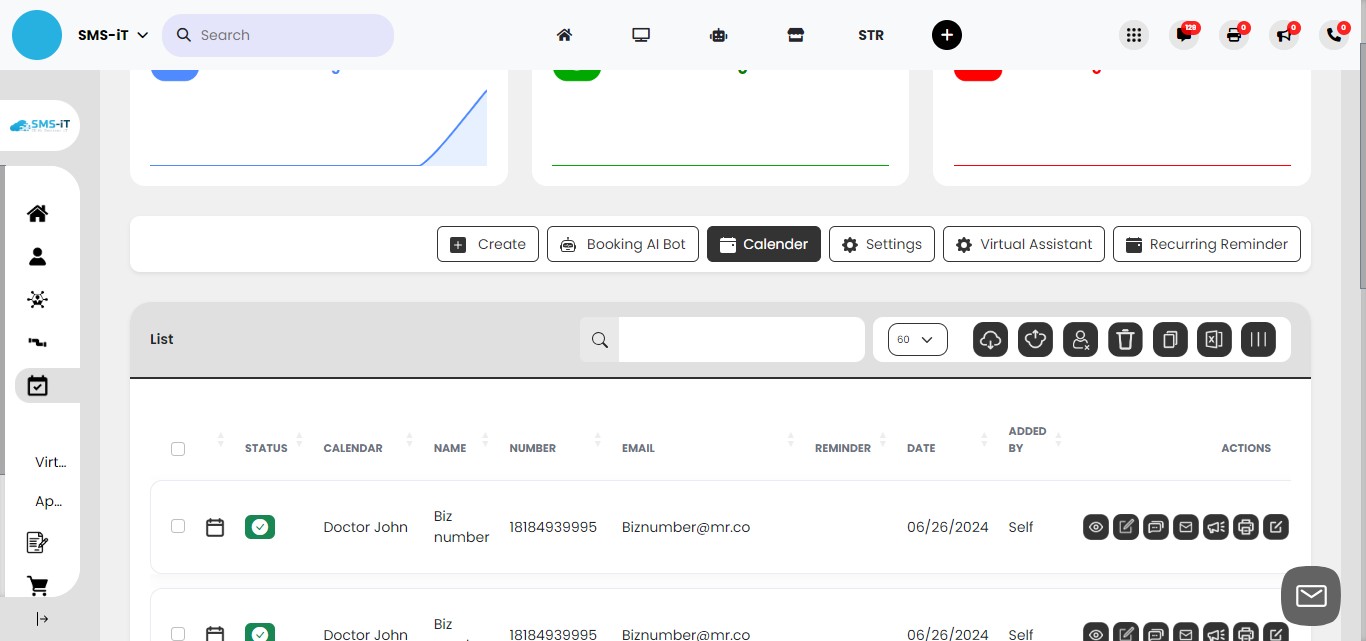
Click on "Calendar"
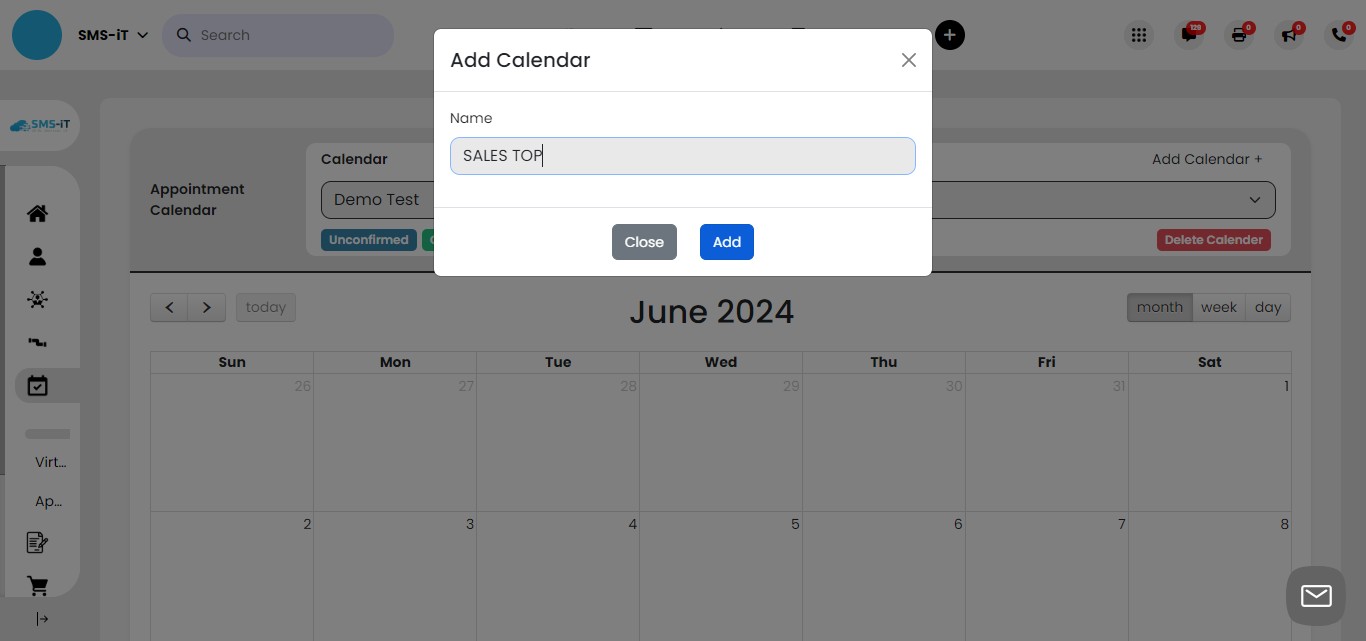
Click on "Add Calendar +"
- In the provided field, enter a descriptive name for your new calendar.
- Click the "Add" button to create the calendar.
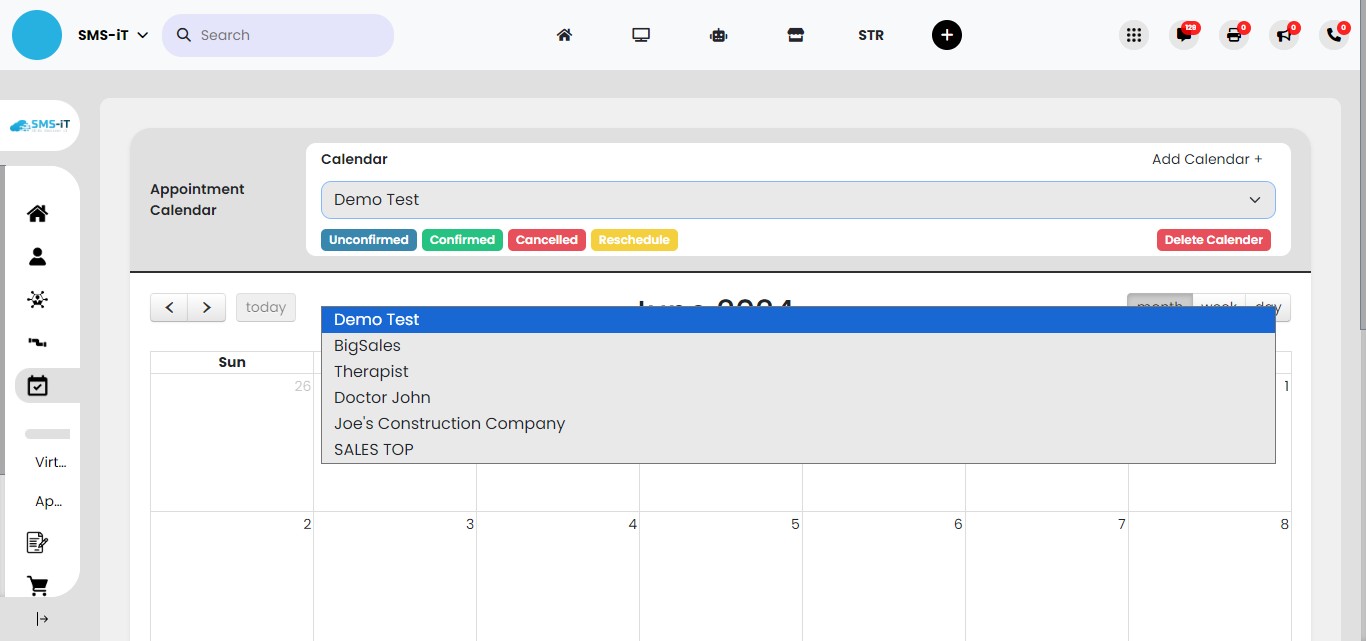
After adding the calendar, use the pull-down menu to view and select your newly created calendar, as well as any existing calendars in your account.
Summary: Creating multiple calendars in SMS-iT CRM offers unparalleled flexibility for businesses managing diverse schedules. This feature allows you to segregate appointments for different services, locations, or client types, streamlining your scheduling process and enhancing organization. For sales and marketing professionals, this means you can effortlessly manage appointments for various campaigns or client segments, potentially improving your ability to tailor your approach and increase conversion rates.
View and edit calendar appointments
Calendar Selection and Appointment Management: - Select a specific calendar from your available options - View all upcoming appointments for the chosen calendar - Edit appointment details as needed directly from this view
This feature offers efficient management of multiple calendars and appointments, benefiting various users:
1. Sales and Marketing Professionals:
- Quickly switch between calendars for different campaigns or client segments
- Get an at-a-glance overview of scheduled client meetings
- Make real-time adjustments to accommodate high-priority prospects
2. Solo Entrepreneurs:
- Manage calendars for multiple business ventures from a single view
- Easily balance personal and professional appointments
- Adjust scheduling on-the-fly to maximize productivity
3. Professionals (e.g., doctors, therapists, consultants):
- Maintain separate calendars for different types of appointments or services
- Quickly assess daily or weekly schedules at a glance
- Make immediate changes to accommodate emergency appointments or cancellations
This centralized view and edit capability streamlines the scheduling process for all users, allowing for:
- More responsive client management
- Improved time allocation across various activities
- Enhanced ability to handle complex scheduling needs efficiently
By leveraging this feature, users can significantly reduce administrative overhead and focus more on their core business activities or client interactions.
From the calendar pull-down menu, select the specific calendar you wish to manage.
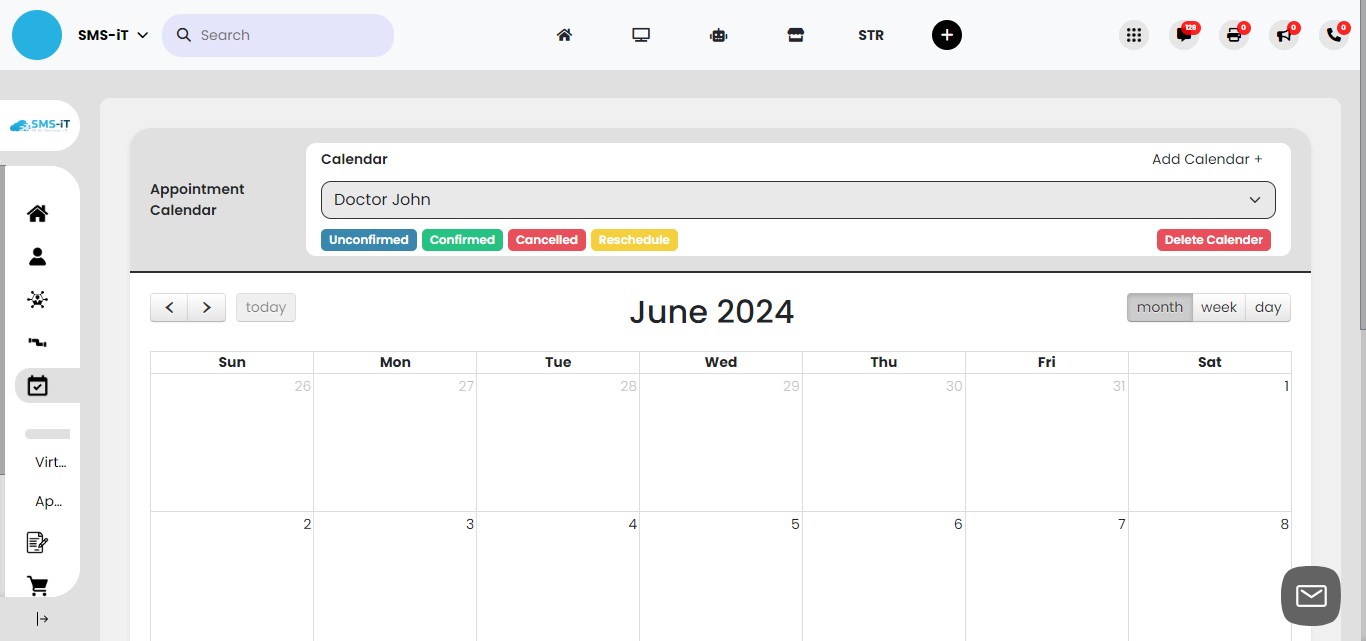
Once a calendar is selected, you'll see a list of all your upcoming appointments for that particular calendar.
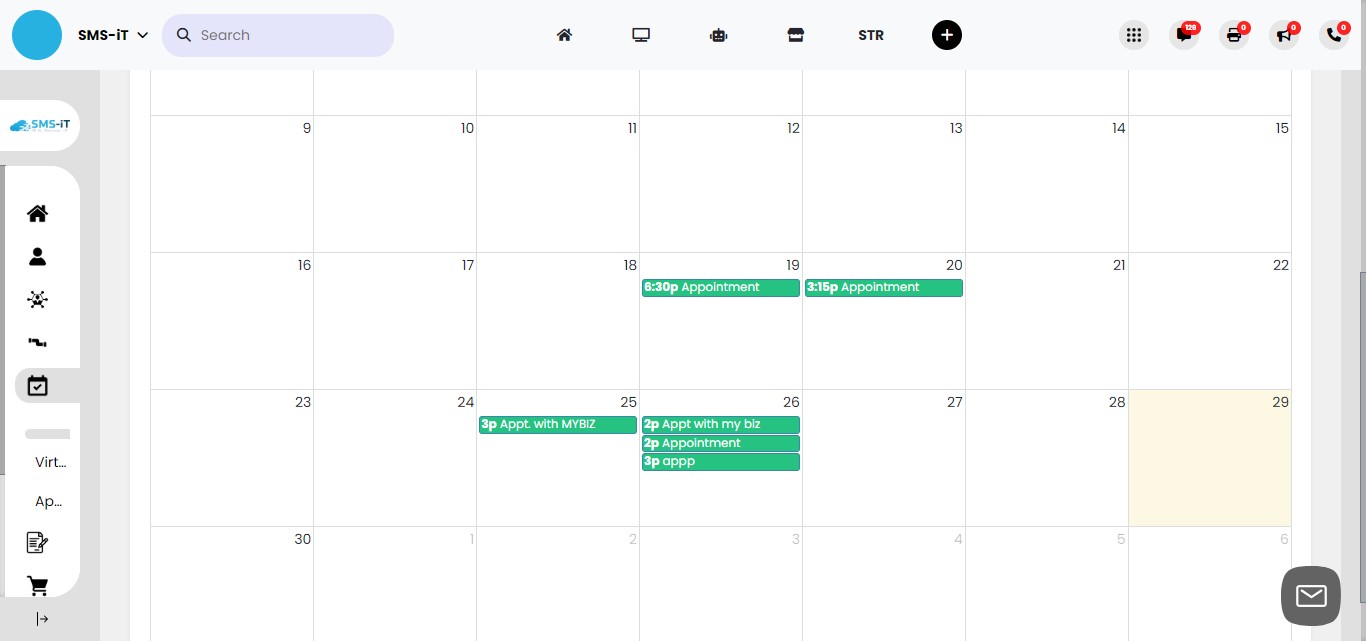
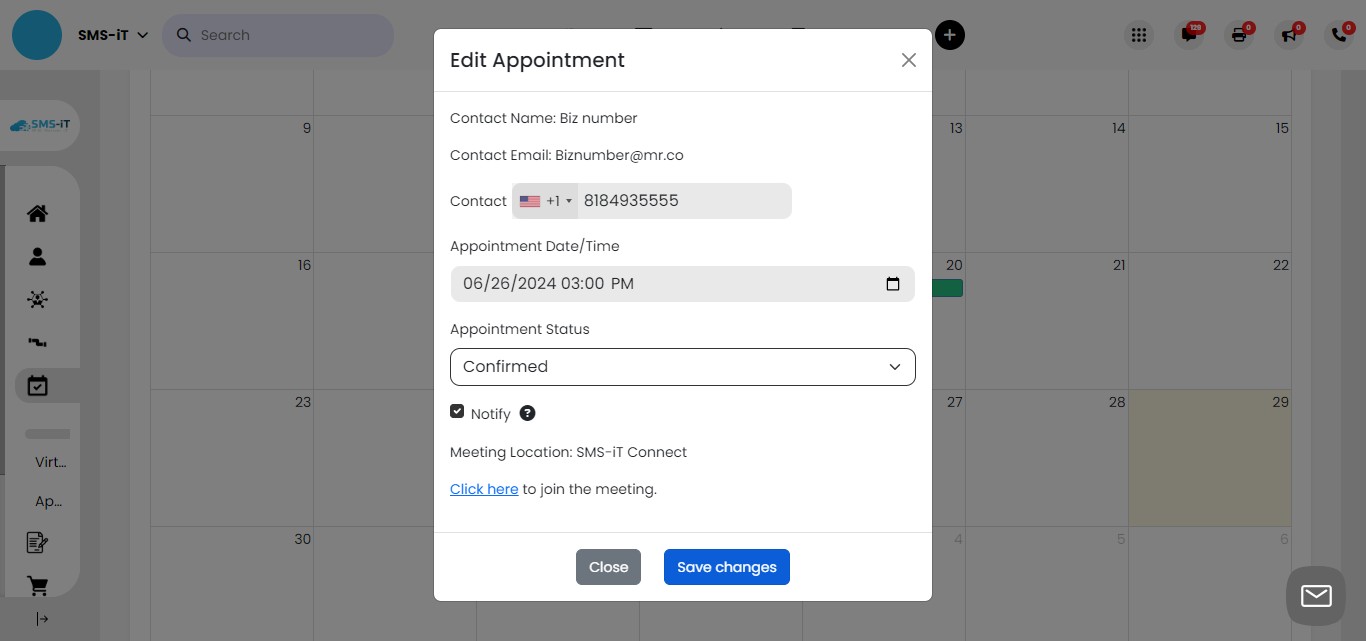
To view details of an upcoming appointment: 1. Click on the specific appointment in the list 2. A popup window will appear, displaying important information about the meeting or appointment

The appointment details popup includes: - Contact name - Email address - Phone number - Appointment time - Status (confirmed, unconfirmed, canceled, or rescheduled)
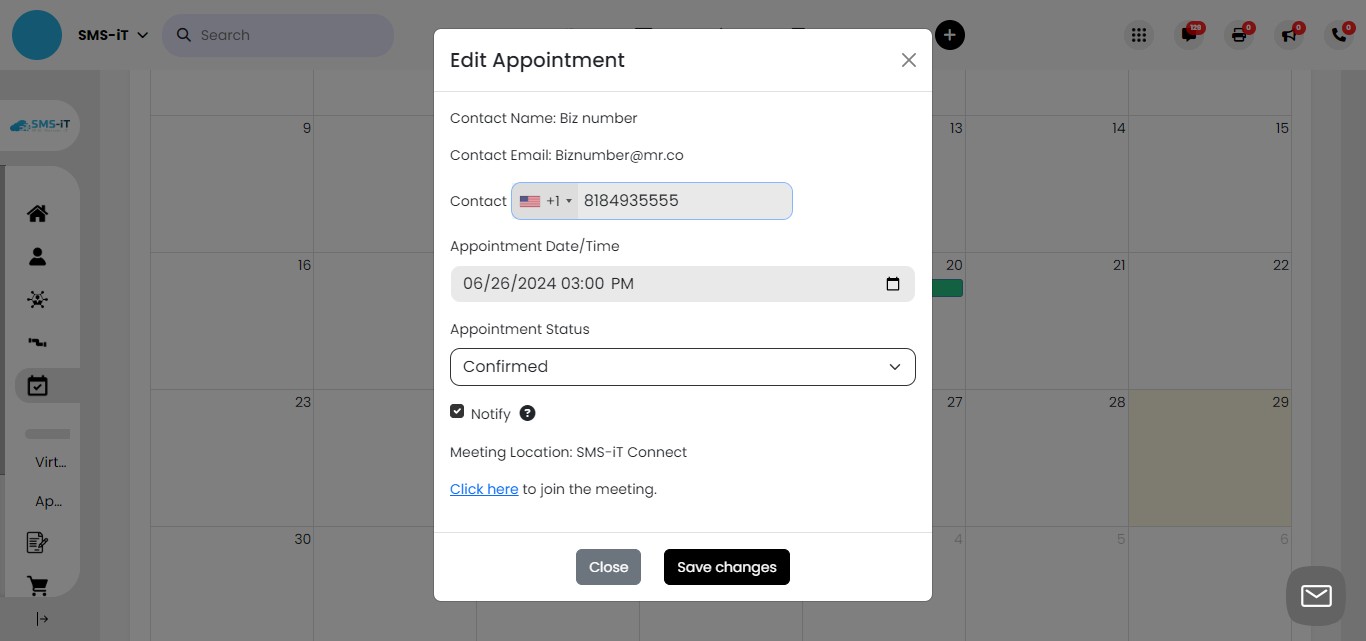
To join a virtual meeting directly from the appointment details: - Look for and click on the "Click here" link within the popup - This will connect you to the designated meeting platform
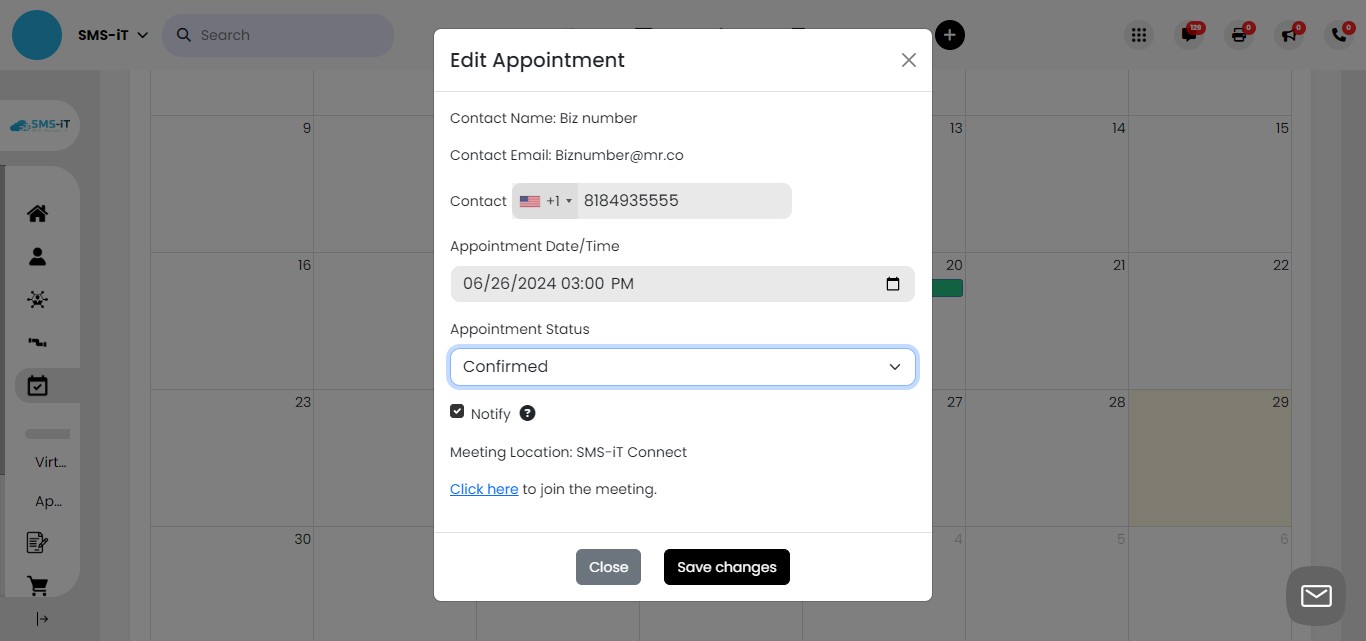
To modify the appointment date or time:
Locate and click on the calendar icon within the appointment details popup

In the calendar view that appears: - Select a new date by clicking on the desired day - Adjust the time using the provided time selection tool
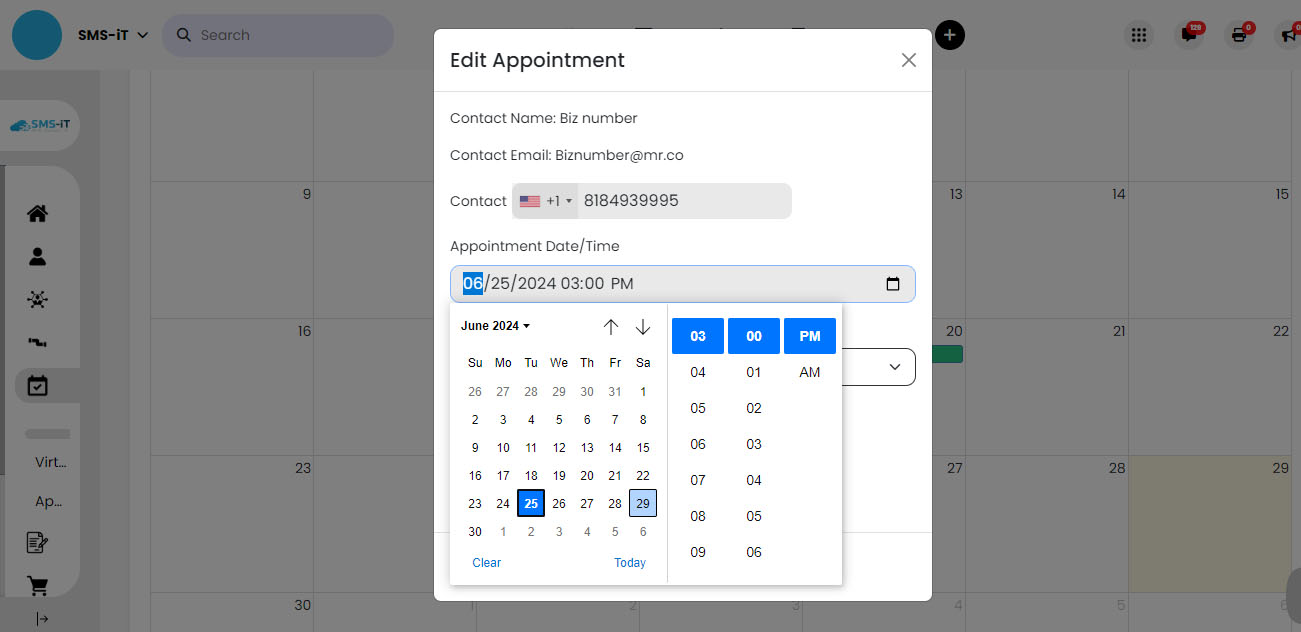
After making your desired changes to the appointment: - Click the "Save changes" button to update the appointment details
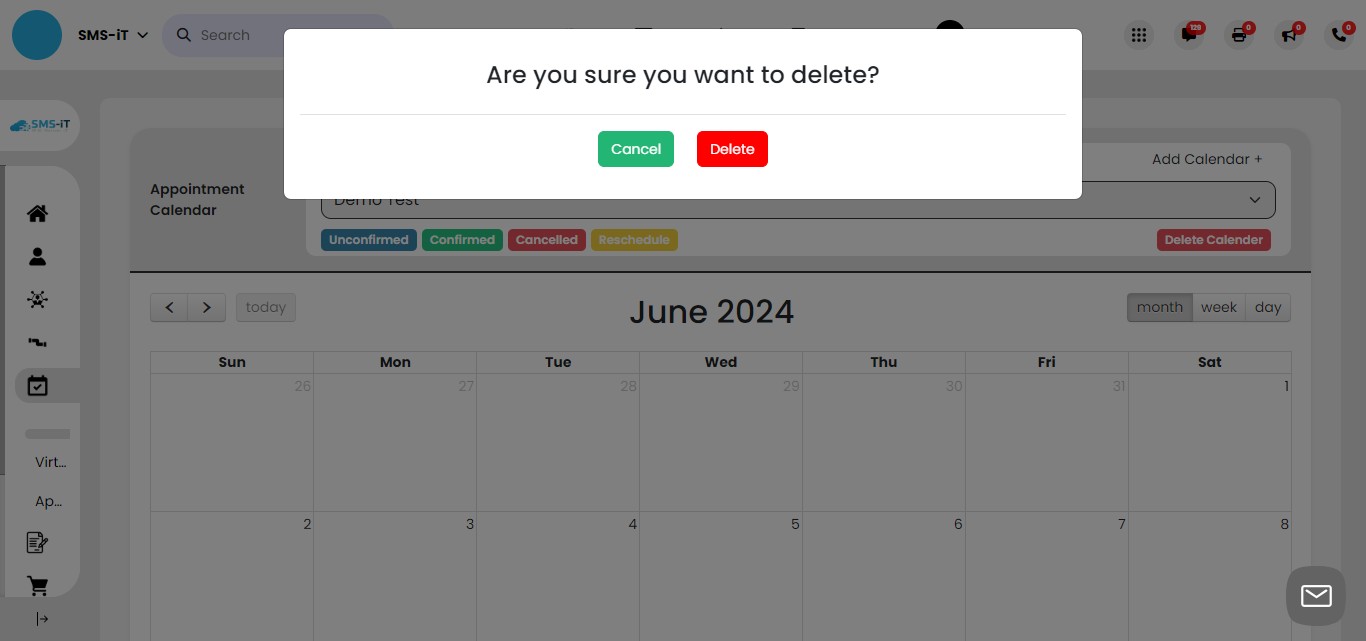
Delete calendar
Click on "Delete Calender"

In the confirmation dialog: - Click "Delete" to permanently remove the calendar - CAUTION: There is no secondary confirmation. The calendar and all associated appointments will be immediately deleted. Ensure you want to proceed before clicking "Delete".
Summary: The SMS-iT CRM's calendar management system offers robust features for viewing, editing, and deleting appointments and calendars. This level of control allows users across various professions to maintain an organized schedule, quickly adapt to changes, and efficiently manage client interactions: 1. Sales and marketing professionals can streamline their client meetings and campaign schedules. 2. Solo entrepreneurs can juggle multiple business ventures and personal commitments from a single platform. 3. Professionals such as doctors, therapists, and consultants can easily manage diverse appointment types and client needs. The ability to easily join virtual meetings directly from the appointment details leads to improved punctuality and professionalism for all users. This feature is particularly valuable for solo entrepreneurs and professionals who often switch between different roles or services throughout their day. The system's flexibility in managing multiple calendars caters to the diverse needs of these user groups, allowing them to separate different aspects of their business or practice effortlessly. However, all users should exercise caution when deleting calendars to avoid unintended data loss, which could be particularly impactful for solo entrepreneurs and professionals managing their entire business through the system. Overall, this comprehensive calendar management tool enhances efficiency and organization for a wide range of users, enabling them to focus more on their core business activities and client relationships.
Create a new appointment manually
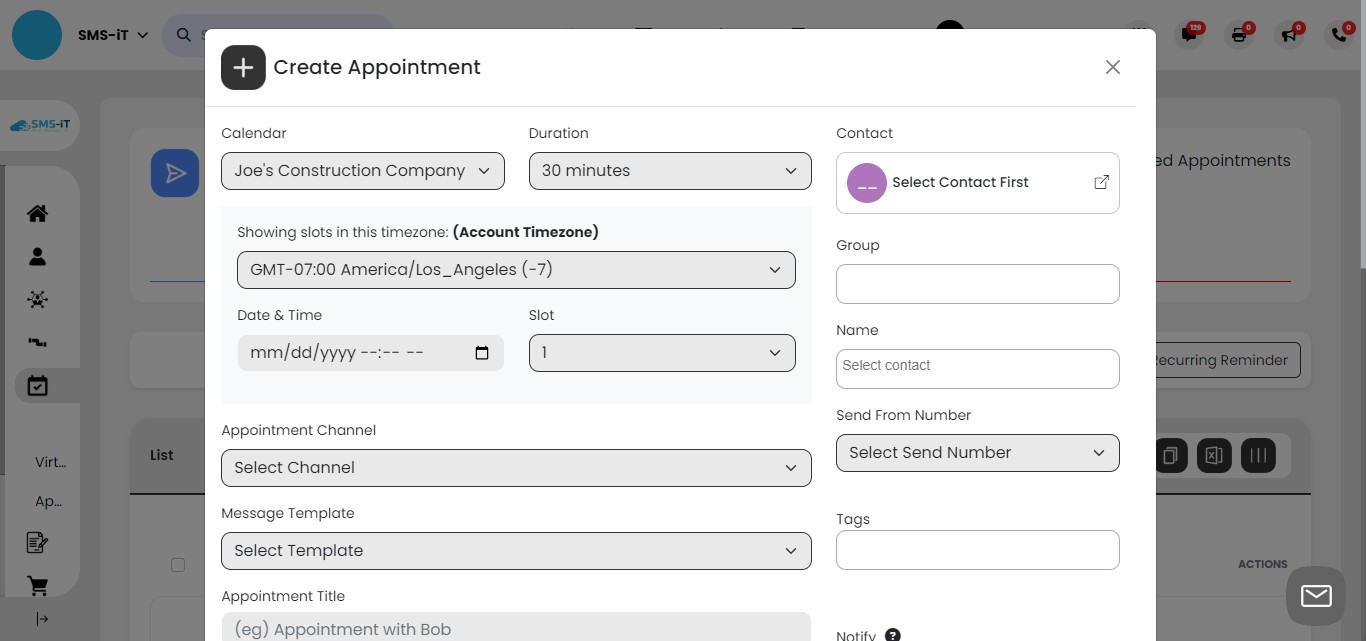
To create a new appointment manually: In the Appointments section, click on the "Create" button.

Use the provided pull-down menus to: - Select the appropriate calendar for the appointment - Choose the desired duration of the meeting
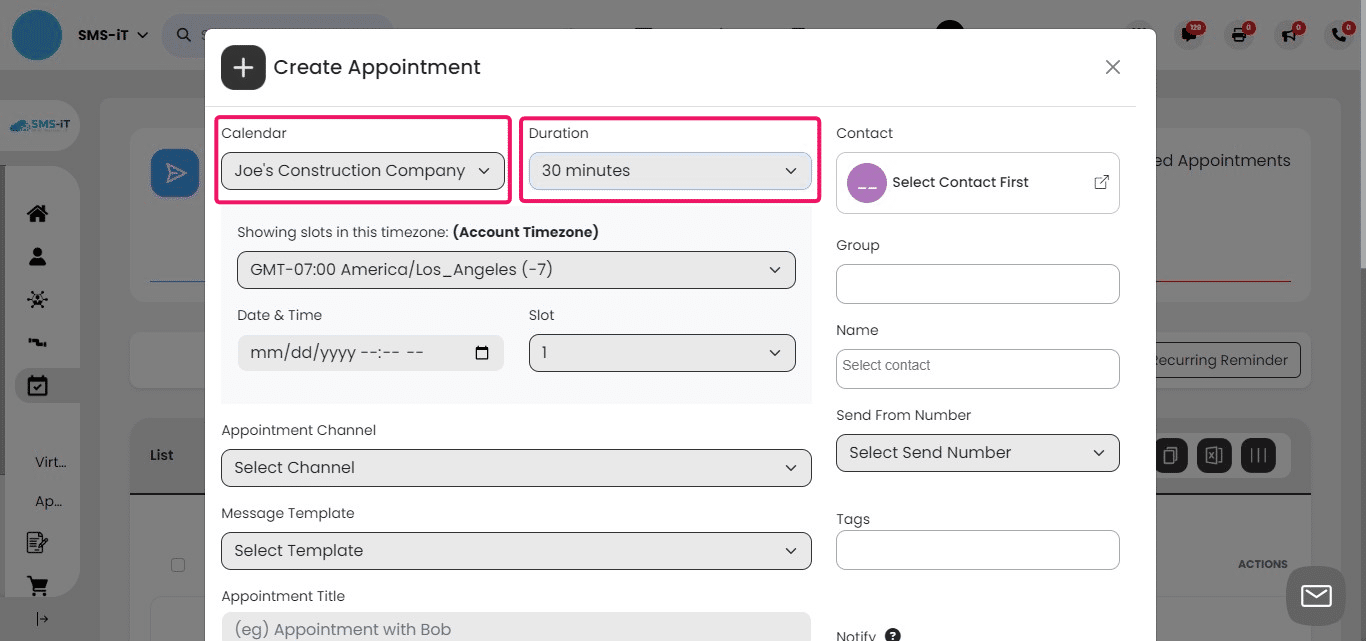
To set the date and time of the appointment: - Click on the "Calendar" icon - In the calendar view, select the desired date and time
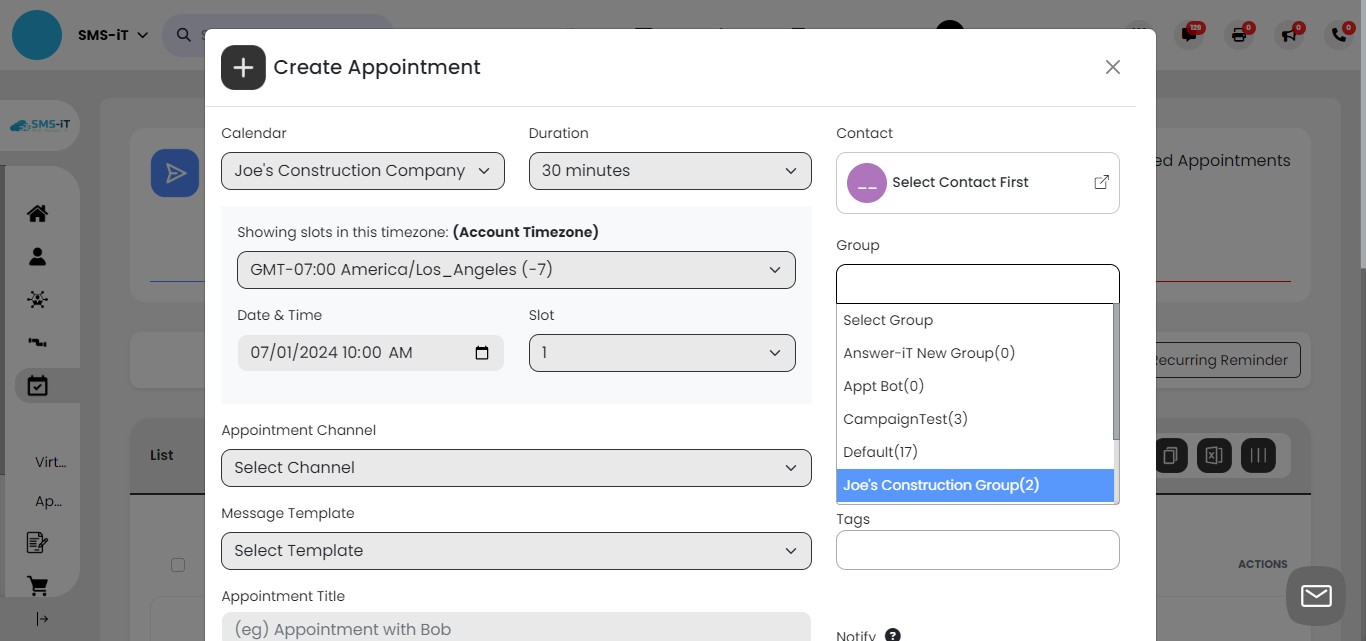
Locate the contact in your system: - Use the pull-down menu to select the group where your contact is stored - This narrows down your search and helps you quickly find the specific contact
Choose the specific contact for the appointment:
Begin typing either: a) The first few letters of the contact's name, or b) The first few digits of their phone number Select the correct contact from the auto-populated list
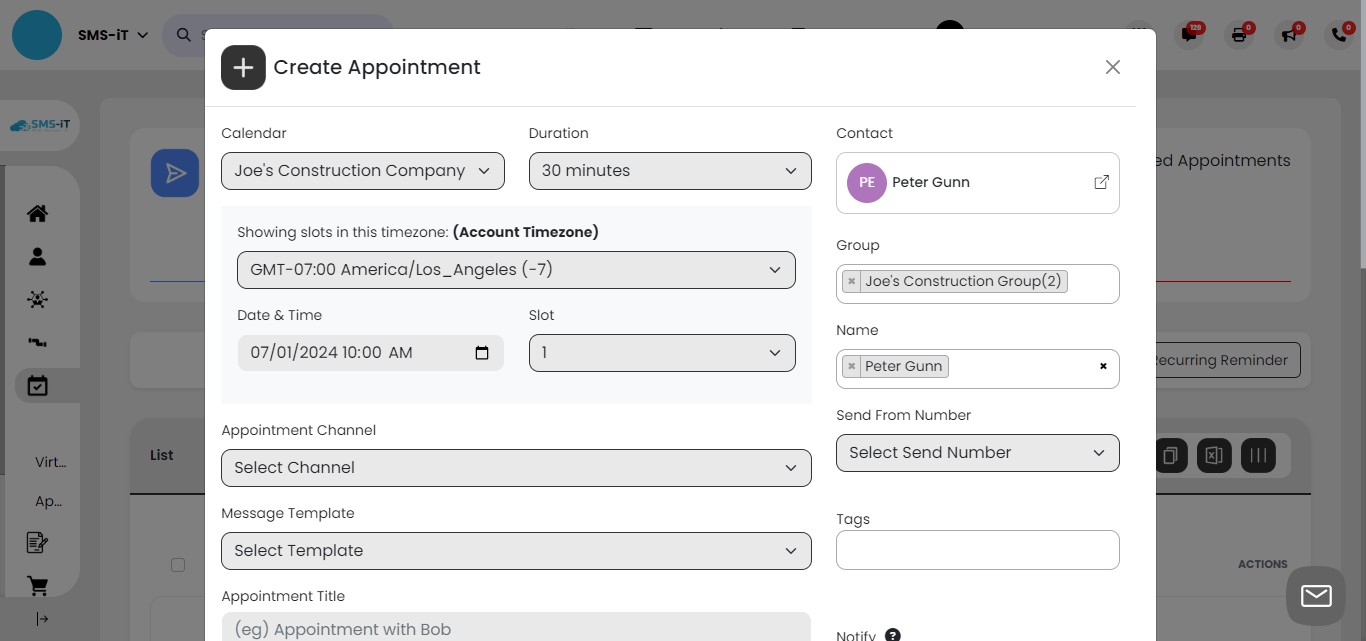
Set up SMS notification for the appointment: - Click on "Select Send Number" - Choose a number from your system to use for sending the SMS notification
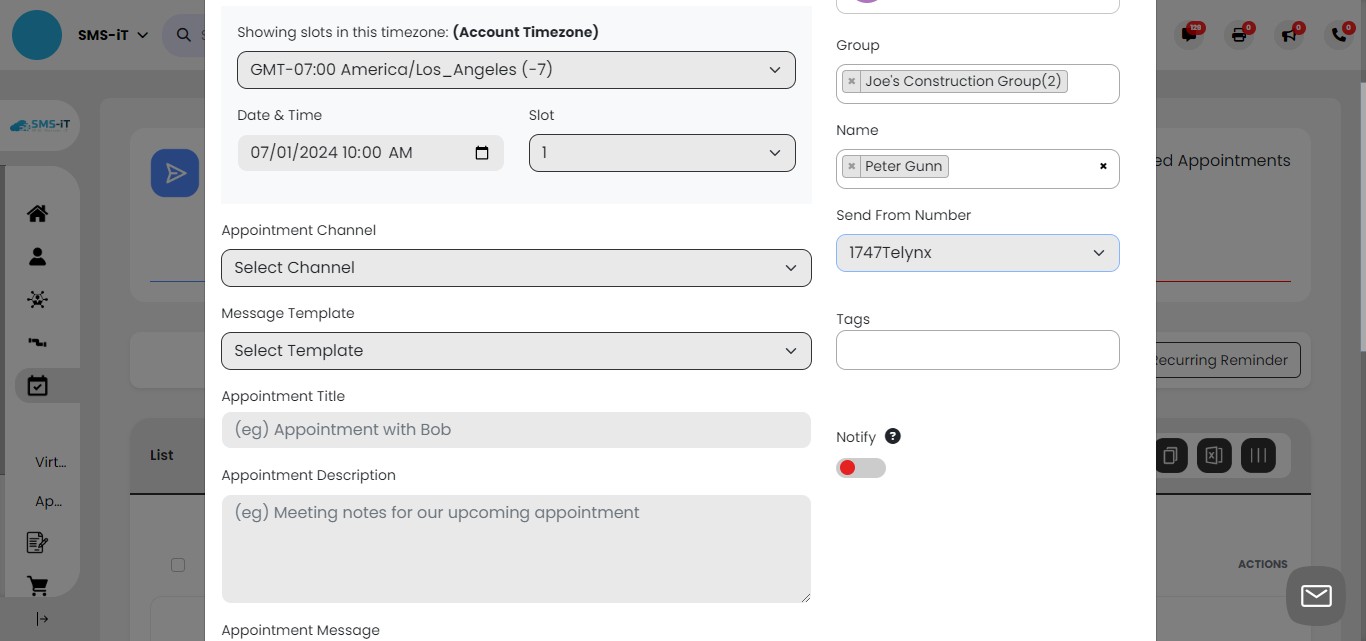
Enable SMS notification: - Locate the "Notify" toggle switch - Click to turn it on, activating SMS notifications for this appointment
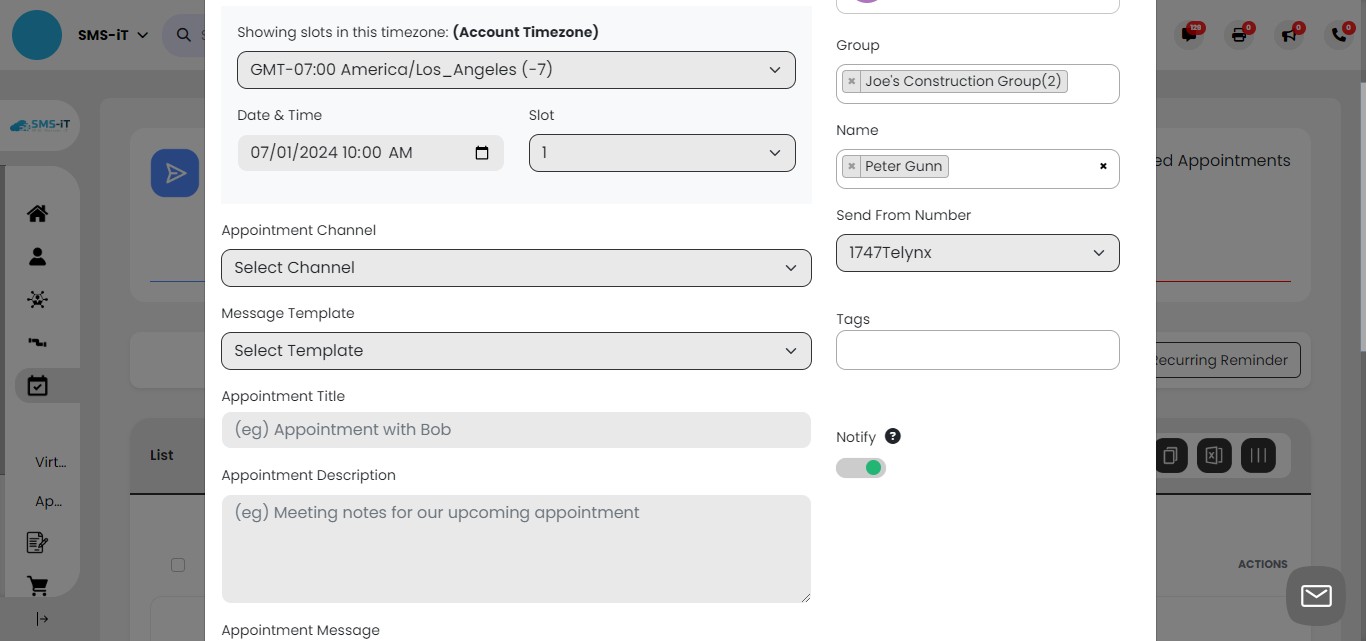
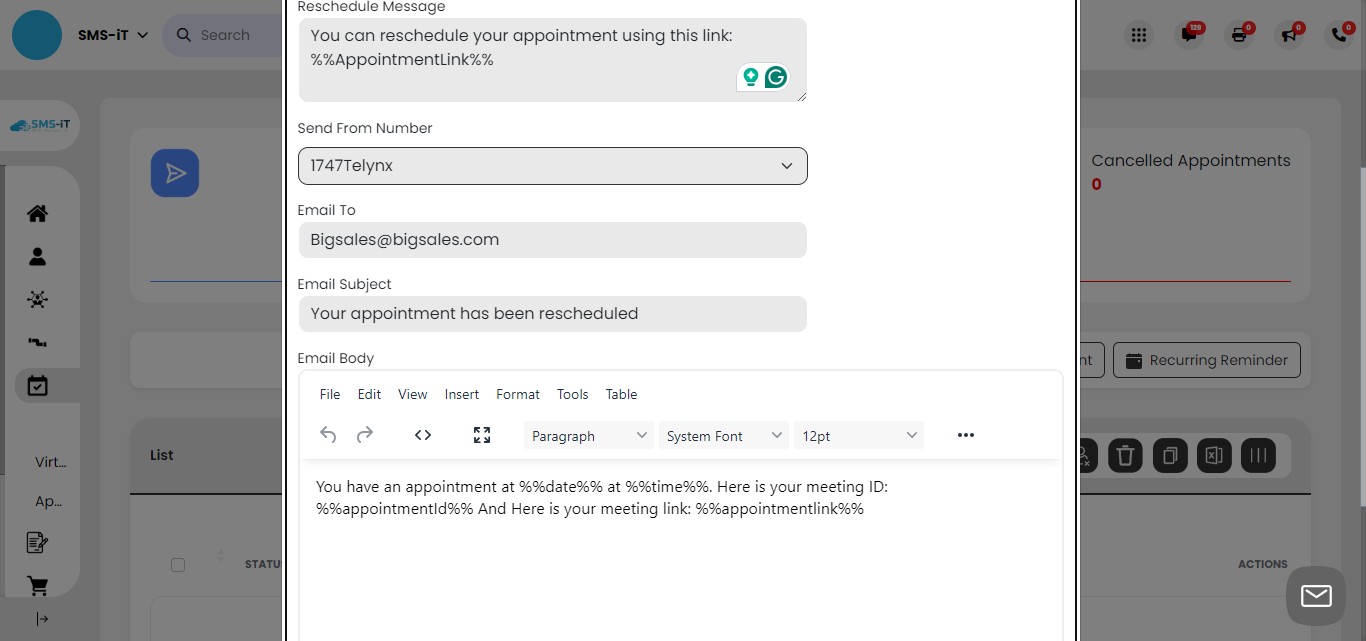
Choose the appointment information delivery method: - Click on "Appointment Channel" - Select your preferred channel (email recommended) - Note: Email is often more reliable for sending appointment links, as SMS may sometimes block links.
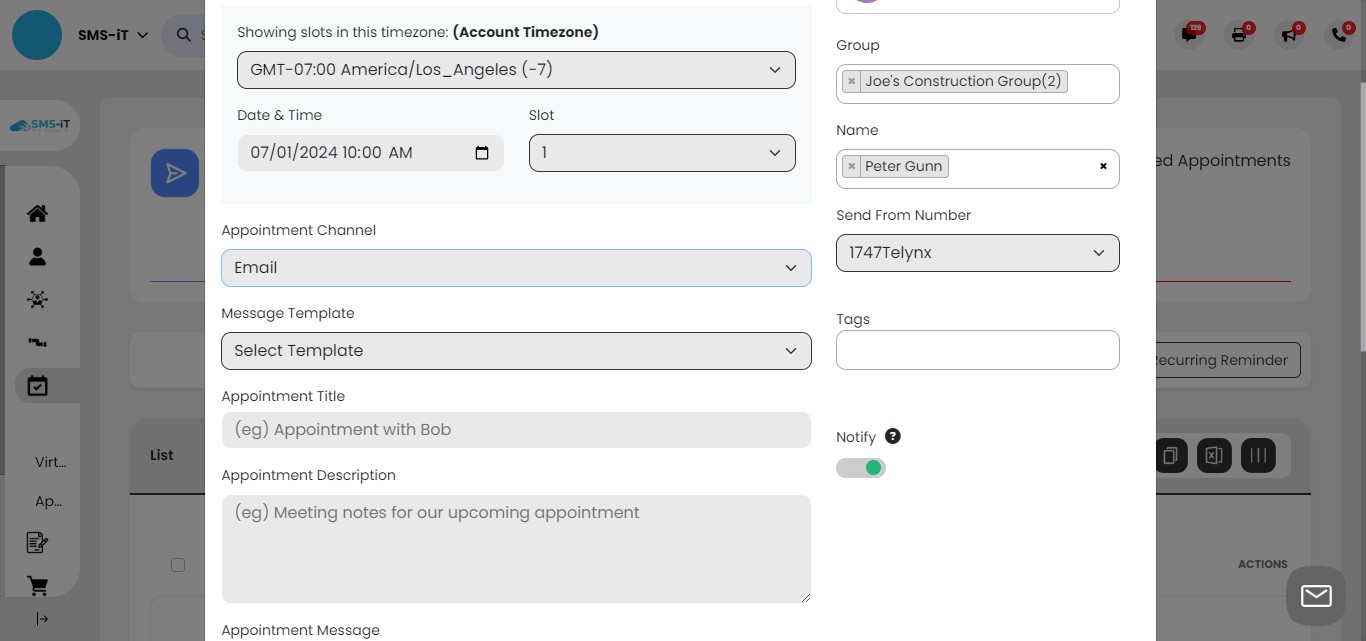
Provide appointment details:
Enter a clear, concise "Appointment Title" Fill in the "Appointment Description" with relevant information or instructions
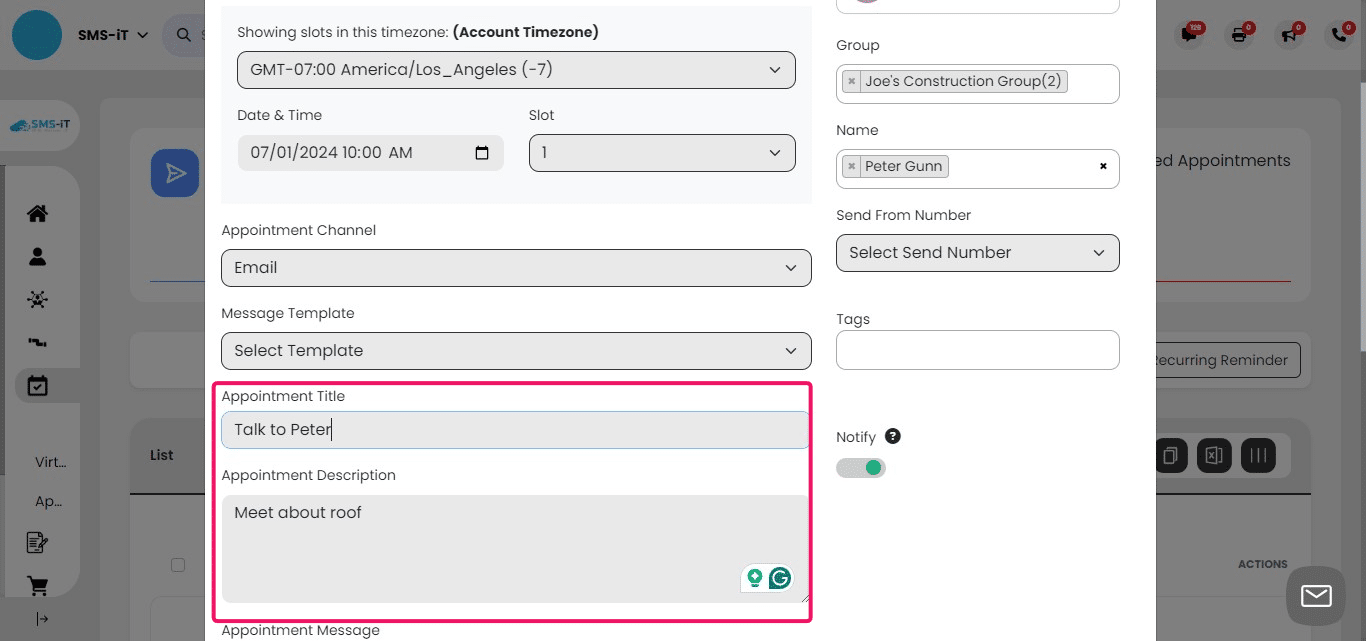
Customize the appointment notification: - Use the prefilled template, which automatically includes: * Date and time * Appointment ID * Appointment link - Augment the message with additional information such as: * Your website URL * Cancellation instructions * Rescheduling options

Specify the meeting location: - Click on the "Meeting Location" radial button
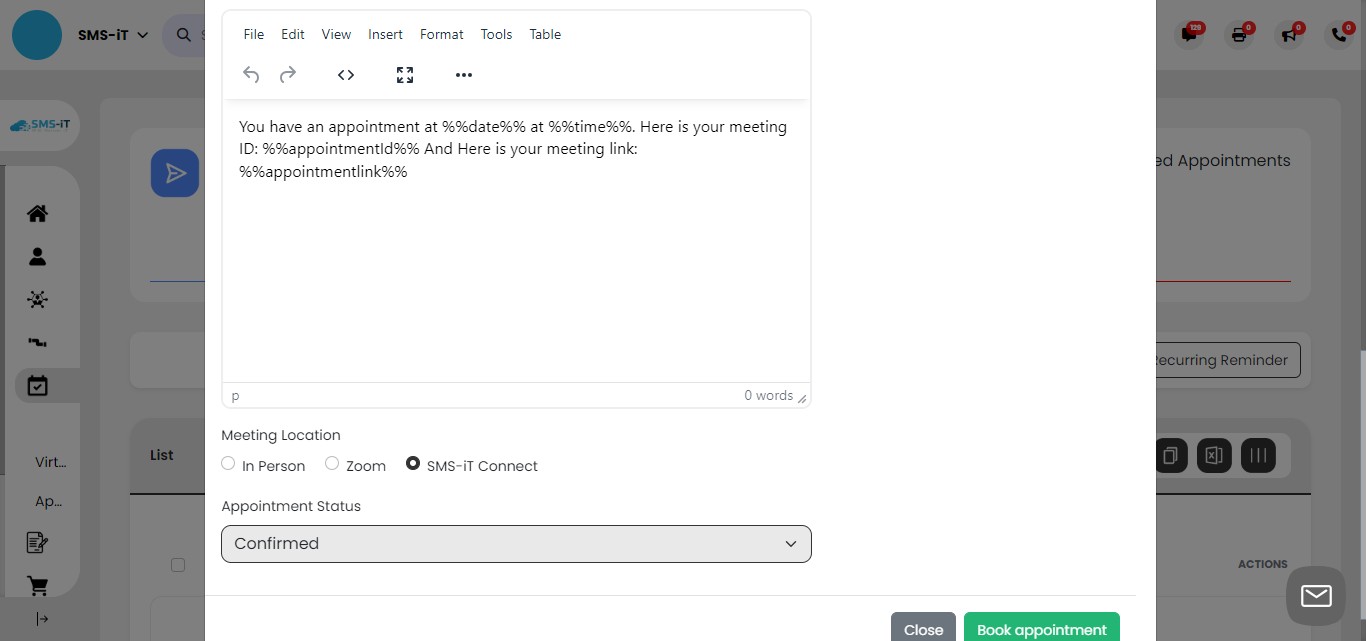
Click on "Book appointment"
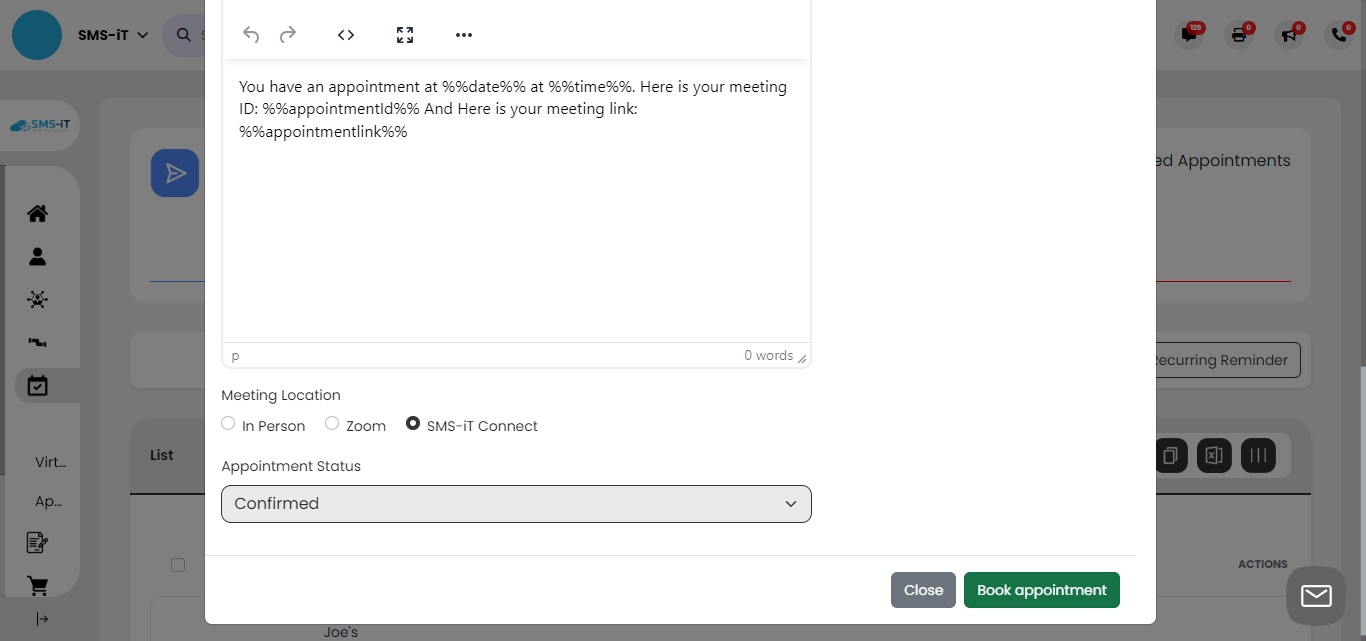
Finalize the appointment: - The system will automatically notify your customer about the new appointment - The appointment will be added to your selected calendar
Result: - Your customer receives timely information about the scheduled meeting - Your calendar is instantly updated, helping you stay organized
Tip: Double-check your notification settings to ensure customers receive the right amount of information through their preferred communication channel (email, SMS, etc.).
Summary: The SMS-iT CRM's appointment creation process is comprehensive and user-friendly, allowing for detailed customization of each appointment. This level of detail can significantly enhance your professional image and improve client communication. For SMS-iT users, the ability to easily categorize contacts, send customized notifications, and provide clear appointment information can lead to better prepared and more engaged clients. This, in turn, may result in more productive meetings and potentially higher conversion rates.
Settings
SMS-iT Appointment Settings: Text-Based Appointment Management
These settings enable customers to manage their appointments via text messages: 1. Booking: Customers can text a keyword to initiate the booking process 2. Cancellation: A specific keyword allows customers to cancel their appointments 3. Confirmation: Customers can confirm their appointments using a designated keyword 4. Rescheduling: A keyword is available for customers to request appointment rescheduling Benefits: - Provides convenience for customers who prefer text-based communication - Reduces phone call volume for appointment management - Allows for 24/7 appointment interactions without direct staff involvement - Enhances customer satisfaction through quick and easy appointment modifications
This feature is particularly valuable for busy professionals, solo entrepreneurs, and small businesses looking to streamline their appointment management process and improve customer service efficiency.
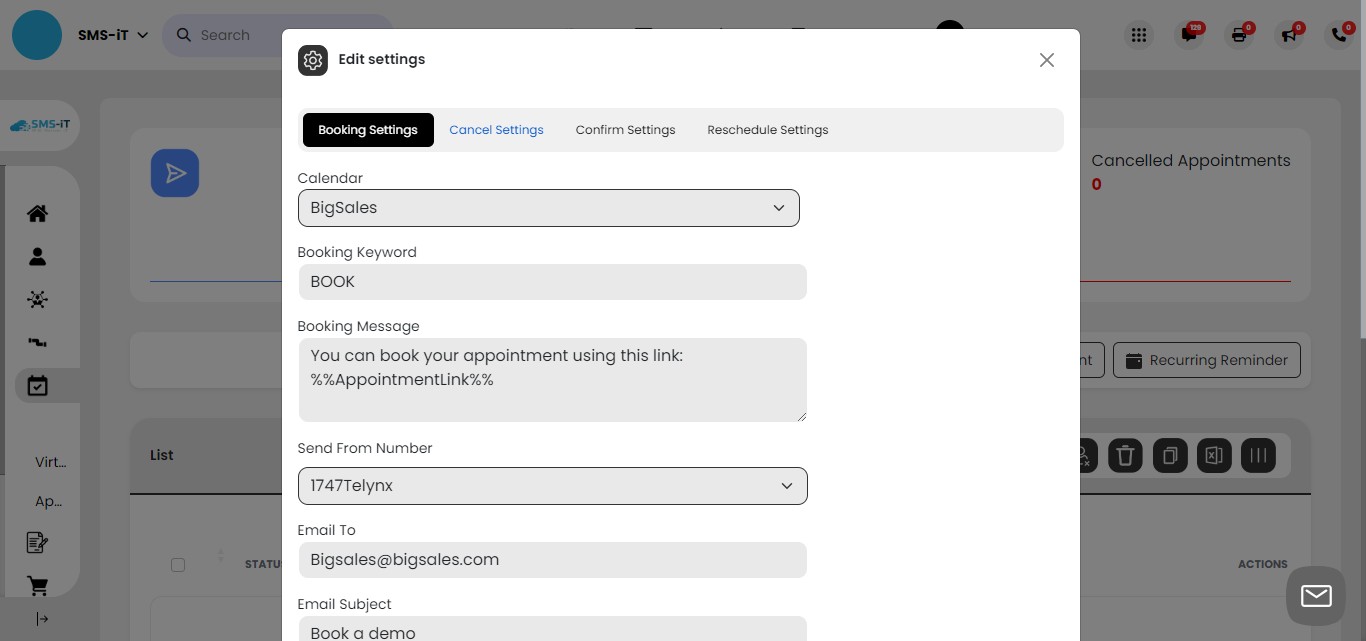
Click on "Settings"
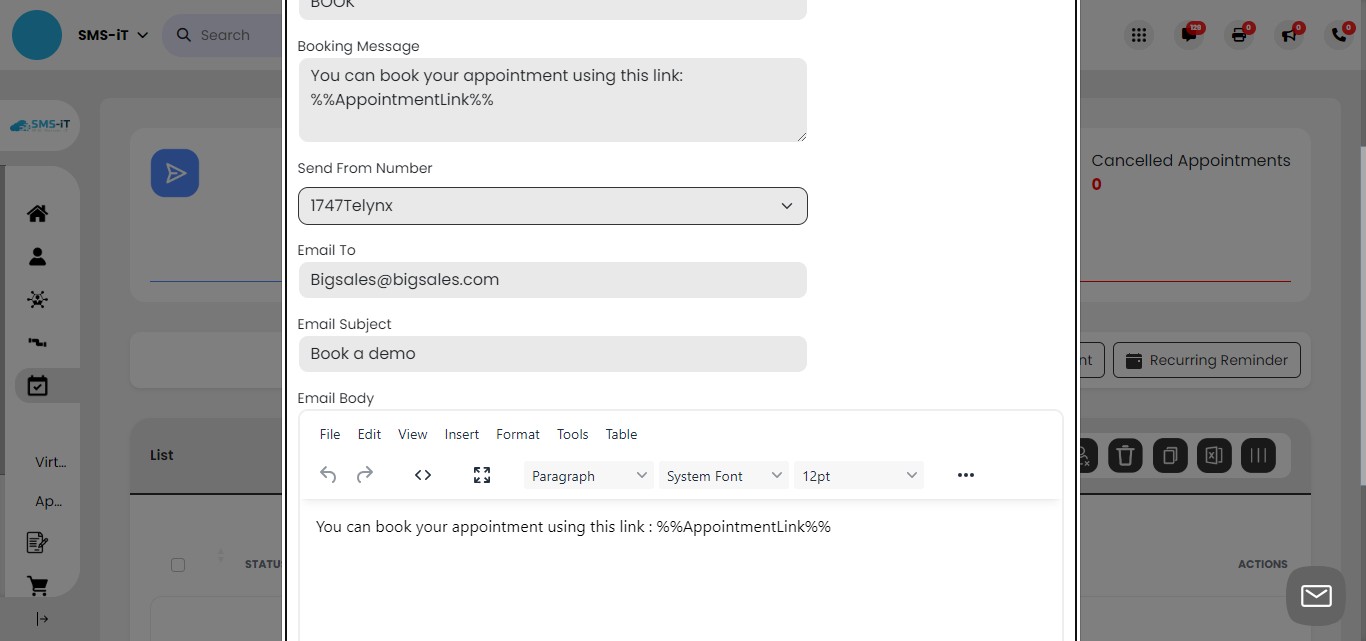
Set up a booking keyword: 1. Click on "Booking Keyword" 2. Enter a simple keyword (e.g., "BOOK") 3. When customers text this keyword, they will receive an automated reply with an appointment booking link
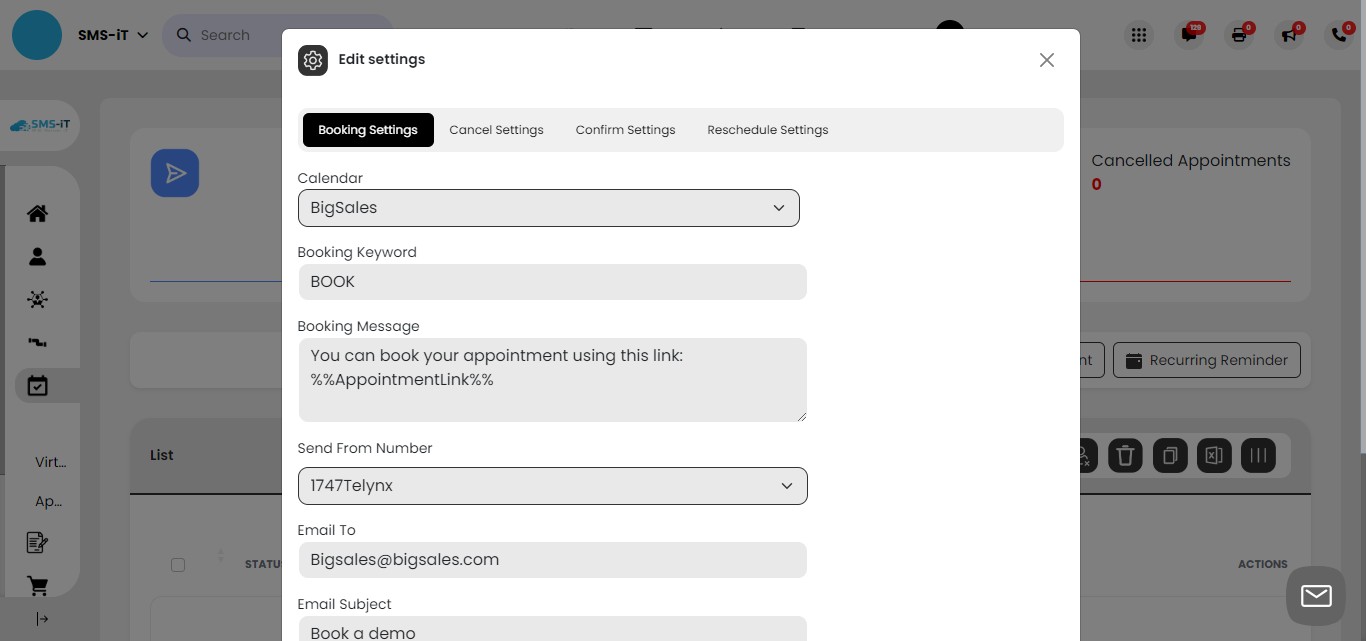
Email notification: The system will also send an email to the customer with booking information Note: This email is only sent if the contact has an email address listed in their contact profile
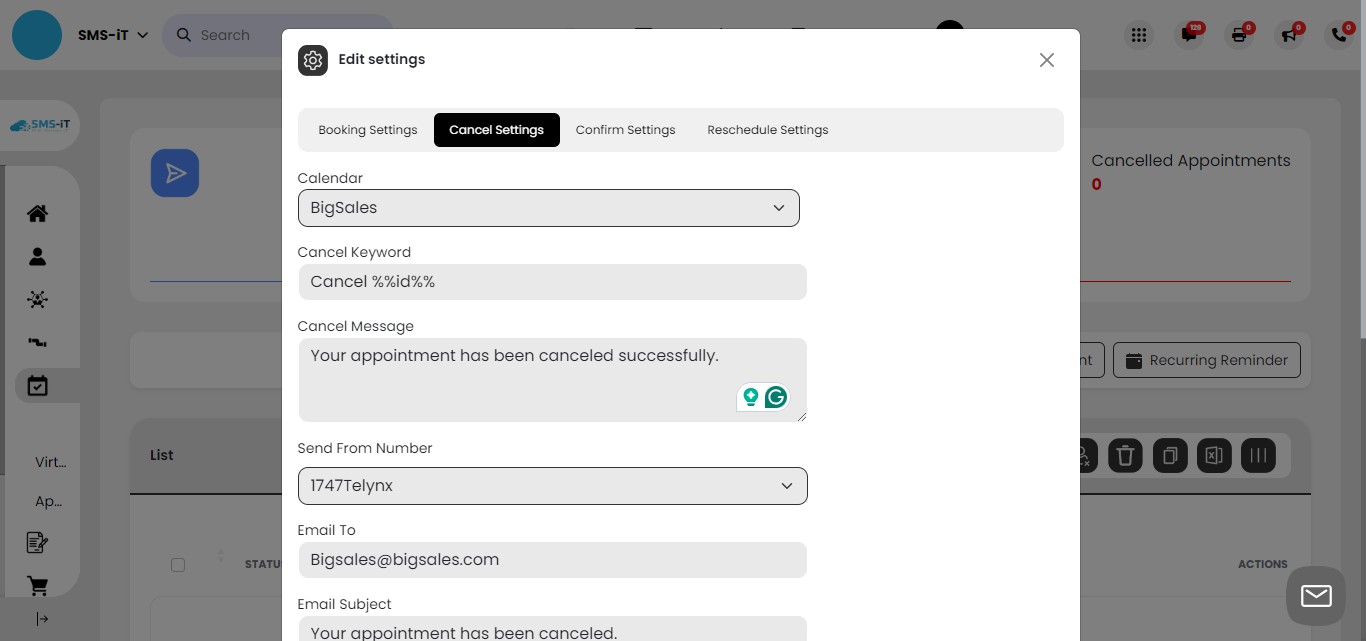
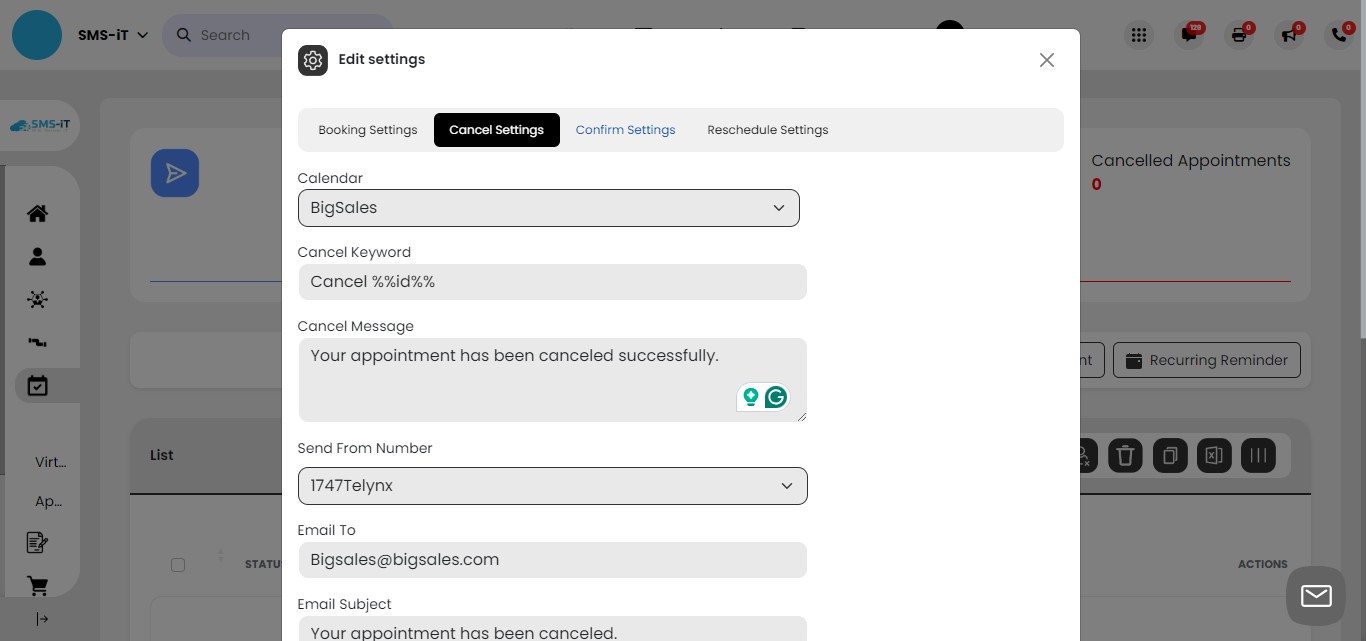
Click on "Cancel Settings"
Configure cancellation keyword: 1. Choose a simple keyword for cancellations (e.g., "CANCEL") 2. Instruct customers to text the keyword followed by their appointment ID - Example: CANCEL %%7755443%%
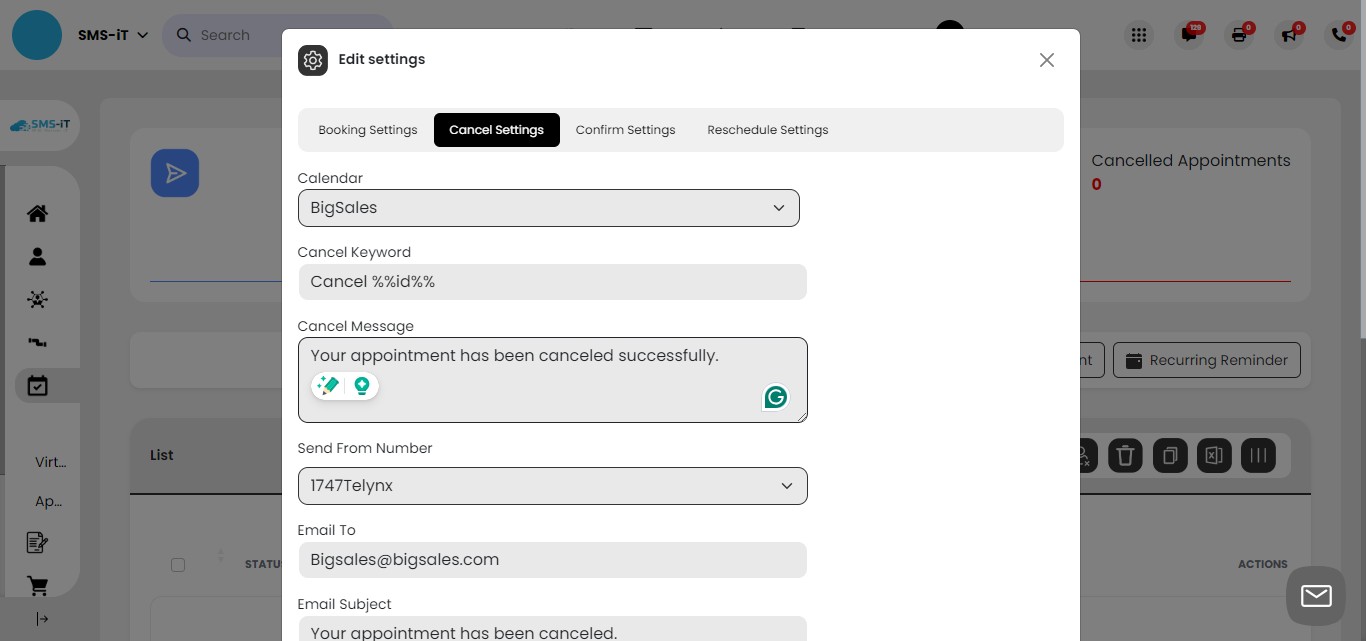
Cancellation confirmation:
When a client cancels using the keyword and ID, they will receive: a) A confirmation text message b) A confirmation email
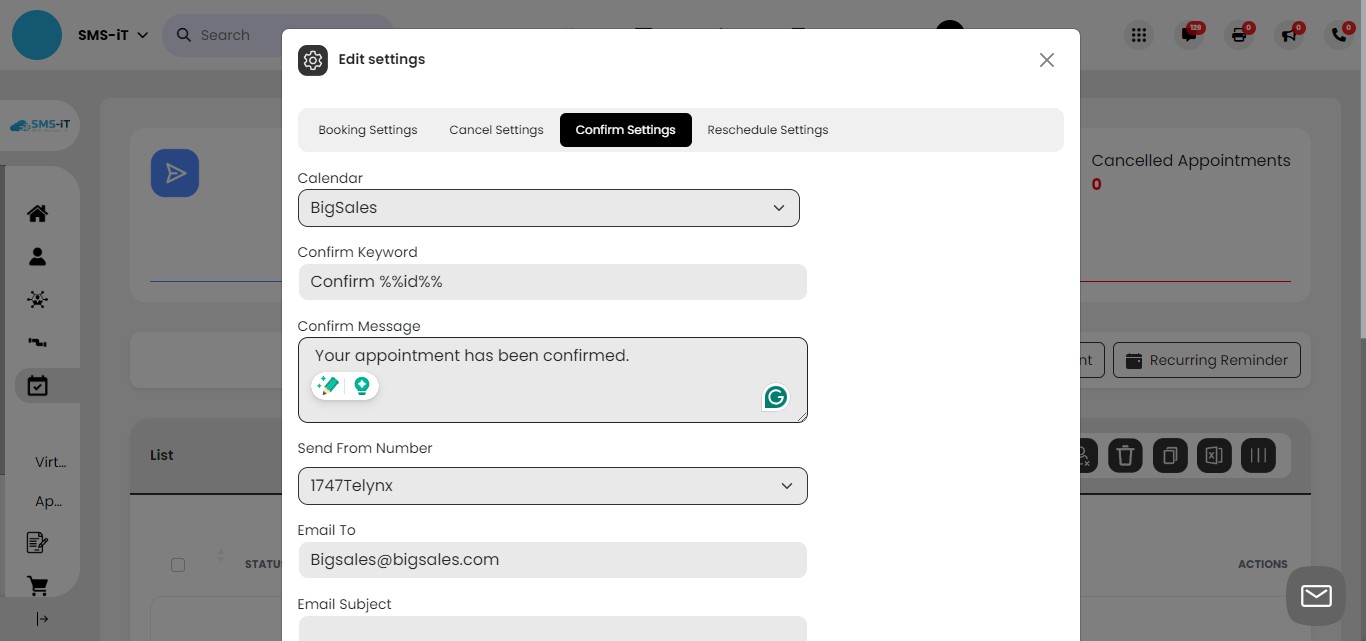
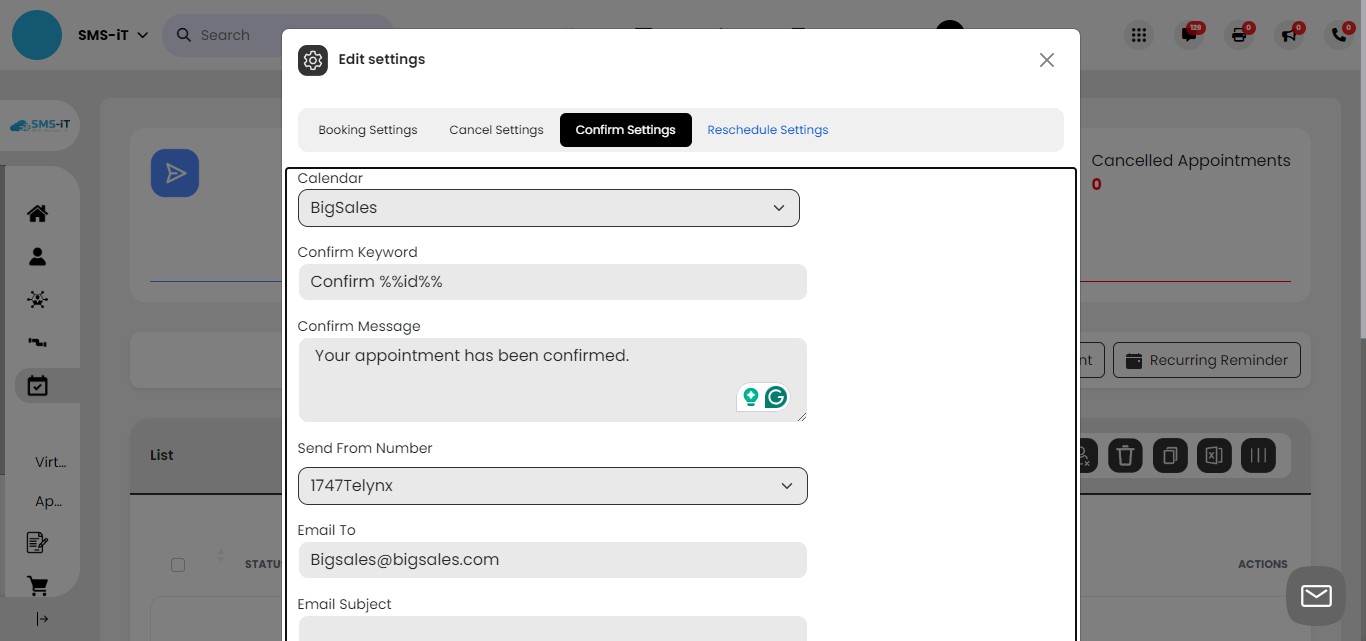
Click on "Confirm Settings"
Configure confirmation keyword: 1. Choose a simple keyword for confirmations (e.g., "CONFIRM") 2. Instruct clients to text the keyword followed by their appointment ID - Example: CONFIRM %%7755443%% When used, the client will receive: a) A confirmation text message b) A confirmation email
Click on "Reschedule Settings"
Configure rescheduling keyword: 1. Choose a simple keyword for rescheduling (e.g., "RESCHEDULE") 2. Instruct clients to text the keyword followed by their appointment ID - Example: RESCHEDULE %%77554444%%
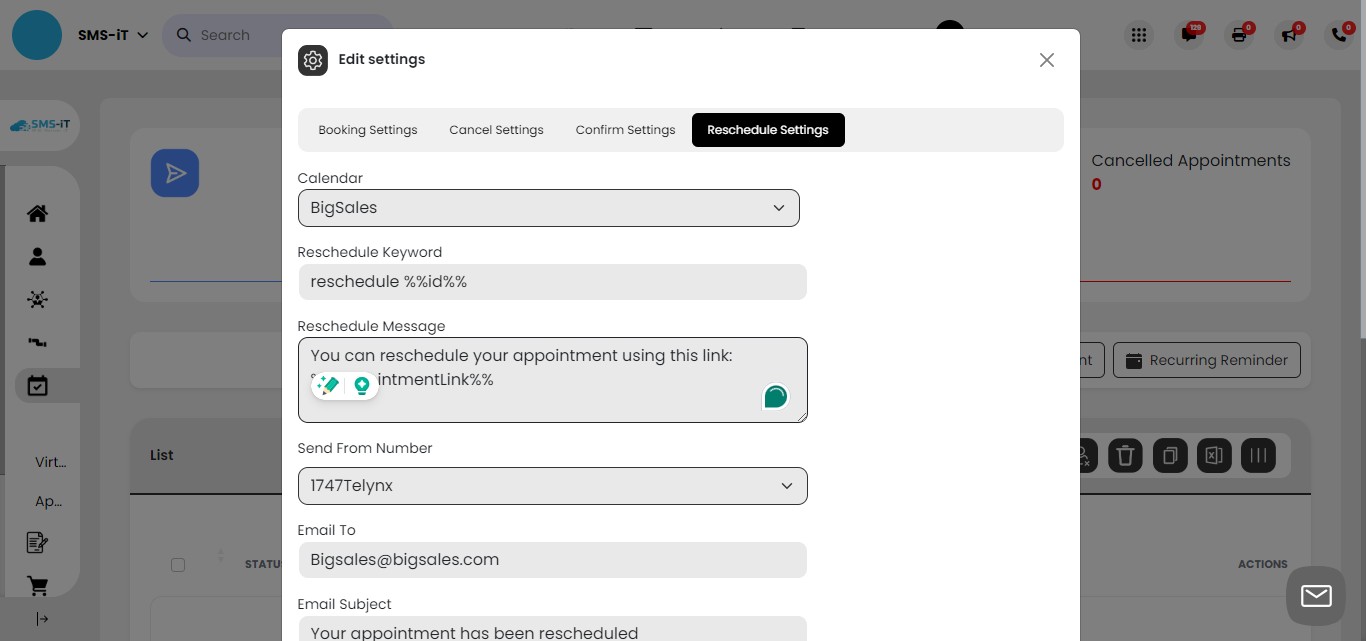
Rescheduling confirmation: - When a client requests rescheduling using the keyword and ID, they will receive: a) A confirmation text message b) A confirmation email with further instructions or a link to reschedule
Summary: The SMS-iT CRM's appointment settings provide a powerful and flexible system for managing bookings, cancellations, confirmations, and rescheduling. By allowing clients to manage their appointments through simple text commands, you're offering a convenient and user-friendly experience. This can lead to increased client satisfaction and reduced no-shows. For SMS-iT users, this automated system can save significant time on administrative tasks, allowing more focus on high-value activities. Additionally, the consistent communication through both text and email ensures that clients are well-informed, potentially leading to better-prepared and more productive meeting
Booking AI Bot
Booking AI Bot Introduction:
The SMS-iT Booking AI Bot offers a streamlined, automated approach to appointment scheduling. This intelligent system provides: 1. Easy appointment booking for customers 2. AI-powered customer interactions 3. Automated information gathering 4. Text-based appointment scheduling How it works: 1. The AI assistant greets the customer via text message 2. It collects relevant information through a conversational interface 3. The bot guides the customer through the appointment booking process 4. All interactions occur through text messaging, ensuring convenience for the customer Benefits: - 24/7 availability for appointment booking - Reduced workload for staff in managing appointments - Improved customer experience through quick and easy scheduling - Consistent information gathering for all appointments This feature is particularly valuable for businesses looking to automate their scheduling process, reduce administrative overhead, and provide flexible booking options for their clients.
Click on "Booking AI Bot"
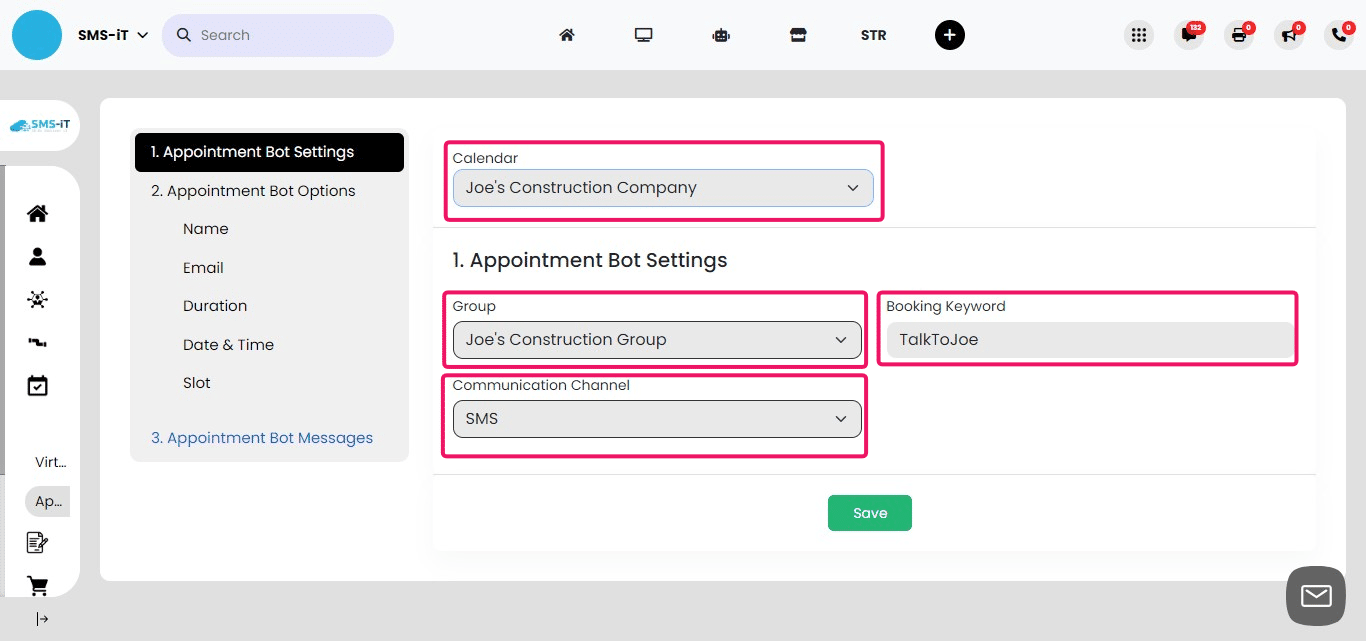
Configure the AI Bot basics: a) Calendar: Select the specific calendar for this AI Bot Note: You can create unique AI Bots for each calendar, useful for managing multiple businesses b) Group: Choose a contact group for new bookings This helps organize contacts within your CRM c) Booking Keyword: Set a word or phrase to initiate the AI Bot Example: "SCHEDULE" or "BOOK APPOINTMENT" d) Communication Channel: Select the AI Bot's operating channel For this example, we'll use SMS text, the most common option
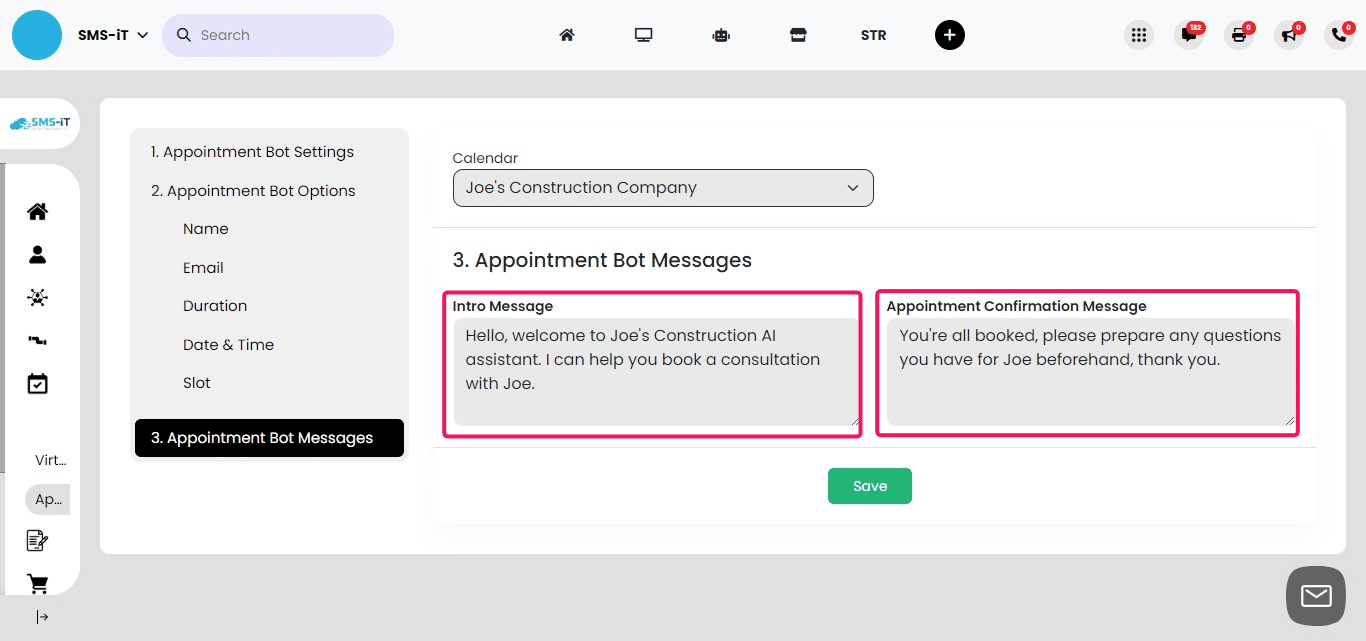
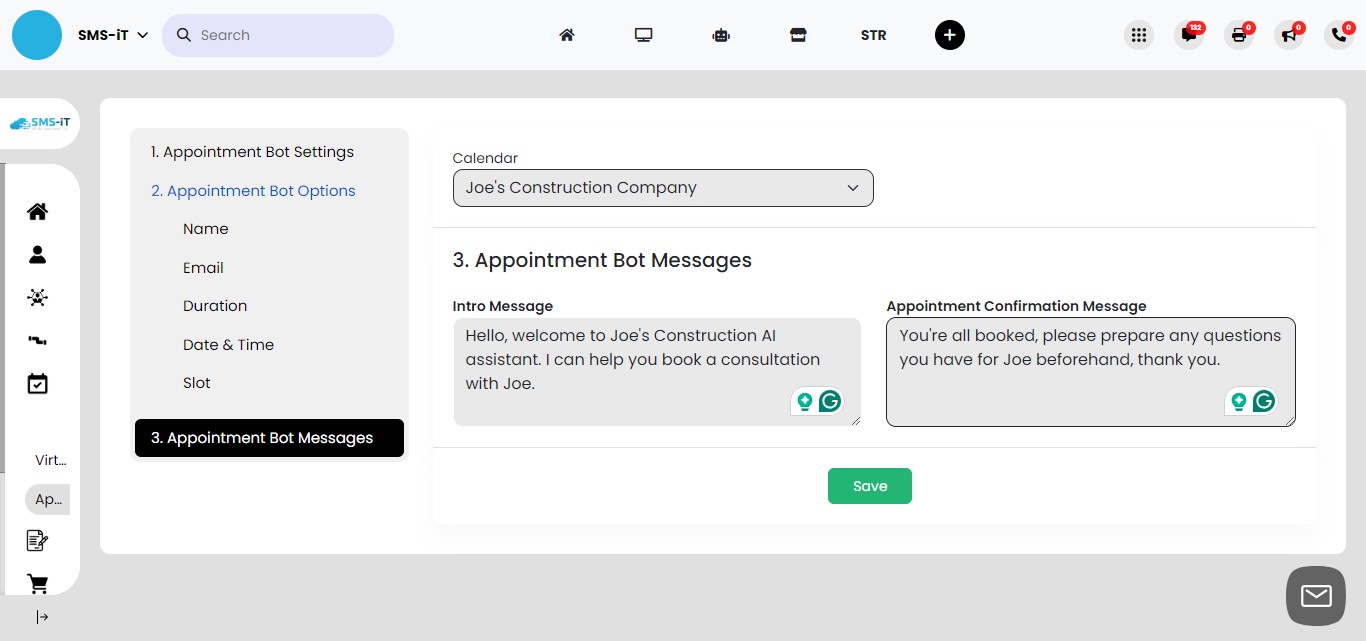
Set up AI Bot messages: a) Click on "Appointment Bot Messages" b) Craft an introductory message This is the first message clients receive after texting the booking keyword c) Create a confirmation message This is the final message sent after the booking process is complet
Click on "2. Appointment Bot Options"
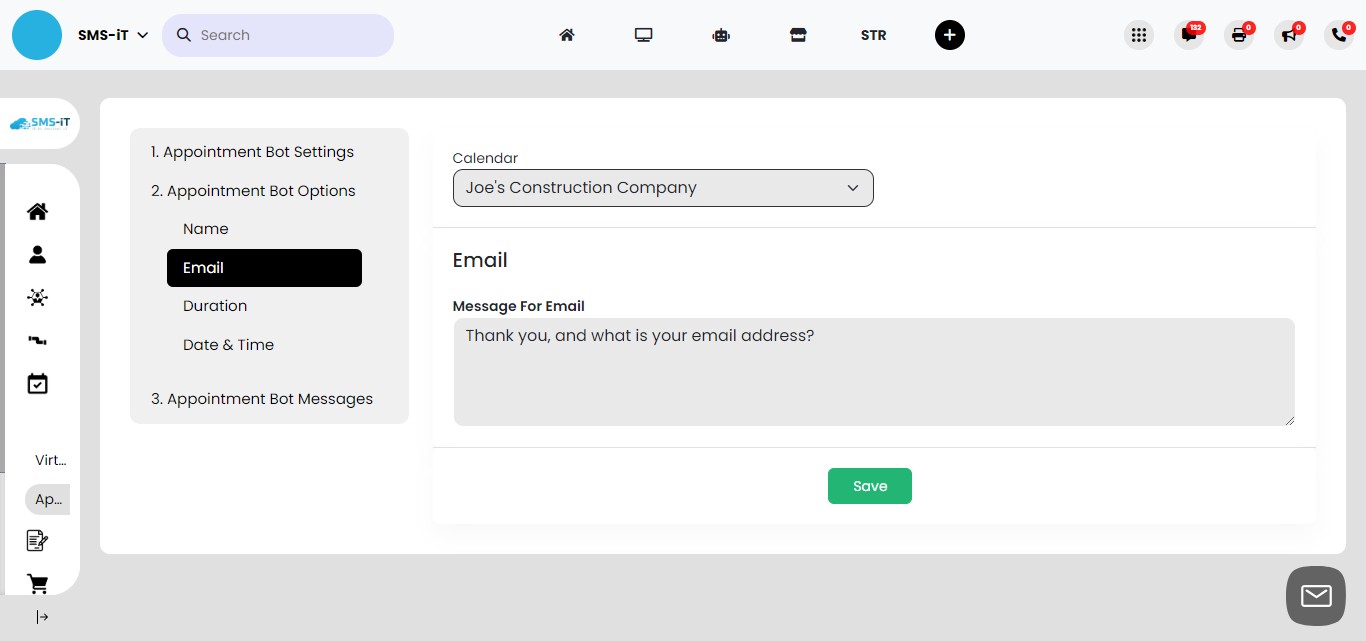
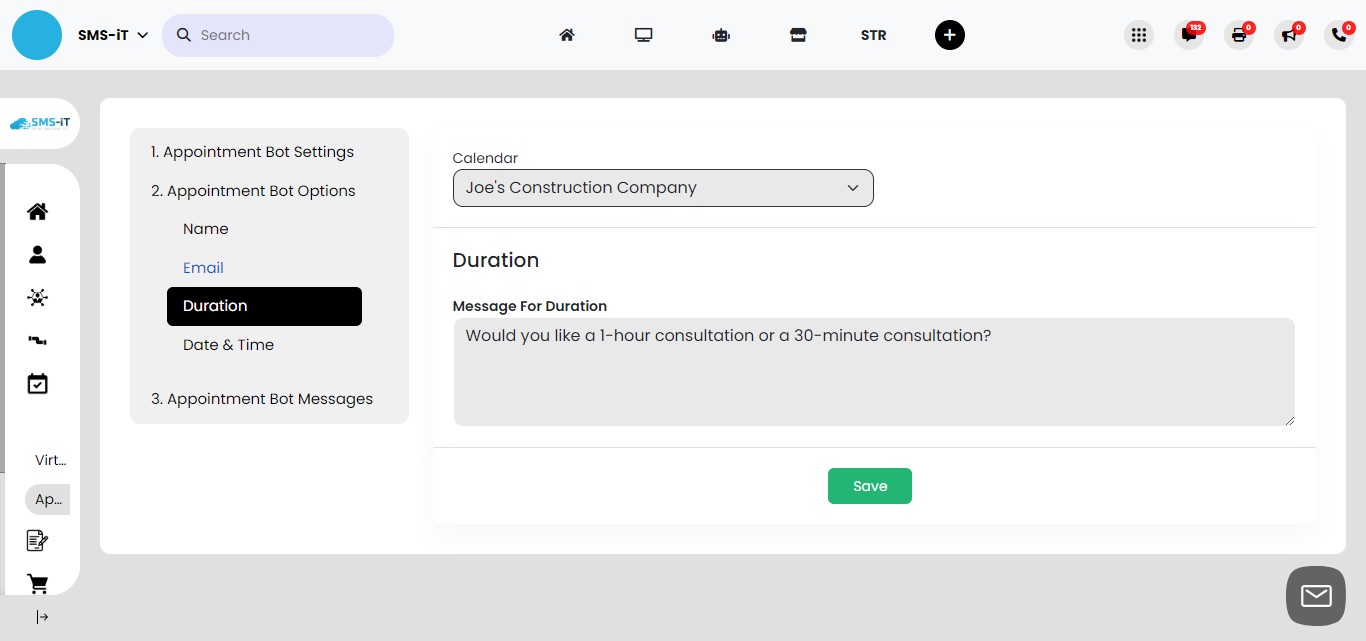
Select the information you want the AI Bot to collect from clients, such as: - Name - Email address - Preferred appointment duration - Desired date and time for the appointment

Craft the name request message:
Compose a message asking for the client's name (first and last, or just one) Note: This message will be combined with the intro message Example: "Hello, welcome to Joe's Construction AI assistant. I can help you book a consultation with Joe. May I have your first and last name?"

Set up email address request: - Create a message asking for the client's email address - This message will be sent after the client provides their name
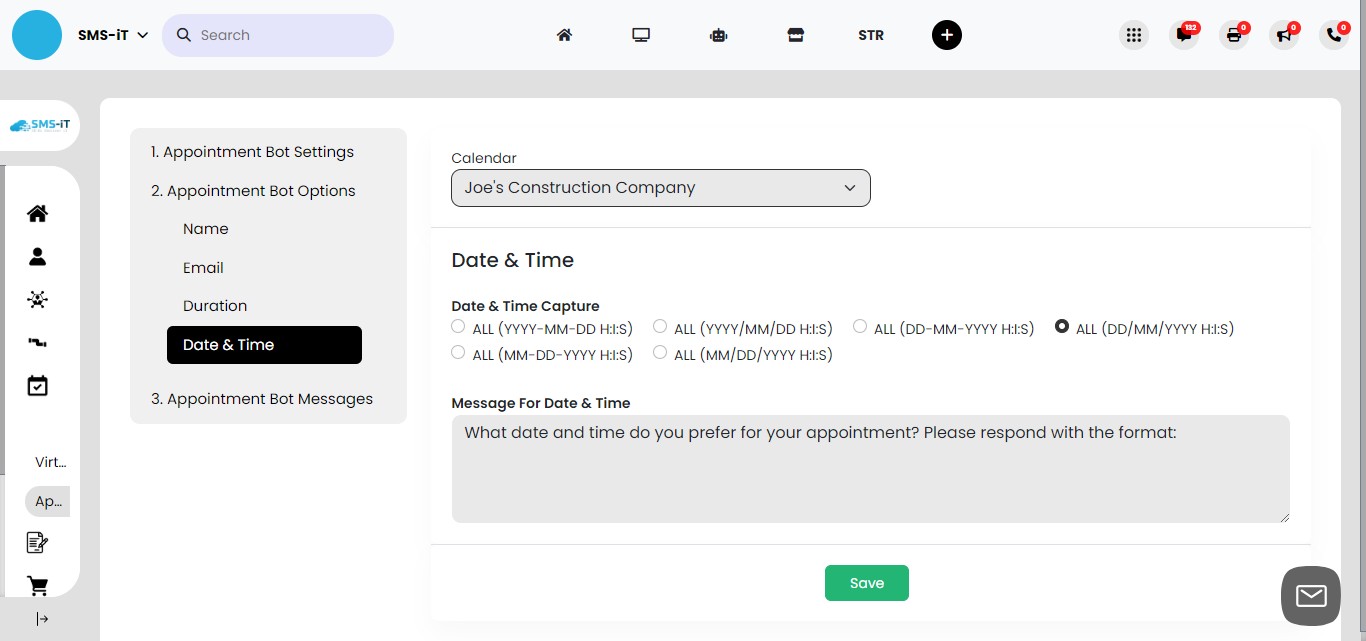
Configure appointment duration question: - Compose a message asking the client about their preferred appointment duration - This will be sent after the email address is provided
Set up date and time request: - Create a message asking for the client's preferred appointment date and time - Use the radial dials to select the date/time format - Example format: DD/MM/YYYY HH:MM:SS (24-hour clock) - Client response example for a 2:30 PM appointment: 07/08/2024 14:30:00
Finalize AI Bot setup: - Click "Save" to create your AI Bot - To make future edits: a) Click on "Booking AI Bot" b) Select the relevant calendar c) Make your desired changes

Summary: The SMS-iT CRM's AI Booking Bot is a powerful tool for automating and streamlining the appointment scheduling process. This feature can significantly reduce the time and effort required for booking appointments, allowing sales and marketing professionals to focus on high-value tasks. The customizable nature of the bot ensures that it can collect all necessary information while maintaining a personalized touch. By offering 24/7 booking capabilities, you can capture leads and schedule appointments even outside of business hours, potentially increasing your client base and revenue. The AI Bot's ability to handle multiple calendars makes it an excellent solution for businesses managing various services or locations, enhancing overall efficiency and organization.
Virtual Assistant
Virtual Assistant Introduction:
The SMS-iT Virtual Assistant is a versatile tool designed to streamline client interactions and appointment scheduling. Key features include: 1. Customizable Availability: Set your working hours for each day of the week 2. Web-based Scheduling: Create a unique web link for client self-scheduling 3. Multi-channel Communication: - Video Calls: Clients can initiate instant video consultations - Messaging: Allow clients to send direct messages - Phone Calls: Provide an option for traditional voice calls
Benefits: - Increased flexibility in managing your schedule - Improved client access to your services - Reduced administrative workload in managing appointments - Enhanced professional image through a modern, multi-channel approach
This feature is particularly valuable for solo entrepreneurs, professionals, and small businesses looking to offer clients multiple convenient ways to connect and schedule appointments, while maintaining control over their availability and communication preferences.
Click on "Virtual Assistant"
Choose the calendar to configure: - Use the "Calendar" pull-down menu to select the desired calendar Note: You can create unlimited calendars and virtual assistants, each with customizable availability and features
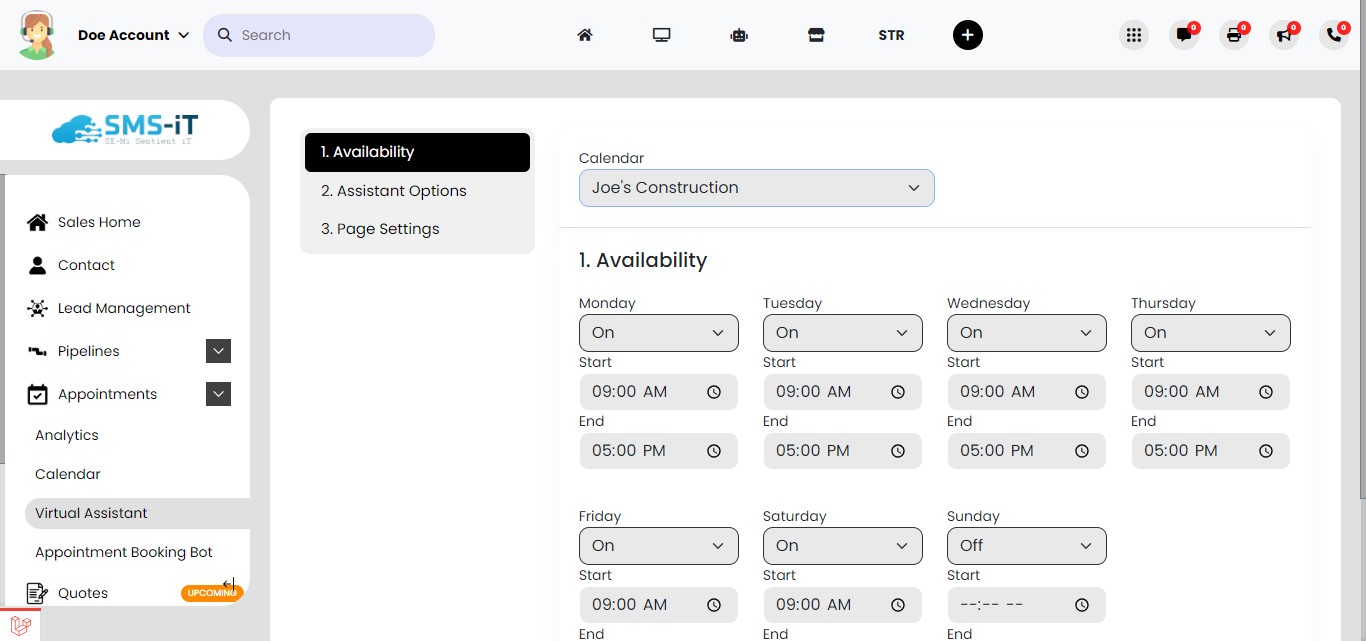
Set availability: For each day of the week, specify your available times for appointments You can either: a) Click the "Time" icon to use a visual time selector, or b) Type the times directly using your keyboard
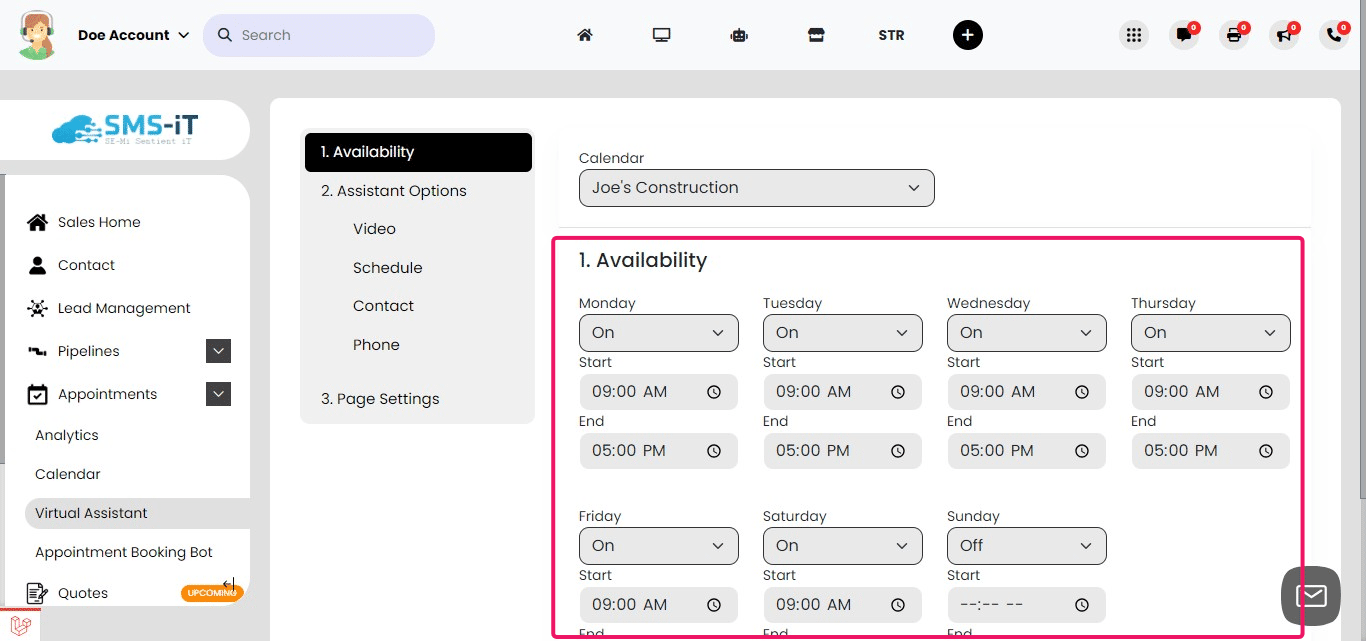
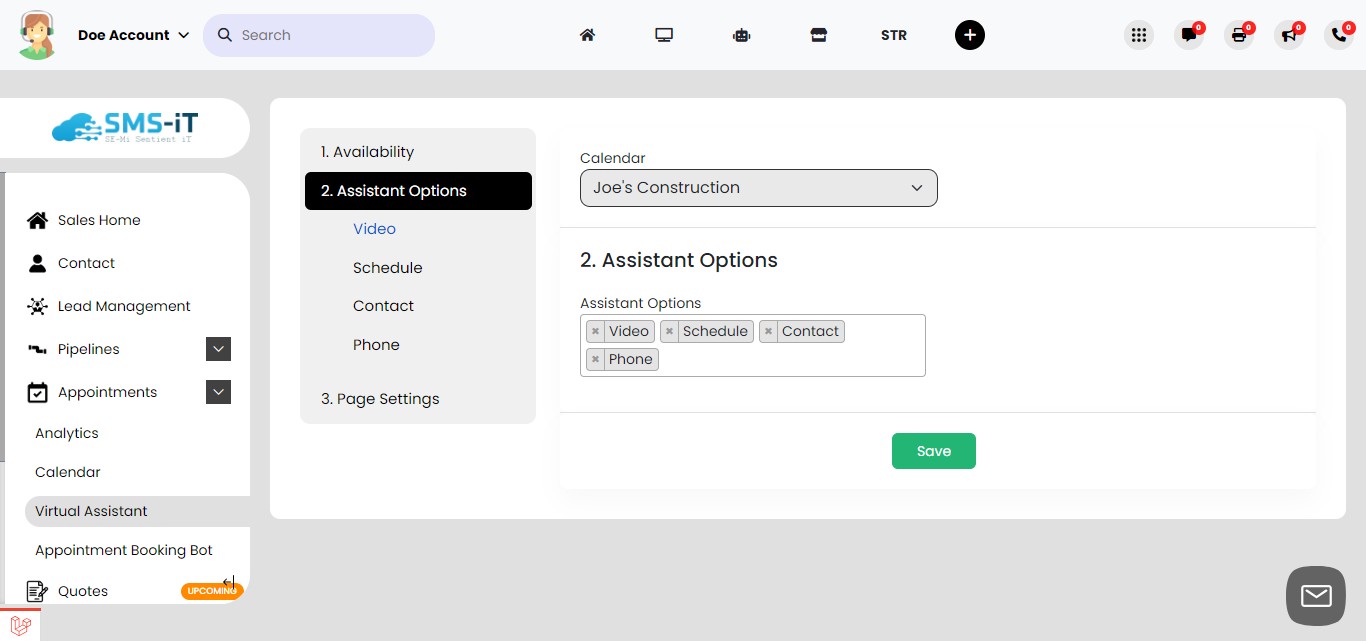
Configure Assistant Options: - Click on "Assistant Options" - You can enable or disable various features for your Virtual Assistant - We'll explore each option in detail in the following steps
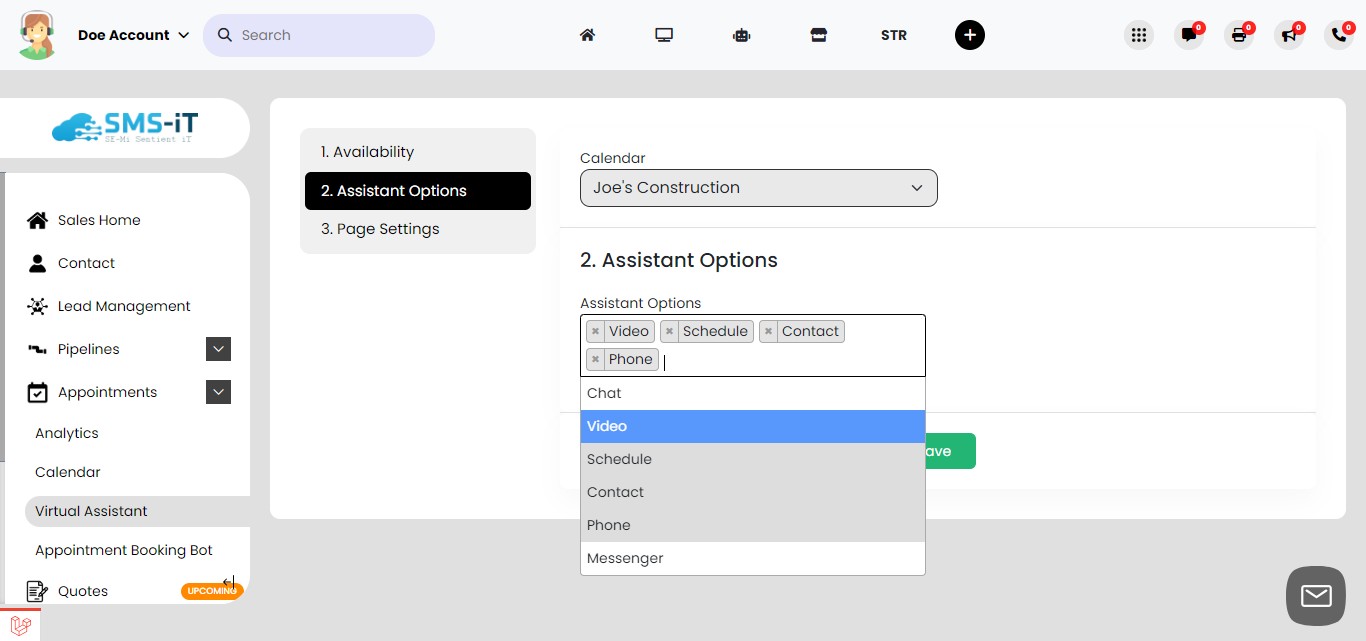
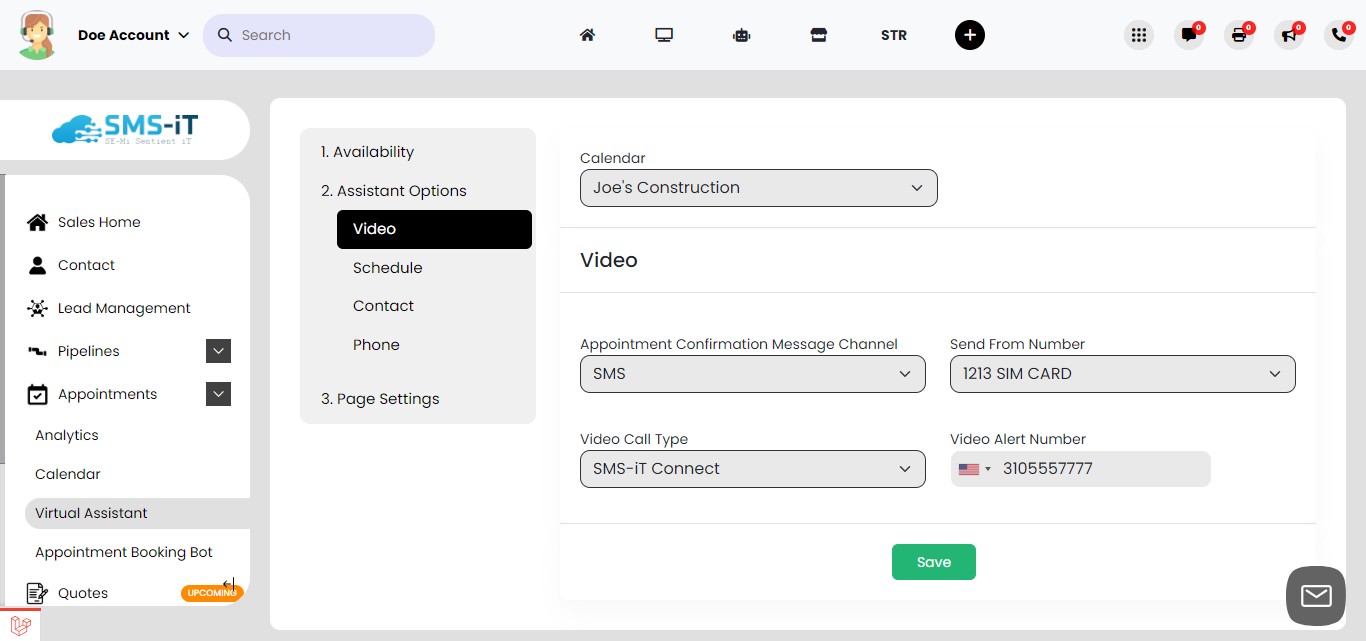
Click on "Video"
Configure video call connections:
The "Video Call" feature enables instant customer connections via: a) Third-party platforms like Zoom, or b) The native SMS-iT Connect application
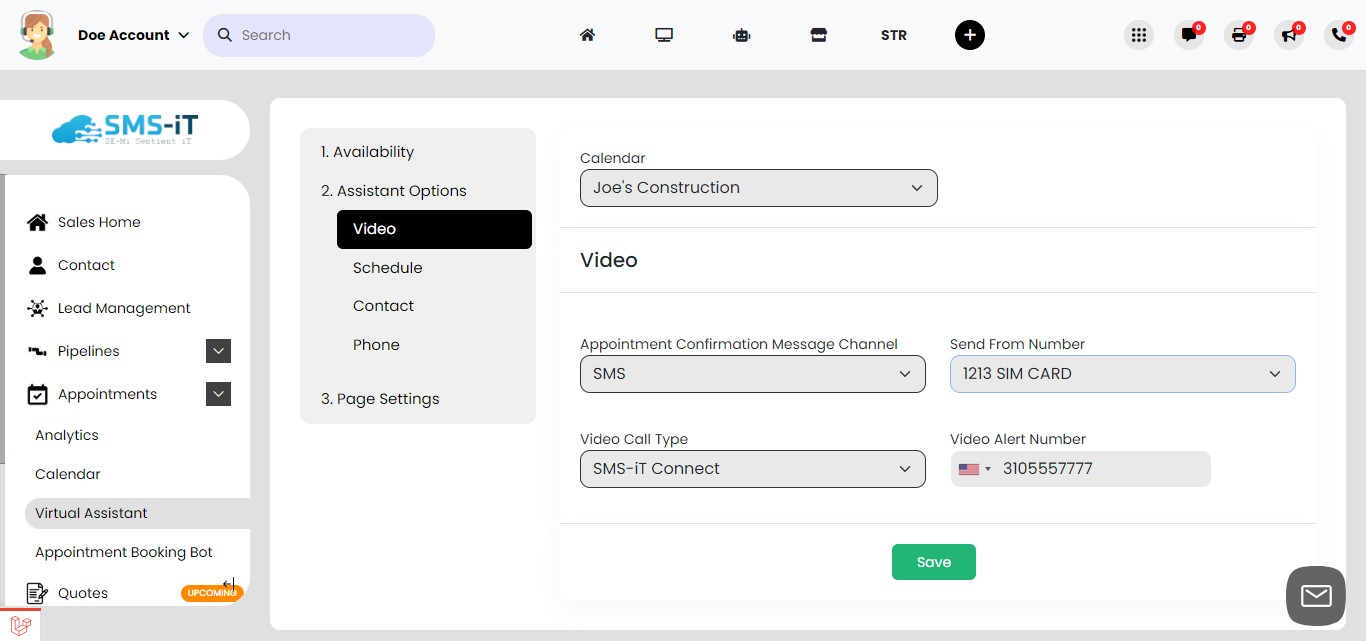
Complete video call setup: - Fill in all required information in the video call settings - Once completed, you'll be able to receive video calls from clients
Appointment Slot Settings: a) Slot Duration: Length of each appointment (e.g., 30 minutes, 1 hour) b) Slot Interval: Time between the start of consecutive slots Example: 30-minute duration with 15-minute intervals creates overlapping slots c) Buffer Duration: Automatic break added after appointments for preparation or rest d) Appointment Slots Per User: Limit on how many slots a client can book e) Maximum Booking or Reschedule Options: Number of preferred times a client can select f) Appointment Confirmation Channel: Method for sending booking confirmations g) Description: Information visible to clients on the booking page
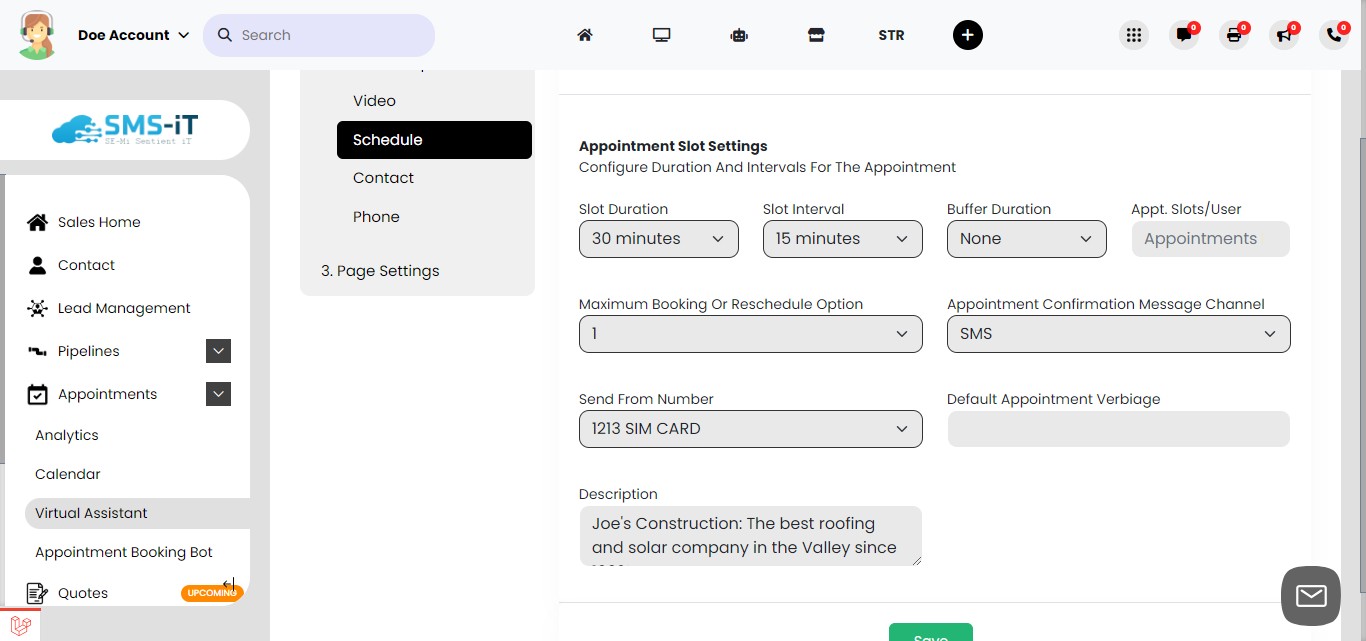
Use Case for Slot Interval: Scenario: A doctor's office with overlapping appointment slots. Slot Duration: 30 minutes Slot Interval: 15 minutes Buffer Duration: None Explanation: Appointments are scheduled every 15 minutes, so while each appointment lasts 30 minutes, the next patient is scheduled to start every 15 minutes. This allows the doctor to see multiple patients within an hour, with each patient starting their appointment at different times. Example: 9:00 AM - 9:30 AM: Patient A 9:15 AM - 9:45 AM: Patient B 9:30 AM - 10:00 AM: Patient C Use Case for Buffer Duration: Scenario: A therapist's office needing time between sessions. Slot Duration: 60 minutes Slot Interval: None Buffer Duration: 15 minutes Explanation: Appointments are scheduled to start right after the previous one ends, but a 15-minute buffer is added to each appointment to allow the therapist to write notes, prepare for the next session, or take a short break. Example: 9:00 AM - 10:00 AM: Client A 10:15 AM - 11:15 AM: Client B 11:30 AM - 12:30 PM: Client C These configurations serve different scheduling needs, with slot intervals allowing overlapping appointments and buffer durations ensuring breaks between appointments.
Set up contact form: - Click on "Contact" to configure the customer inquiry form - Create a new contact group or select an existing one for these inquiries - This organization allows for easy follow-up and future marketing efforts
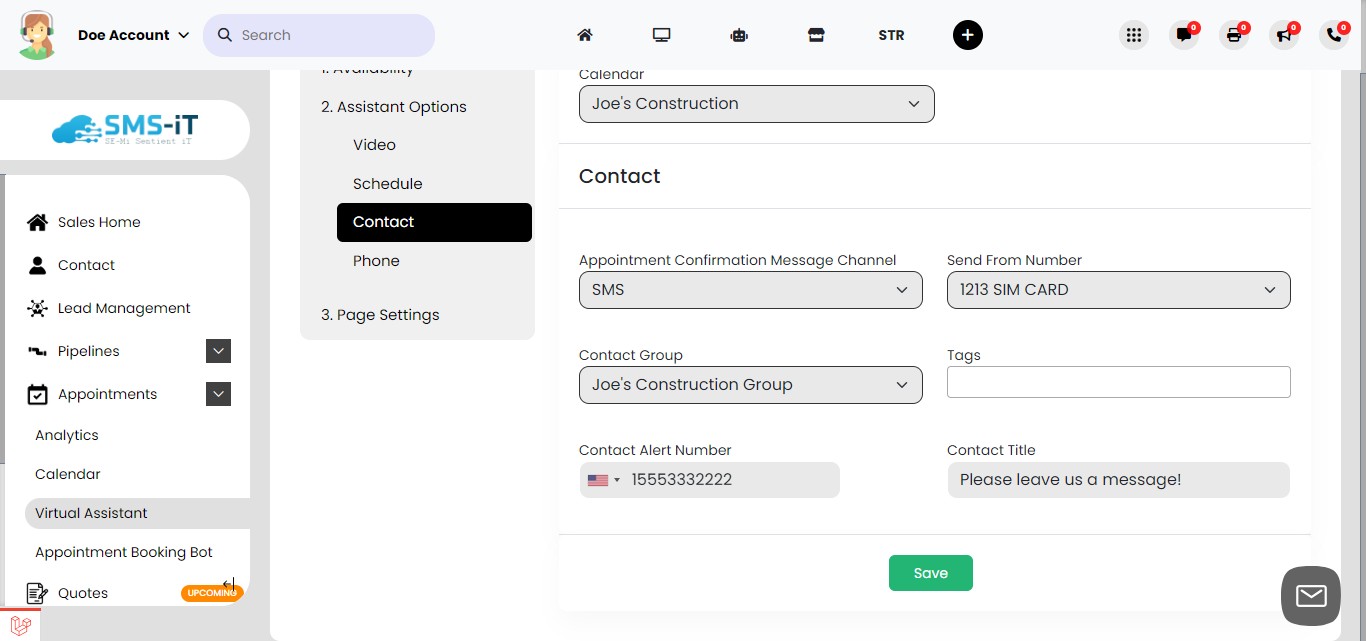
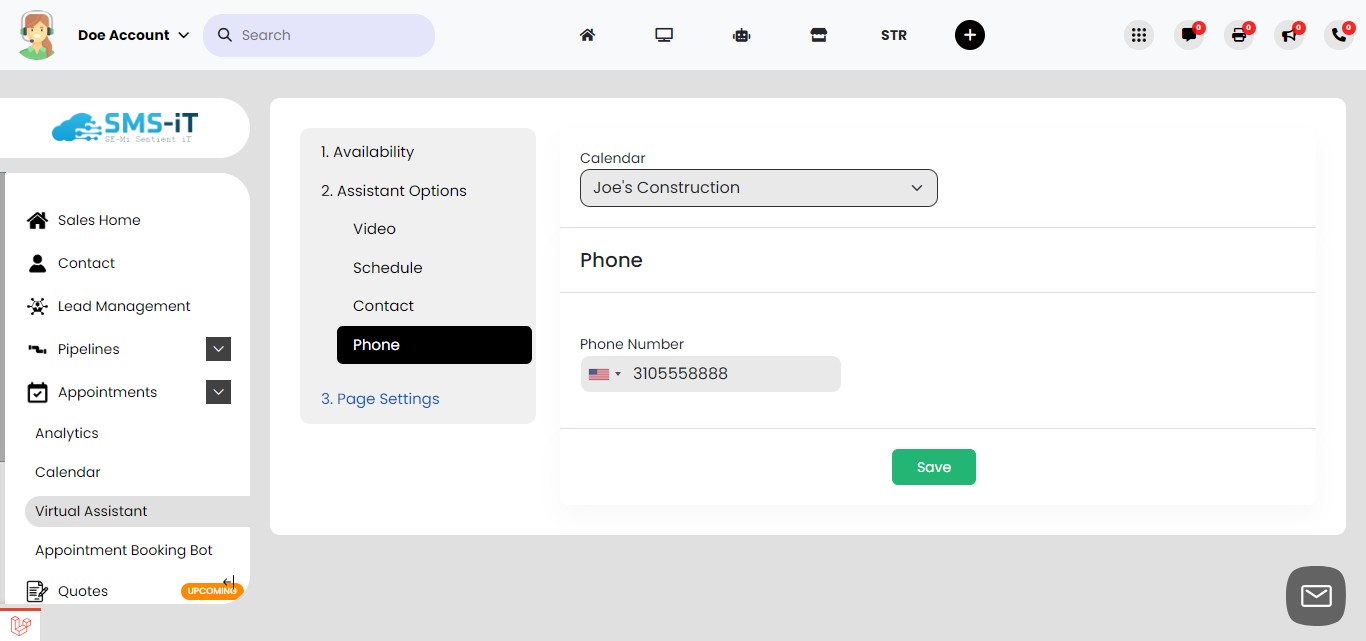
Configure phone contact option: - Click on "Phone" - Enter the phone number you want displayed to clients - This number will be shown if clients prefer to call your office directl
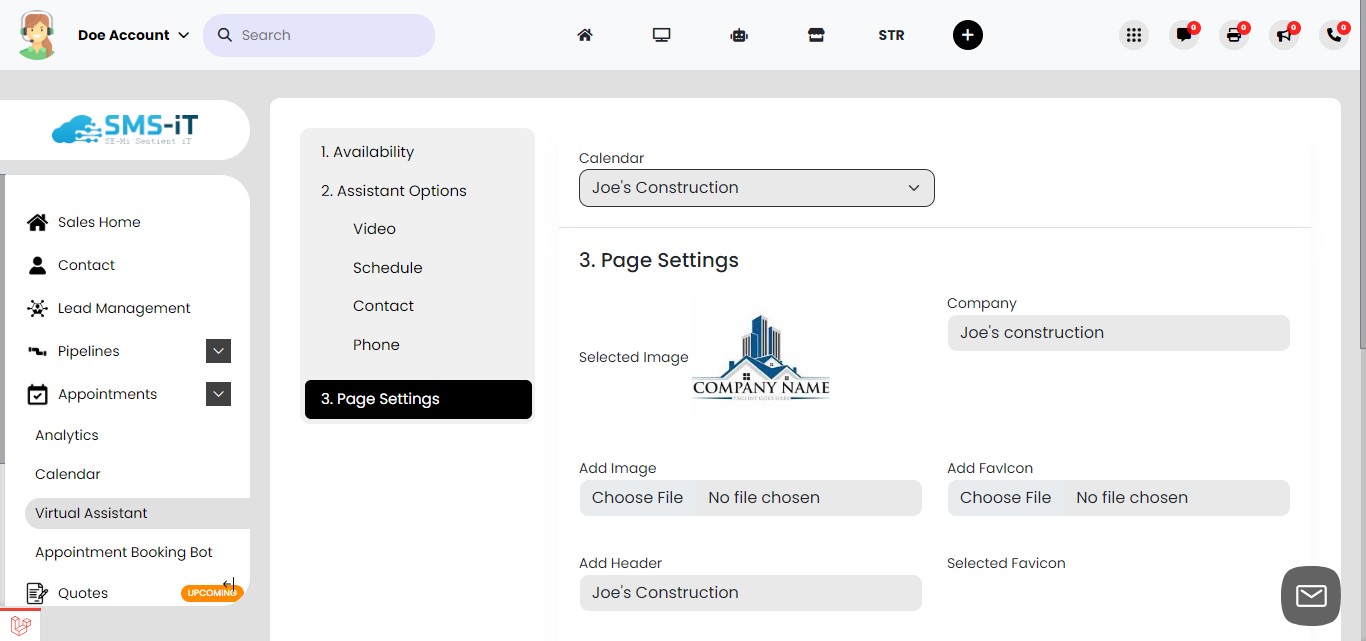
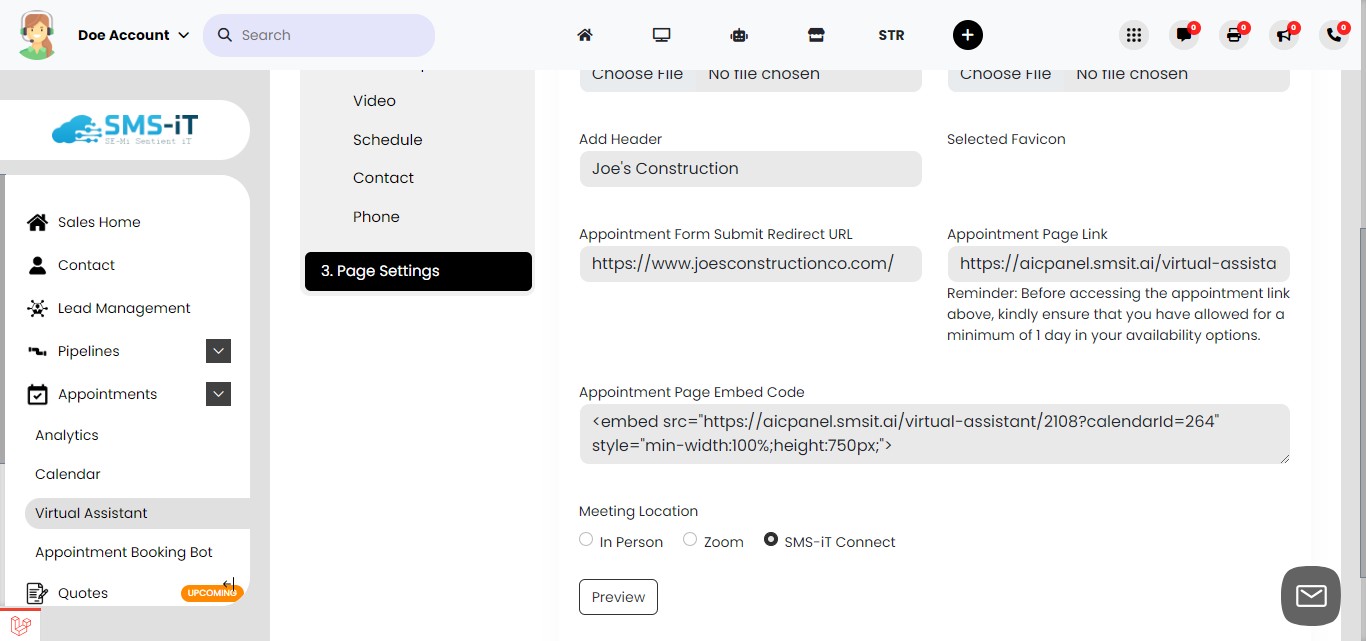
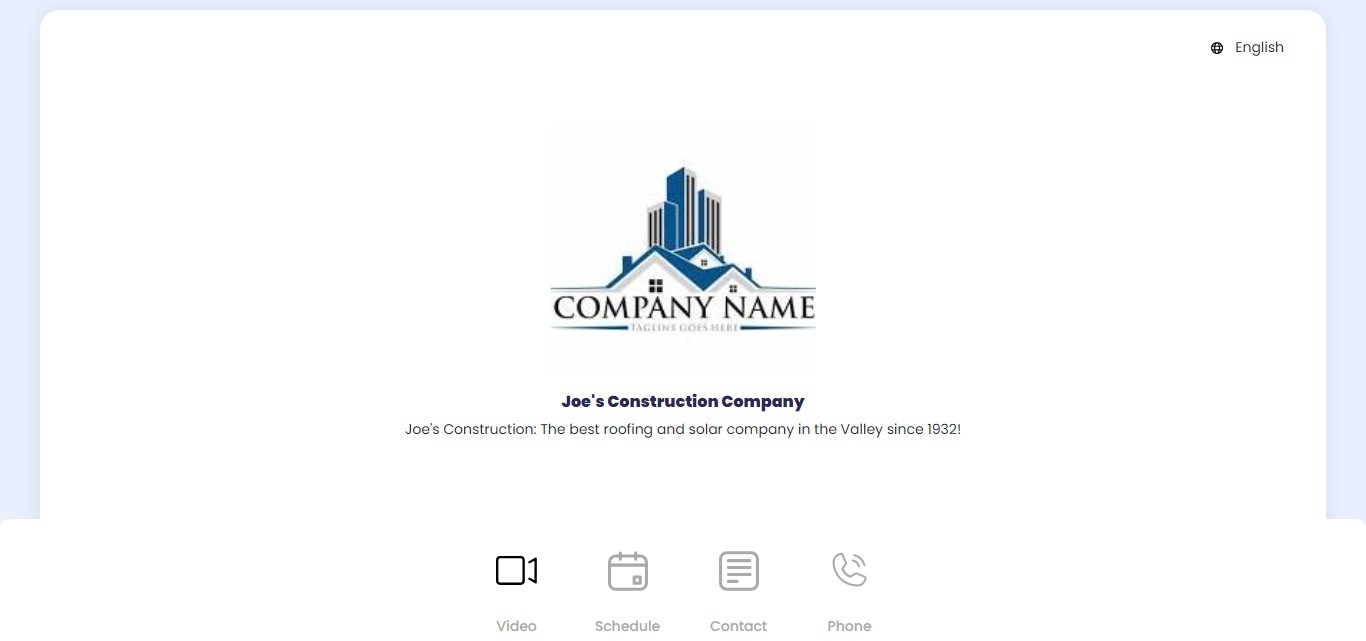
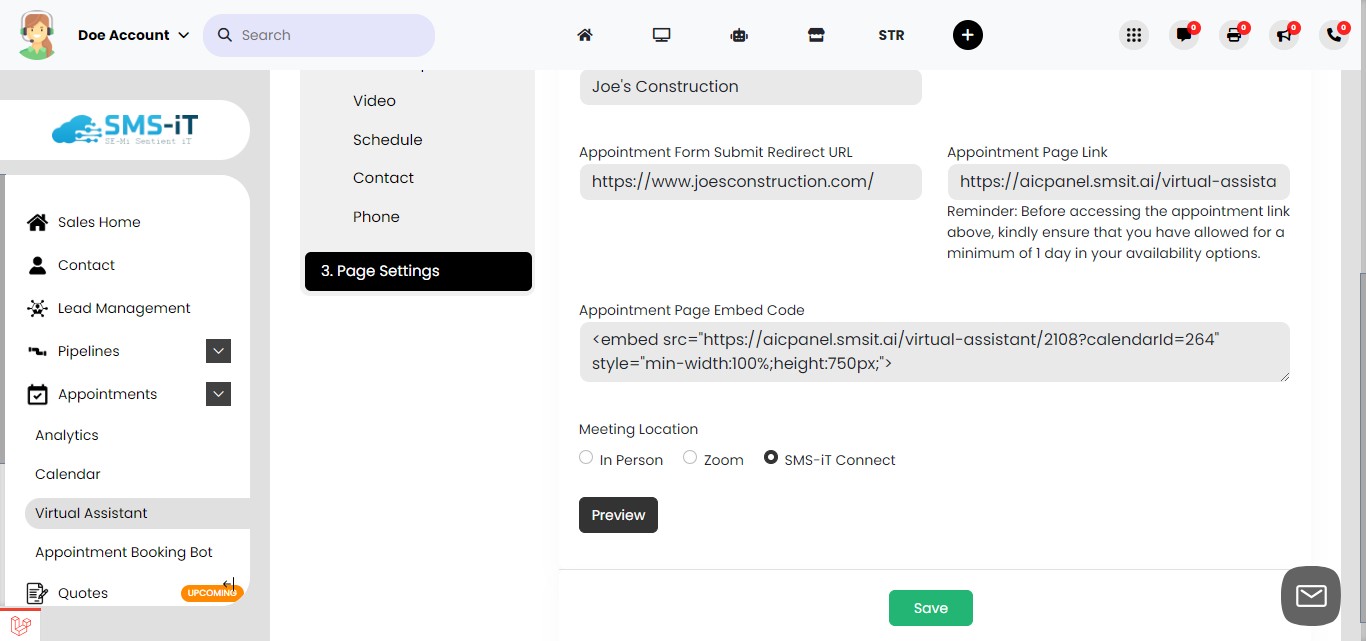
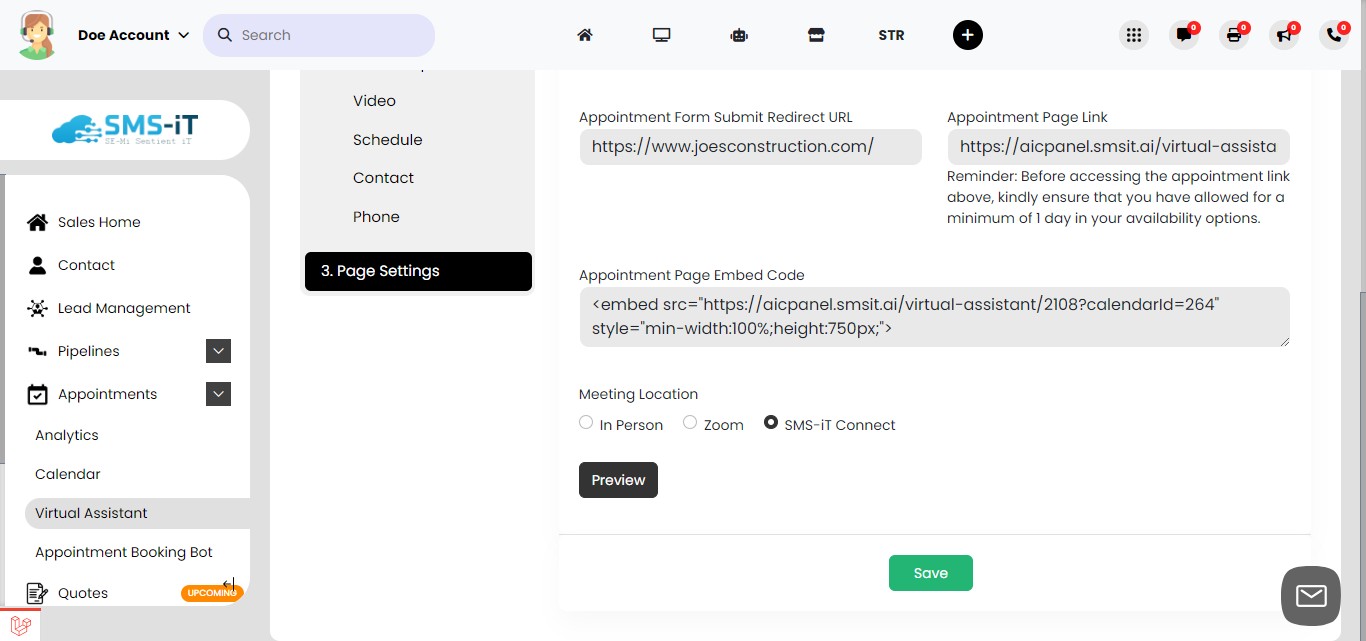
Customize page appearance: - Click on "Page Settings" - In this section, you can add: a) Company logo b) Favicon (small icon displayed in browser tabs) c) Header information d) Company name These elements help brand your booking page and create a professional appearance.
Configure additional page options: - Set up a redirect link for after form submission - Obtain the appointment page link for sharing via email or text - Get the embed code to integrate the booking form into your website or marketing funnel
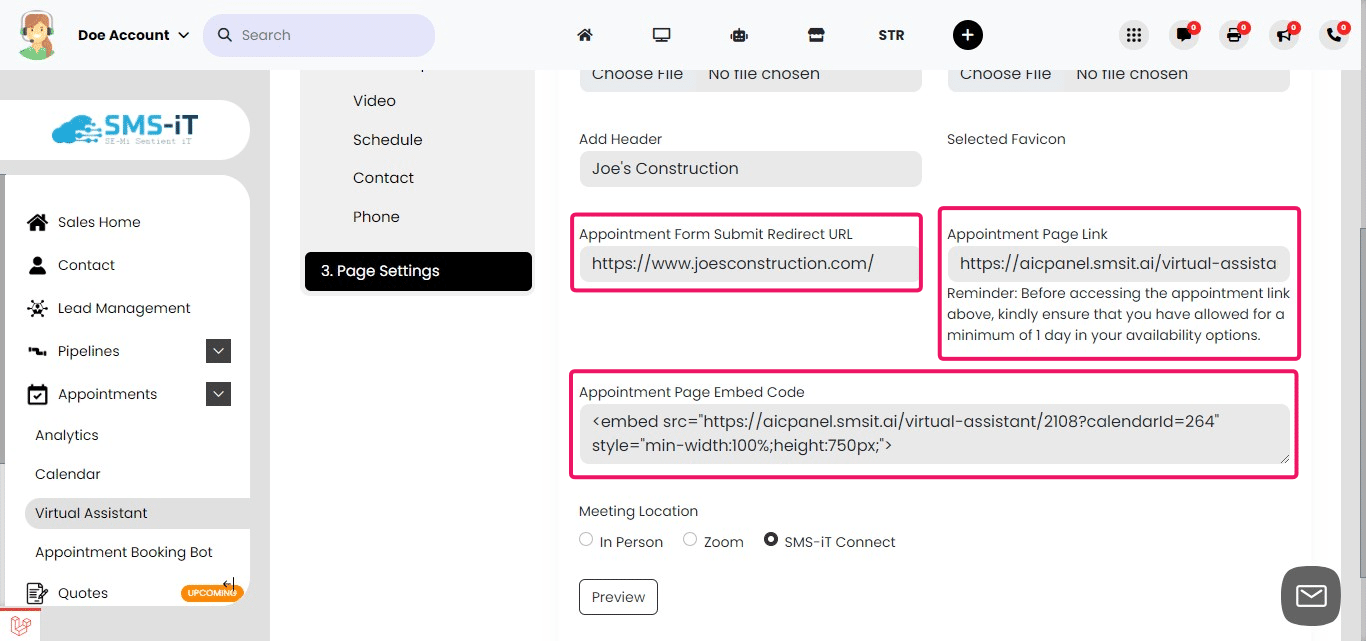
Set meeting location and connection method: - Specify the meeting location or connection method - Consider using the native "SMS-iT Connect" application for enhanced call features and a more professional appearance
Next, we'll explore how the Virtual Assistant looks and functions from the client's perspective.
Click on "Preview"

Preview Virtual Assistant
In the preview mode, we'll examine four key features: - Video Call - Schedule - Contacts - Phone
Let's start with the Video Call feature.

Preview Video
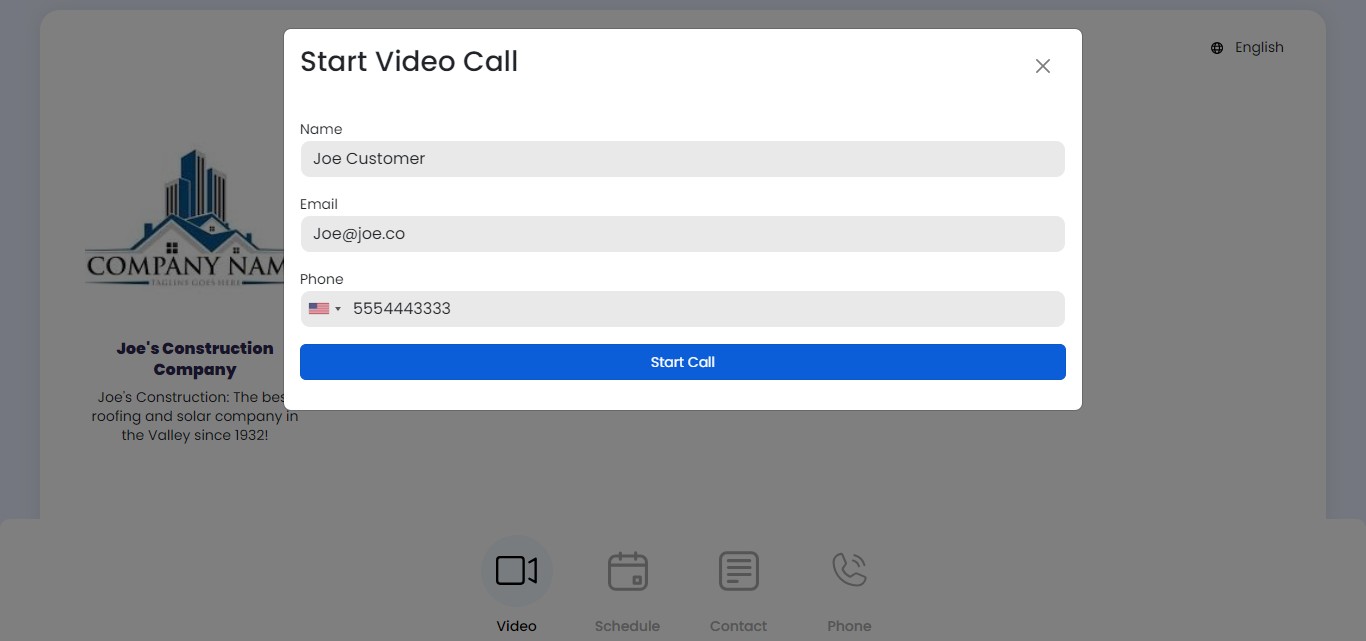
Click on "Video"
Initiate a test video call: - Click on the "Start Video Call" button to see the client's perspective
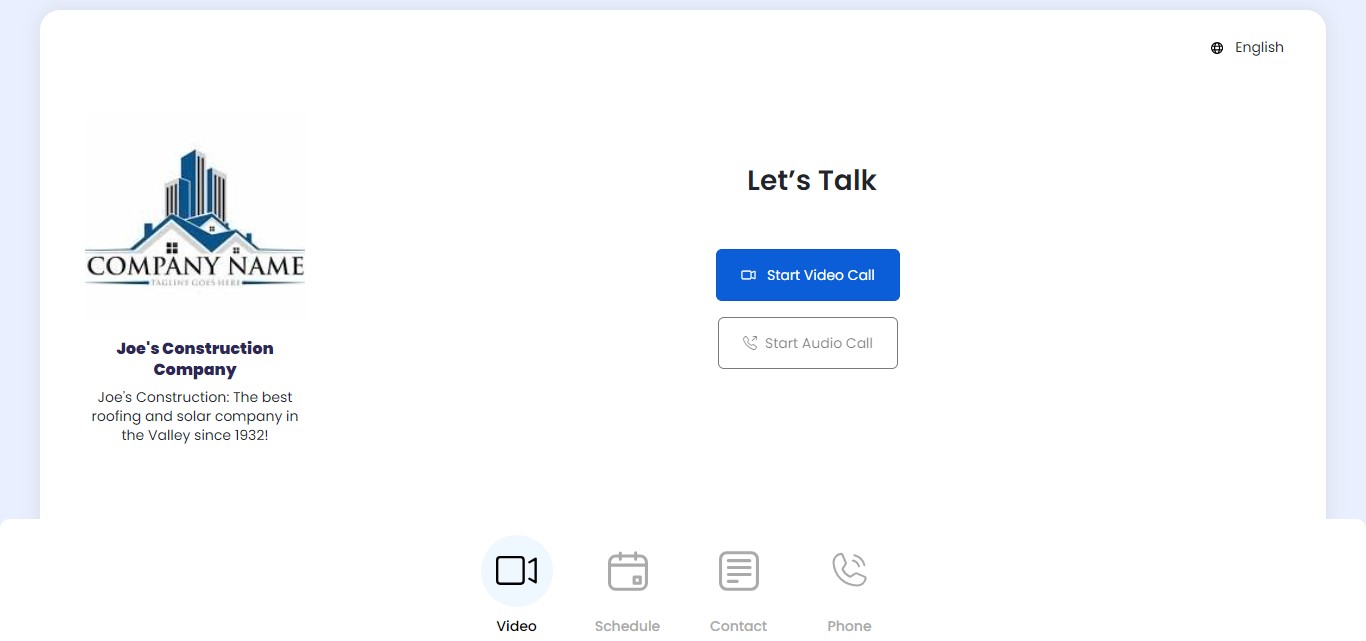
Understand the client's video call process: Clients will: a) Fill in required information b) Click "Start Call" to connect via SMS-iT Connect The system will: a) Add customer information to your SMS-iT CRM b) Place the contact in the group assigned to Video Calls You can later: a) Include this contact in campaign workflows b) Use the information for future marketing efforts
Preview Schedule
Click on "Preview"
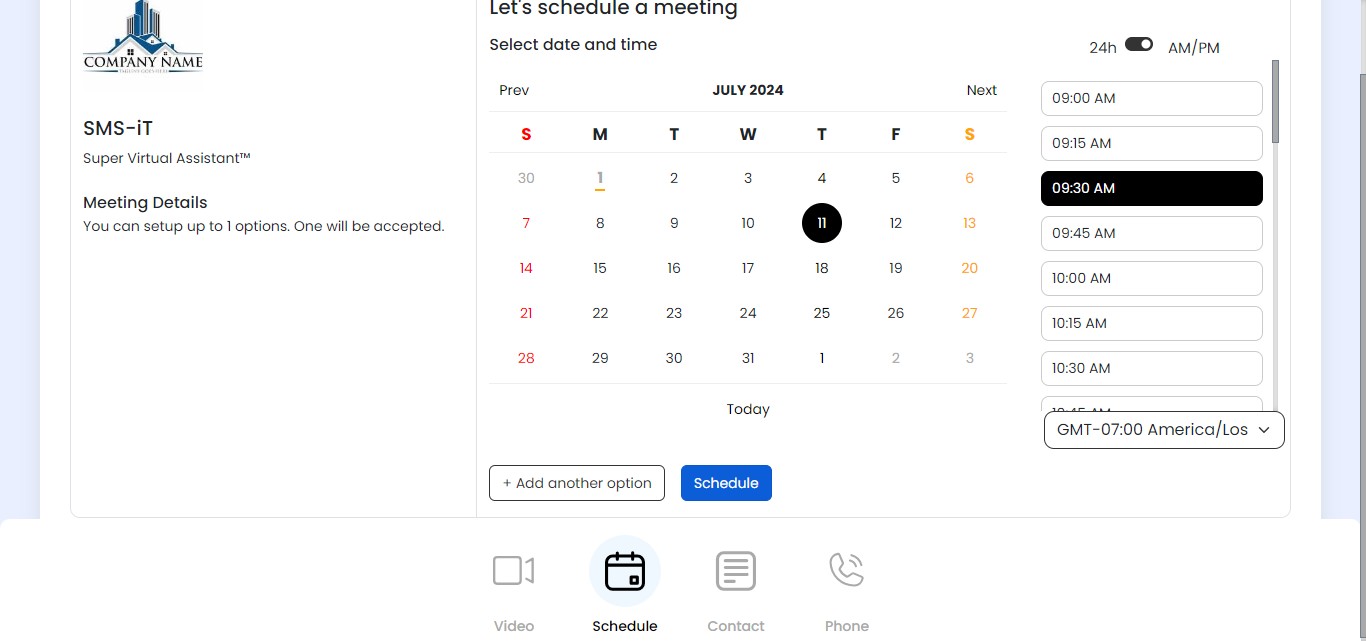
Click on "Schedule"

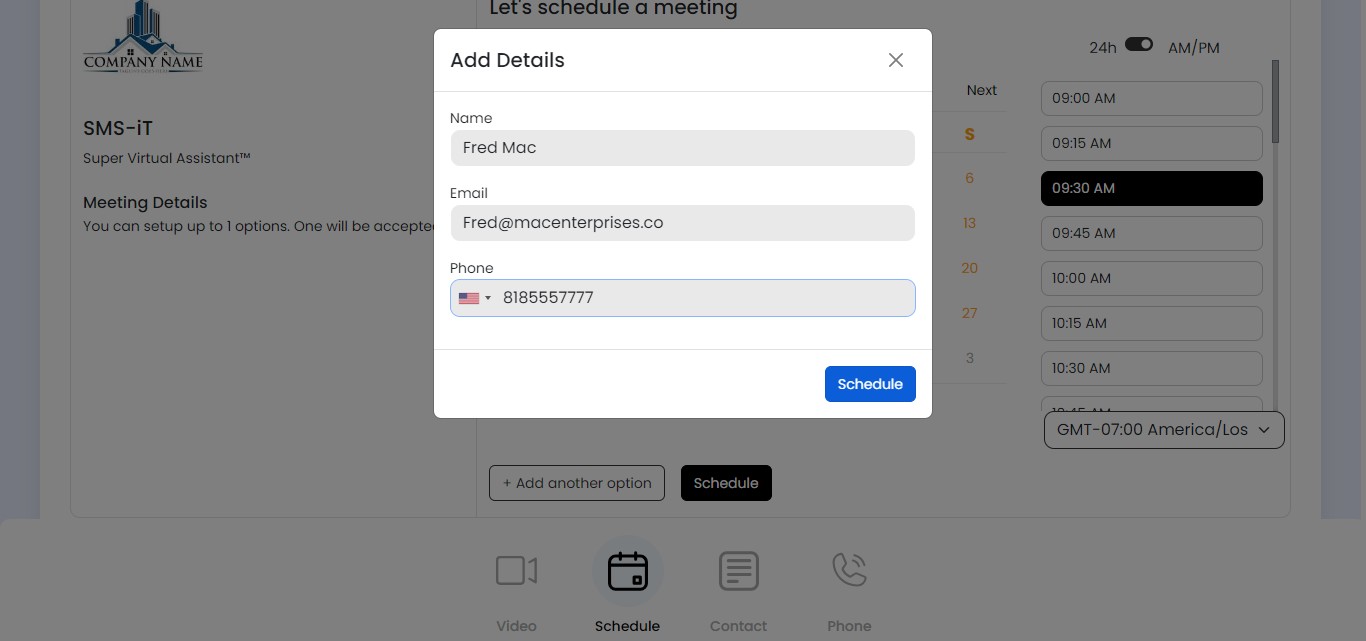
Understand the client's scheduling process: - Clients can select their preferred date and time If multiple options are enabled: a) Clients can choose two or three preferred time slots b) They will be notified which option is ultimately selected
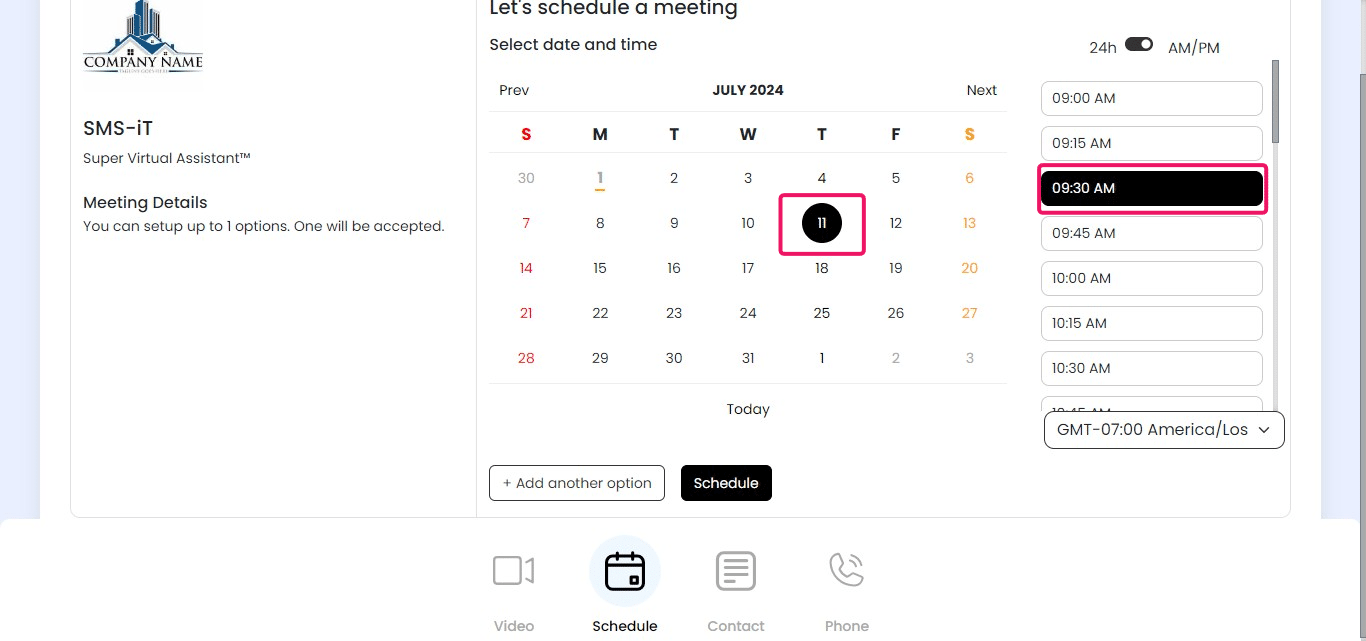
Click on "Schedule"
Complete the scheduling preview: - Clients will fill in their information and click "Schedule" The system will then: a) Send a confirmation email to the client b) Include all appointment details in the email c) Provide a unique appointment link and ID d) Give instructions for canceling, confirming, or rescheduling
Preview Contact
Click on "Preview"

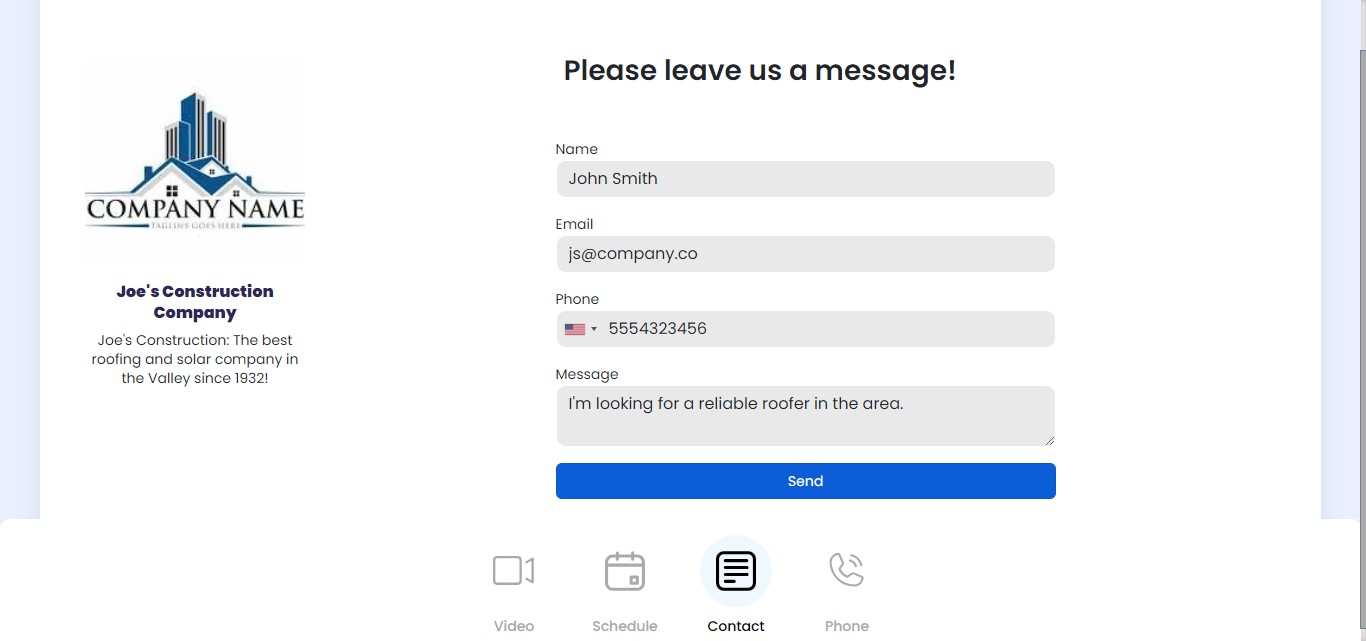
Click on "Contact"

Understand the client's contact process: - Clients will: a) Fill out their information b) Type their message c) Click "Send" - The system will: a) Send you the message via email and text b) Add the customer to a designated group for follow-up - This allows for: a) Prompt response to inquiries b) Organized follow-up communication c) Targeted marketing efforts
Preview Phone
Click on "Preview"
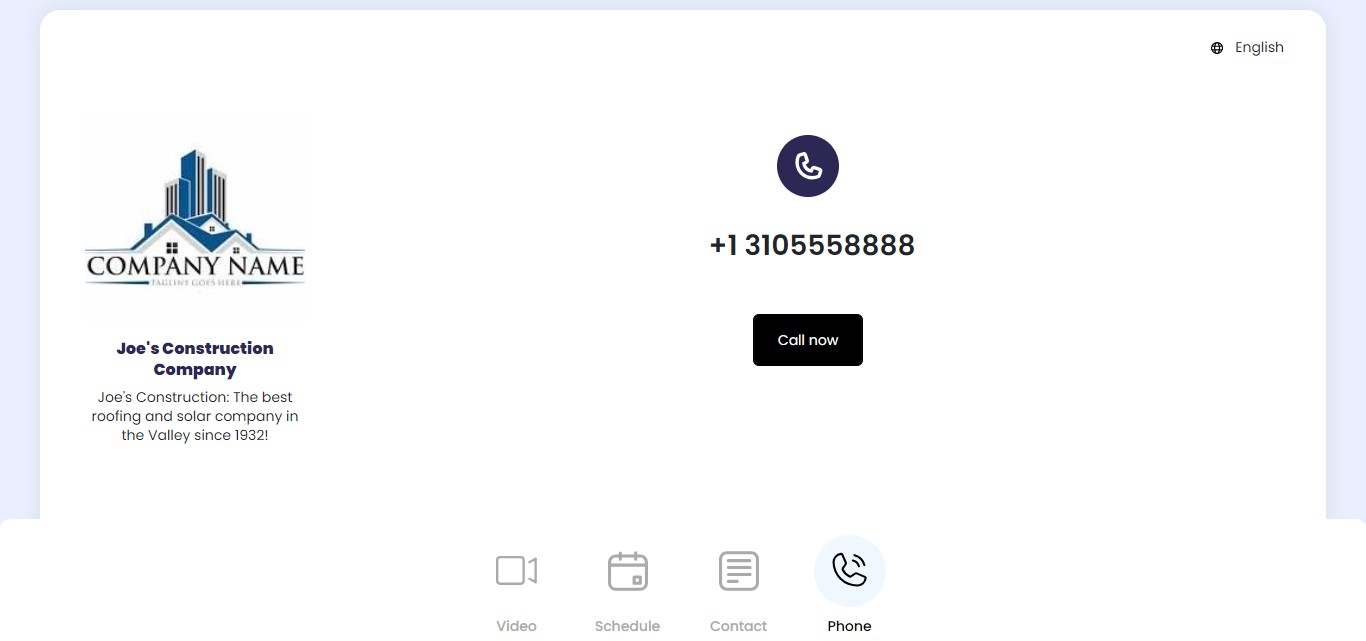
Click on "Phone"

Understand the direct call option: - Clients will see the phone number you've provided - They can use this number to call your office or mobile directly - This option caters to clients who prefer immediate voice communication
Summary: The comprehensive preview feature of the SMS-iT CRM Virtual Assistant allows you to experience and refine every aspect of client interaction. By offering multiple contact methods - video calls, scheduling, contact forms, and direct phone calls - you cater to various client preferences, potentially increasing engagement and conversion rates. For sales and marketing professionals, this multi-channel approach ensures that no potential leads are lost due to communication barriers. The automatic grouping of contacts based on their interaction method also facilitates targeted follow-ups and personalized marketing strategies, which can lead to improved client relationships and increased sales opportunities.
Recurring Reminders
Recurring Reminders Introduction:
The SMS-iT CRM allows you to set up a series of reminders to ensure your clients don't forget their upcoming appointments. Key features include: 1. Multiple Reminders: Create a sequence of reminders for each appointment 2. Customizable Timing: Set reminders to be sent at various intervals before the appointment 3. Multi-channel Notifications: Send reminders via SMS, email, or both How it works: - Configure reminder settings for different time points (e.g., 1 day before, 1 hour before) - The system automatically sends out reminders based on your settings - Clients receive timely notifications to help them remember and prepare for their appointments Benefits: - Reduce no-shows and last-minute cancellations - Improve client preparation and punctuality - Enhance the professional image of your business - Save time on manual follow-ups and reminders This feature is particularly valuable for busy professionals, solo entrepreneurs, and small businesses looking to minimize missed appointments and improve overall scheduling efficiency.
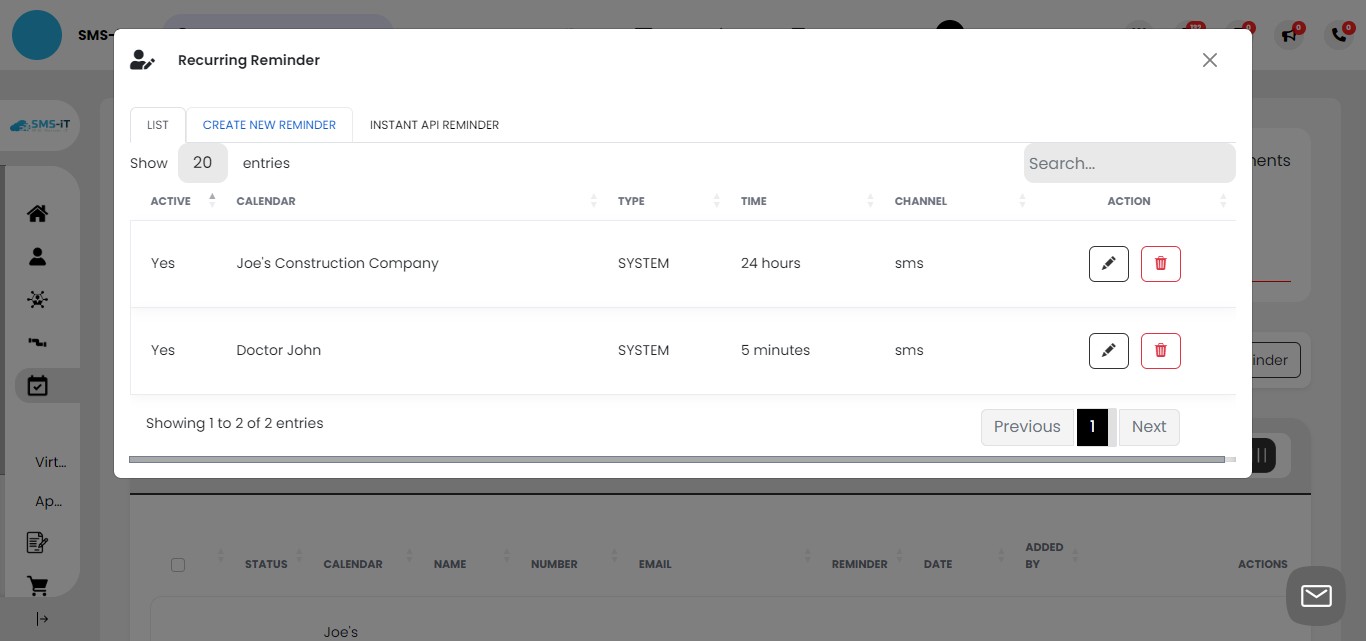
Click on "Recurring Reminders"
Click on "CREATE NEW REMINDER"
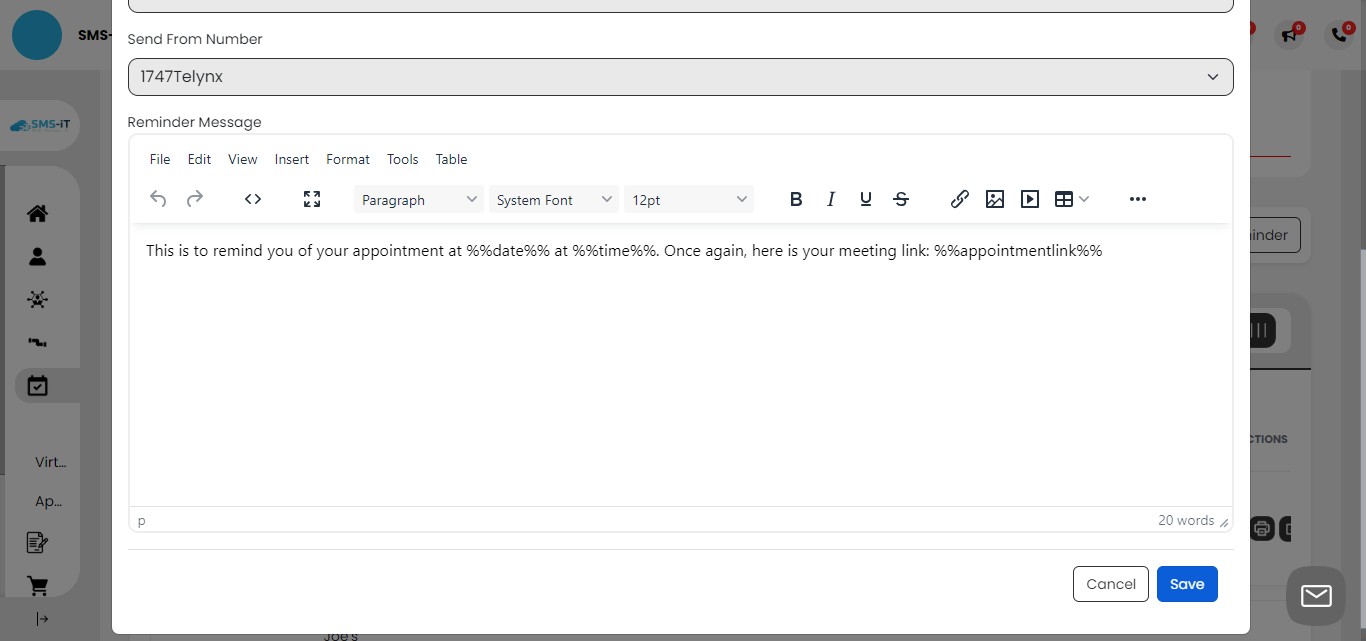
Configure reminder settings: - Fill in the required information for the reminder - Example: Set a reminder for one hour before the appointment - Tip: For maximum effectiveness, create both SMS and email reminders
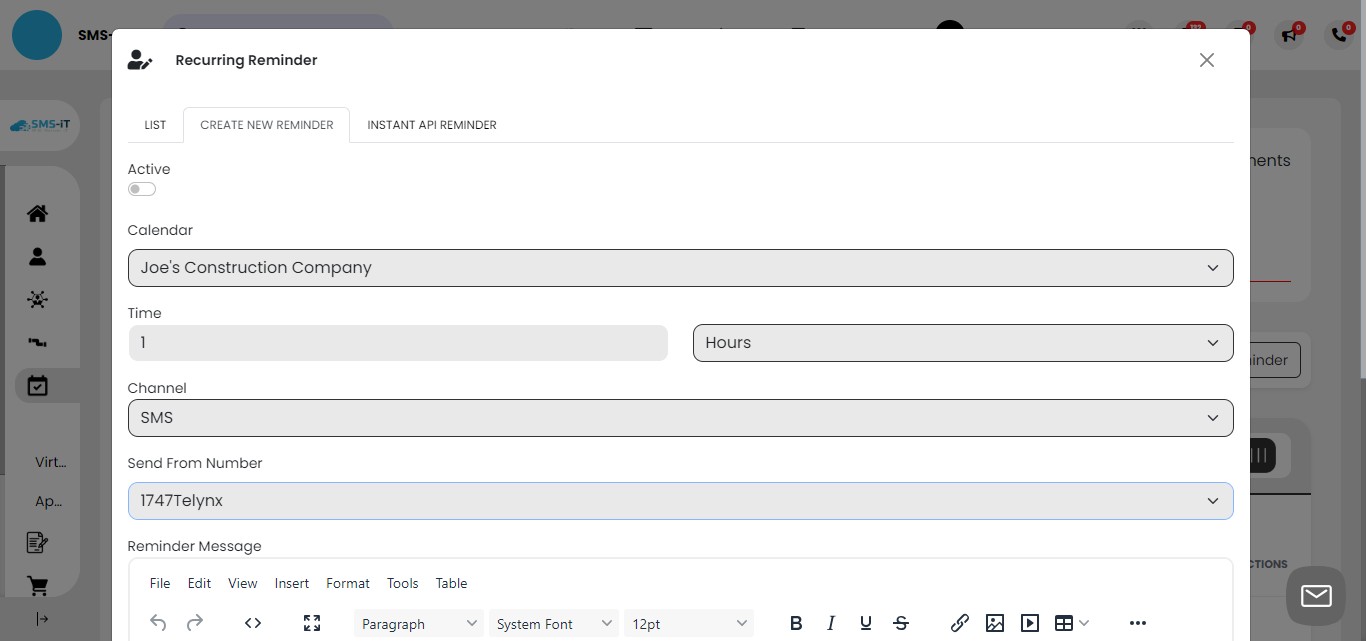
Activate the reminder: Locate and click the "Active" toggle to enable your newly created remin
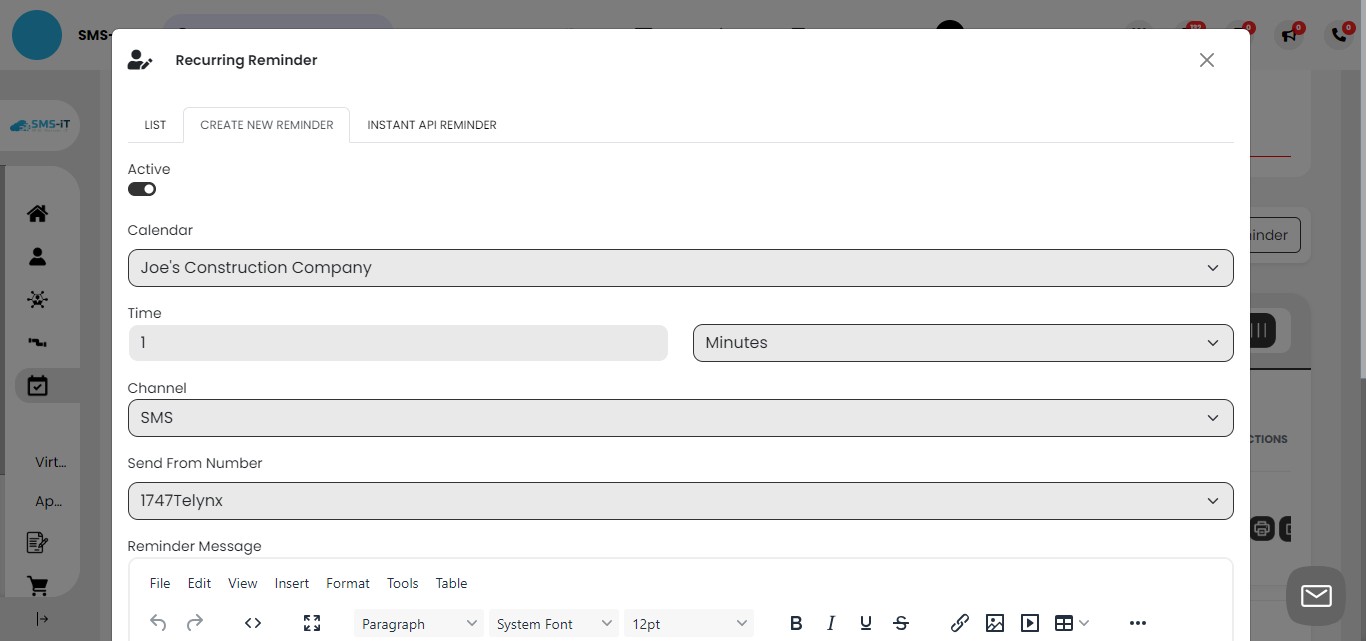
Click on "Save"
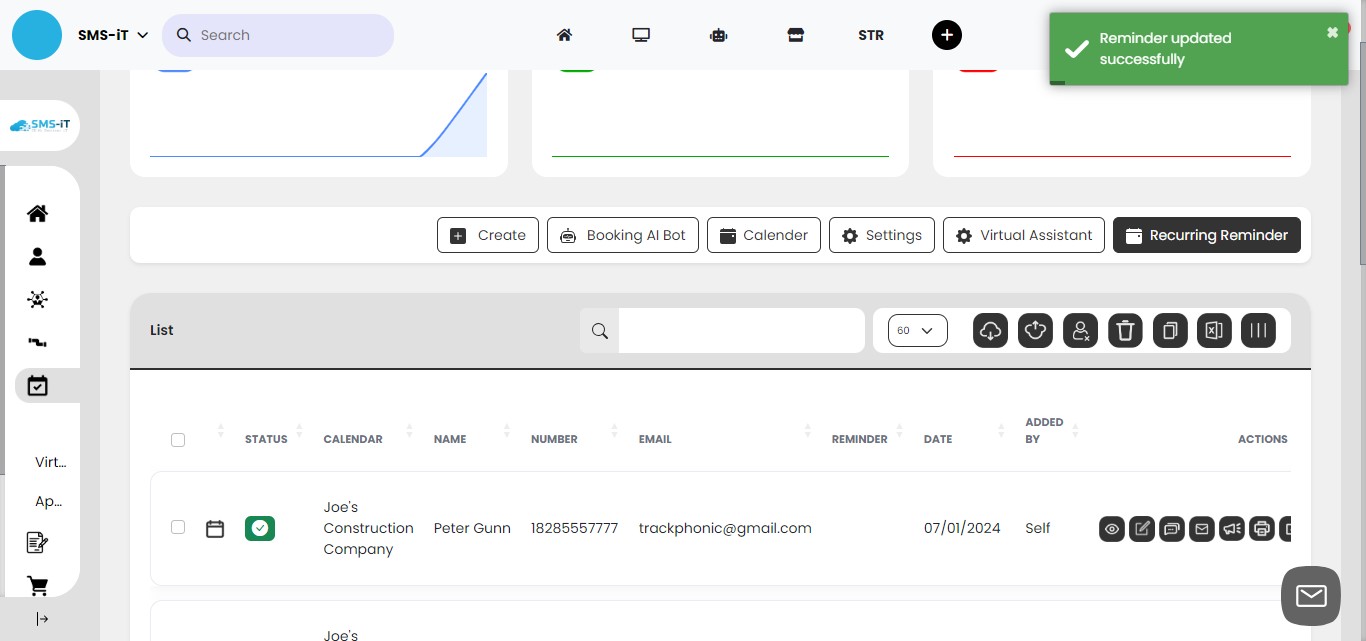
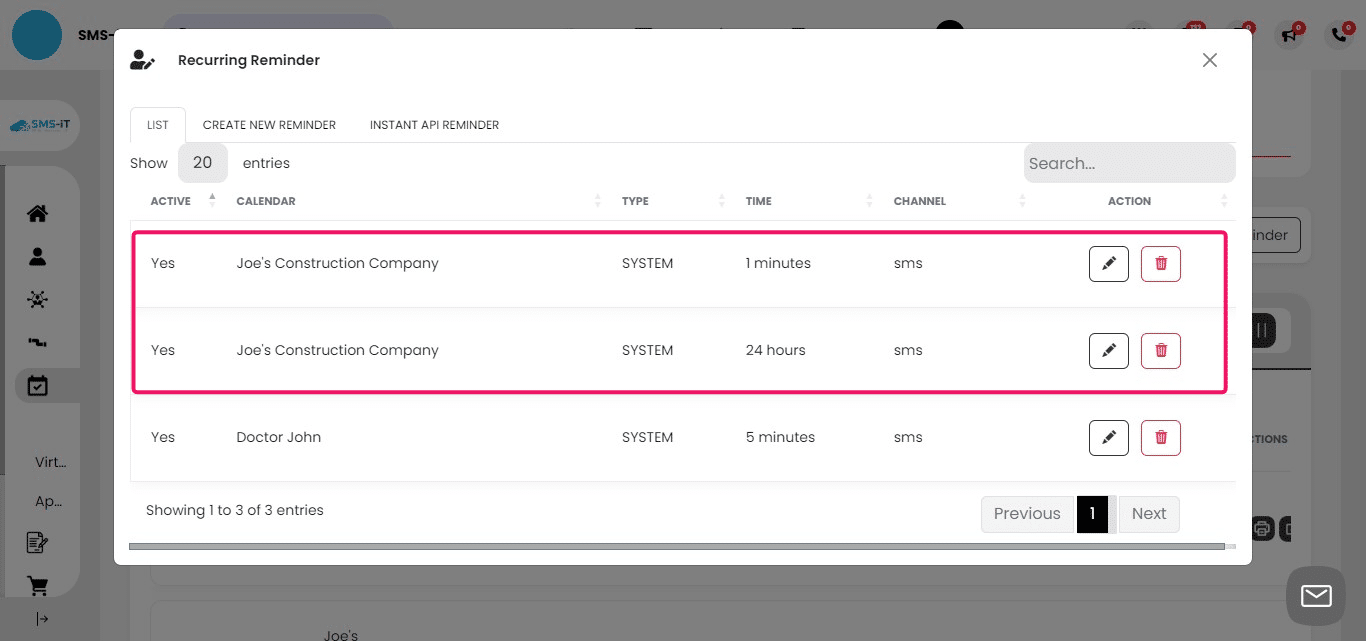
Click on "Recurring Reminder" to view all your configured reminders
Optimize reminder strategy: - Example reminder setup: a) SMS reminder 1 day before the appointment b) SMS reminder 1 hour before the appointment c) Email reminder (recommended for ensuring delivery) Customize reminder timing based on your clients' preferences and your business needs
Summary: The Recurring Reminders feature in SMS-iT CRM is a powerful tool for reducing no-shows and improving client engagement. By setting up multiple reminders through different channels (SMS and email), you significantly increase the chances of clients remembering and attending their appointments. For sales and marketing professionals, this feature can lead to more consistent client interactions, potentially increasing conversion rates and customer satisfaction. The flexibility to customize reminder timing allows you to find the perfect balance between keeping clients informed and avoiding over-communication. This automated system not only saves time but also presents a professional image, showing clients that you value their time and are prepared for their appointments.
Closing Summary:
The SMS-iT CRM Appointments module offers a comprehensive suite of tools designed to streamline your appointment management process and enhance client interactions. Key benefits include: 1. Flexible scheduling: Multiple calendars and customizable time slots cater to diverse business needs. 2. AI-powered booking: The Booking AI Bot automates appointment scheduling, saving time and resources. 3. Virtual Assistant: Provides a professional, branded booking experience for clients. 4. Multi-channel communication: Video calls, scheduling forms, contact forms, and direct phone options cater to various client preferences. 5. Automated reminders: Reduce no-shows and improve client engagement with customizable, multi- channel reminders. For sales and marketing professionals, solo entrepreneurs, small businesses, and various professionals (such as doctors, therapists, and consultants), this platform offers significant advantages: * Increased efficiency in lead capture and appointment scheduling * Enhanced professional image through branded, user-friendly interfaces * Improved client engagement through multiple communication channels * Reduced administrative workload, allowing more focus on high-value tasks * Better organization of client information for targeted follow-ups and marketing efforts * Ability to manage multiple business ventures or service types from a single platform * Customizable solutions to fit diverse scheduling needs and client interactions Solo entrepreneurs can benefit from: * All-in-one solution for managing various aspects of their business * Professional appearance that competes with larger companies * Time-saving features allowing focus on core business activities Small businesses can leverage: * Scalable appointment management as the business grows * Improved customer service without increasing staff * Efficient handling of diverse appointment types and client needs Professionals such as doctors and therapists can utilize: * HIPAA-compliant communication channels * Reduced no-shows through automated reminders * Efficient management of complex scheduling requirements By leveraging the SMS-iT CRM Appointments module, businesses of all sizes and individual professionals can expect to see improvements in client satisfaction, appointment attendance rates, and overall operational efficiency. This comprehensive tool not only simplifies the appointment management process but also provides valuable insights for refining your business strategies and enhancing client relationships.